
The deadlift is one of the best exercises you can do to build muscle and strength. Take your sumo deadlift or conventional deadlift to the next level with this definitive how to deadlift guide.
by Greg Nuckols
Most people should deadlift. Do you want to add muscle to your posterior chain, gaining quality mass from your traps all the way down to your hamstrings? You’d be hard-pressed to find a better exercise than the deadlift. Do you want to become more athletic while decreasing your injury risk on the field or the court? Deadlifts should probably be at the core of your training program.
And of course, do you want to get stronger? If so, there are few exercises that can build or test head-to-toe strength as well as the deadlift (I’d put squats on the same level, with push press close behind).
Of course, I probably don’t need to tell you any of that. If you sought out or happened upon this guide, you probably already know that the deadlift is pretty awesome. You’re primarily interested in improving your deadlift technique, pulling heavier weights, or building a dense, muscular back and set of traps that scratch your ears.
If so, you’re in luck.
Deadlifts come in all shapes and sizes and can be used for a variety of training goals. This guide is going to break down the movement in-depth, teach you how to optimize your deadlift technique, and teach you how to start maximizing your deadlift training.
If you’re new here, you may be asking yourself, “Who is this guy, and why should I care what he has to say about deadlifting?”
Fair questions! I’m a coach and drug-free powerlifter. I’ve been training for 12 years and coaching for 9. I’ve deadlifted 735 lbs. in the gym (at 240; over 3x my bodyweight) and 710 in competition. I’ve coached lifters at all experience levels, teaching hundreds of new lifters how to deadlift on one end of the spectrum, and training several 600lb deadlifters and 3x-bodyweight deadlifters on the other end of the spectrum. This is combined with a thorough understanding of the biomechanics of the lift. Check the reference list at the end of the article; it’s tough to make it through that much scientific literature without picking up a few tidbits along the way (which largely match my personal experiences as an athlete and coach, I’ll note).
I don’t say any of that to toot my own horn. I just want you to know I’m not just some random internet dude opining about the deadlift. I’d never claim that everything I say is right just because I can pull a fair amount of weight (nor would I claim to be a world-class deadlifter), and I’m entirely open to changing my views as I gain more experience, talk to more high-level athletes and coaches, and read new scientific evidence as it’s published.
One quick note before we get under way: This guide covers a lot of ground. I’d strongly recommend you read the whole thing, but if there’s one section in particular that interests you, feel free to skip around using the links below. If you’re looking for information on how to deadlift, for example, then consider skipping the initial “physics” and “anatomy” sections for your first read, and come back to those later.
Table of Contents
- Super Basic Physics
- Anatomy
- Biomechanics
- Deadlift: The Setup and Execution
- Setting Up For the Deadlift: General Strategies
- Technique 1: Tension your hamstrings, and then pull your back tight as you get down to the bar.
- Technique 2: Start with your back tight, then “compress the spring” as you get down to the bar.
- Technique 3: Set up over the bar, then rock your hips back into position.
- Technique 4: “Clean pull” style with your hips starting low
- Technique 5: Grip and Rip
- Technique 6: Rolling the bar
- Creating tension instead of jerking the bar
- Bar Positioning/Finding Your Balance
- The Importance of the Lats
- Lifting the damn bar
- Diagnosing Weaknesses in the Deadlift
- VI. Frequently Asked Questions
- Should I deadlift sumo or conventional?
- What’s the point of chalk and baby powder?
- Is it necessary to start the lift with a perfectly vertical shin?
- Ramping vs. Scooping: Making Lockout Easier
- When you’re pulling multiple reps in a set, should you reset between reps, or pull touch-and-go?
- The role of lats
- Head position
- Improving grip strength for the deadlift
- Troubleshooting deadlift training
- Difference in hip height/technique with different body proportions
- Spinal Flexion and Hip Extension Demands
- How risky is spinal flexion in the deadlift?
- How to correct mobility issues or spinal flexion issues
- Do I need to deadlift from the floor in the first place?
- When should I use a belt?
- What’s the deal with deadlift bars?
- What should I do about scraping my shins?
- Different deadlift variations and their functions
- When should you deadlift with straps? Also how/when to use straps.
- Is it okay to deadlift with a trap bar?
- Wrapping Things Up
- Sources
Super Basic Physics
There are a few simple terms we need to understand that describe how our muscles interact with our bones to produce the movements that (hopefully) result in a good-looking deadlift.
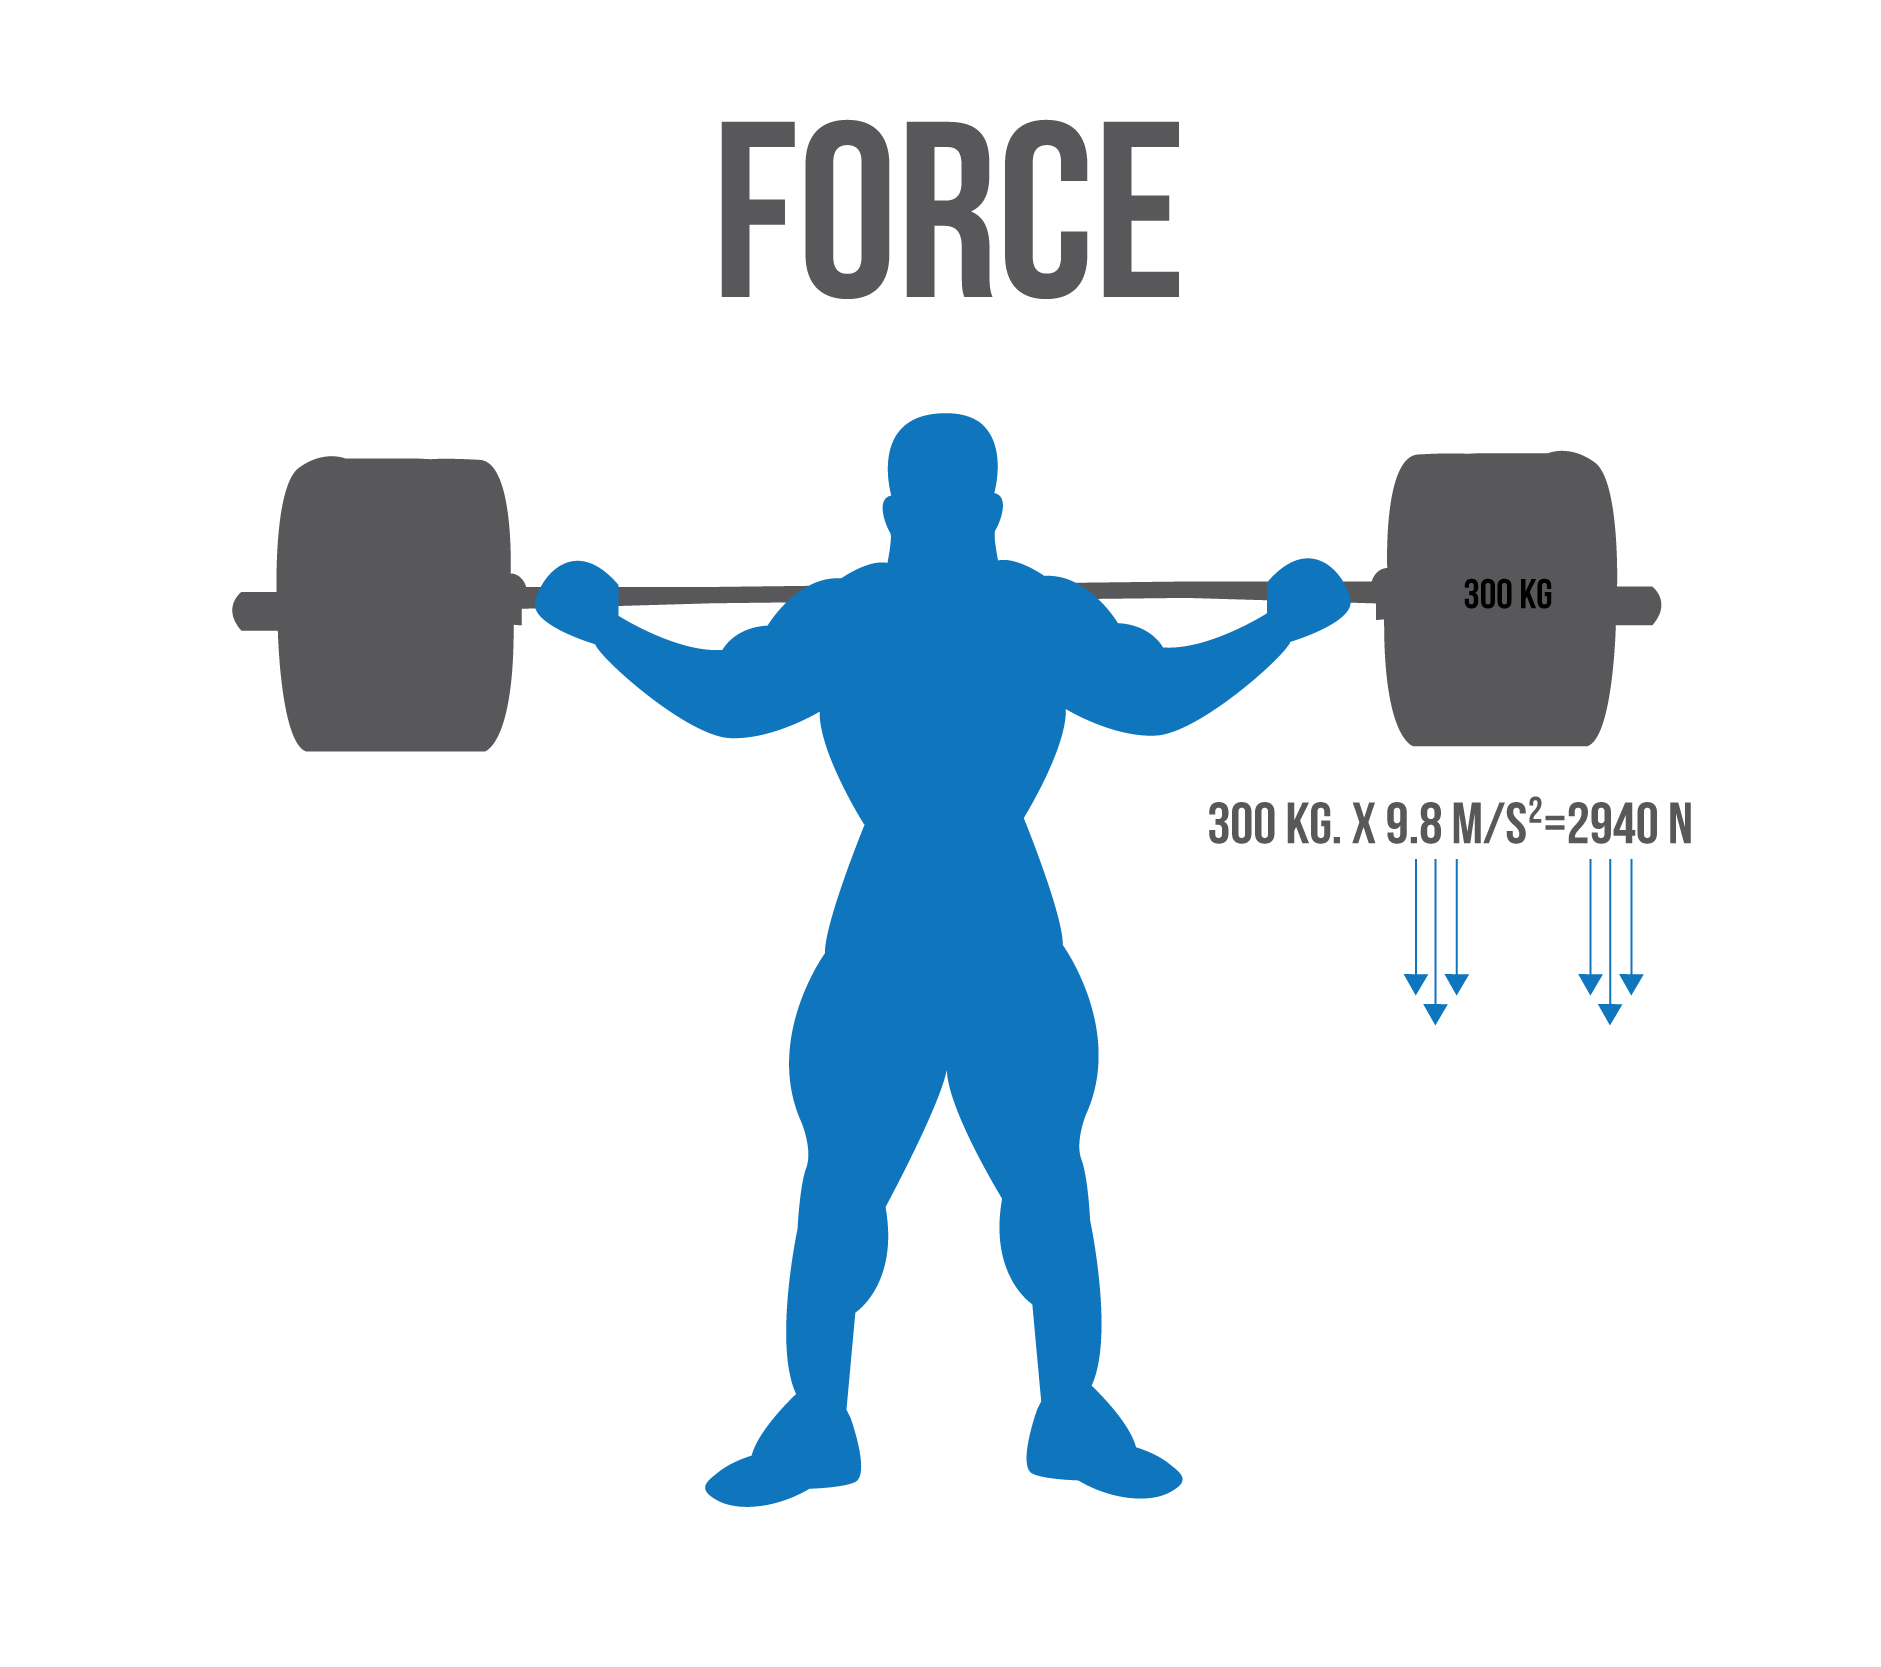
Force
The first is force. Force is the product of mass and acceleration, typically calculated in Newtons (one Newton is the force it takes to accelerate a 1kg mass at a rate of 1m/sec2). Most important for our purposes here, force is linear: It describes things that are being pulled or pushed in a straight line.
So, let’s say you have a 300kg bar on your back. The 300kg bar represents the mass component of force. If you weren’t supporting the bar, it would accelerate downward at 9.8m/sec2 (due to gravity), so the bar is exerting 300kg x 9.8m/sec2 = 2940N of force upon your body. The direction of the force is the direction that gravity is pulling: straight down. Similarly, when our muscles contract, they exert a force pulling one end of the muscle straight toward the other end.
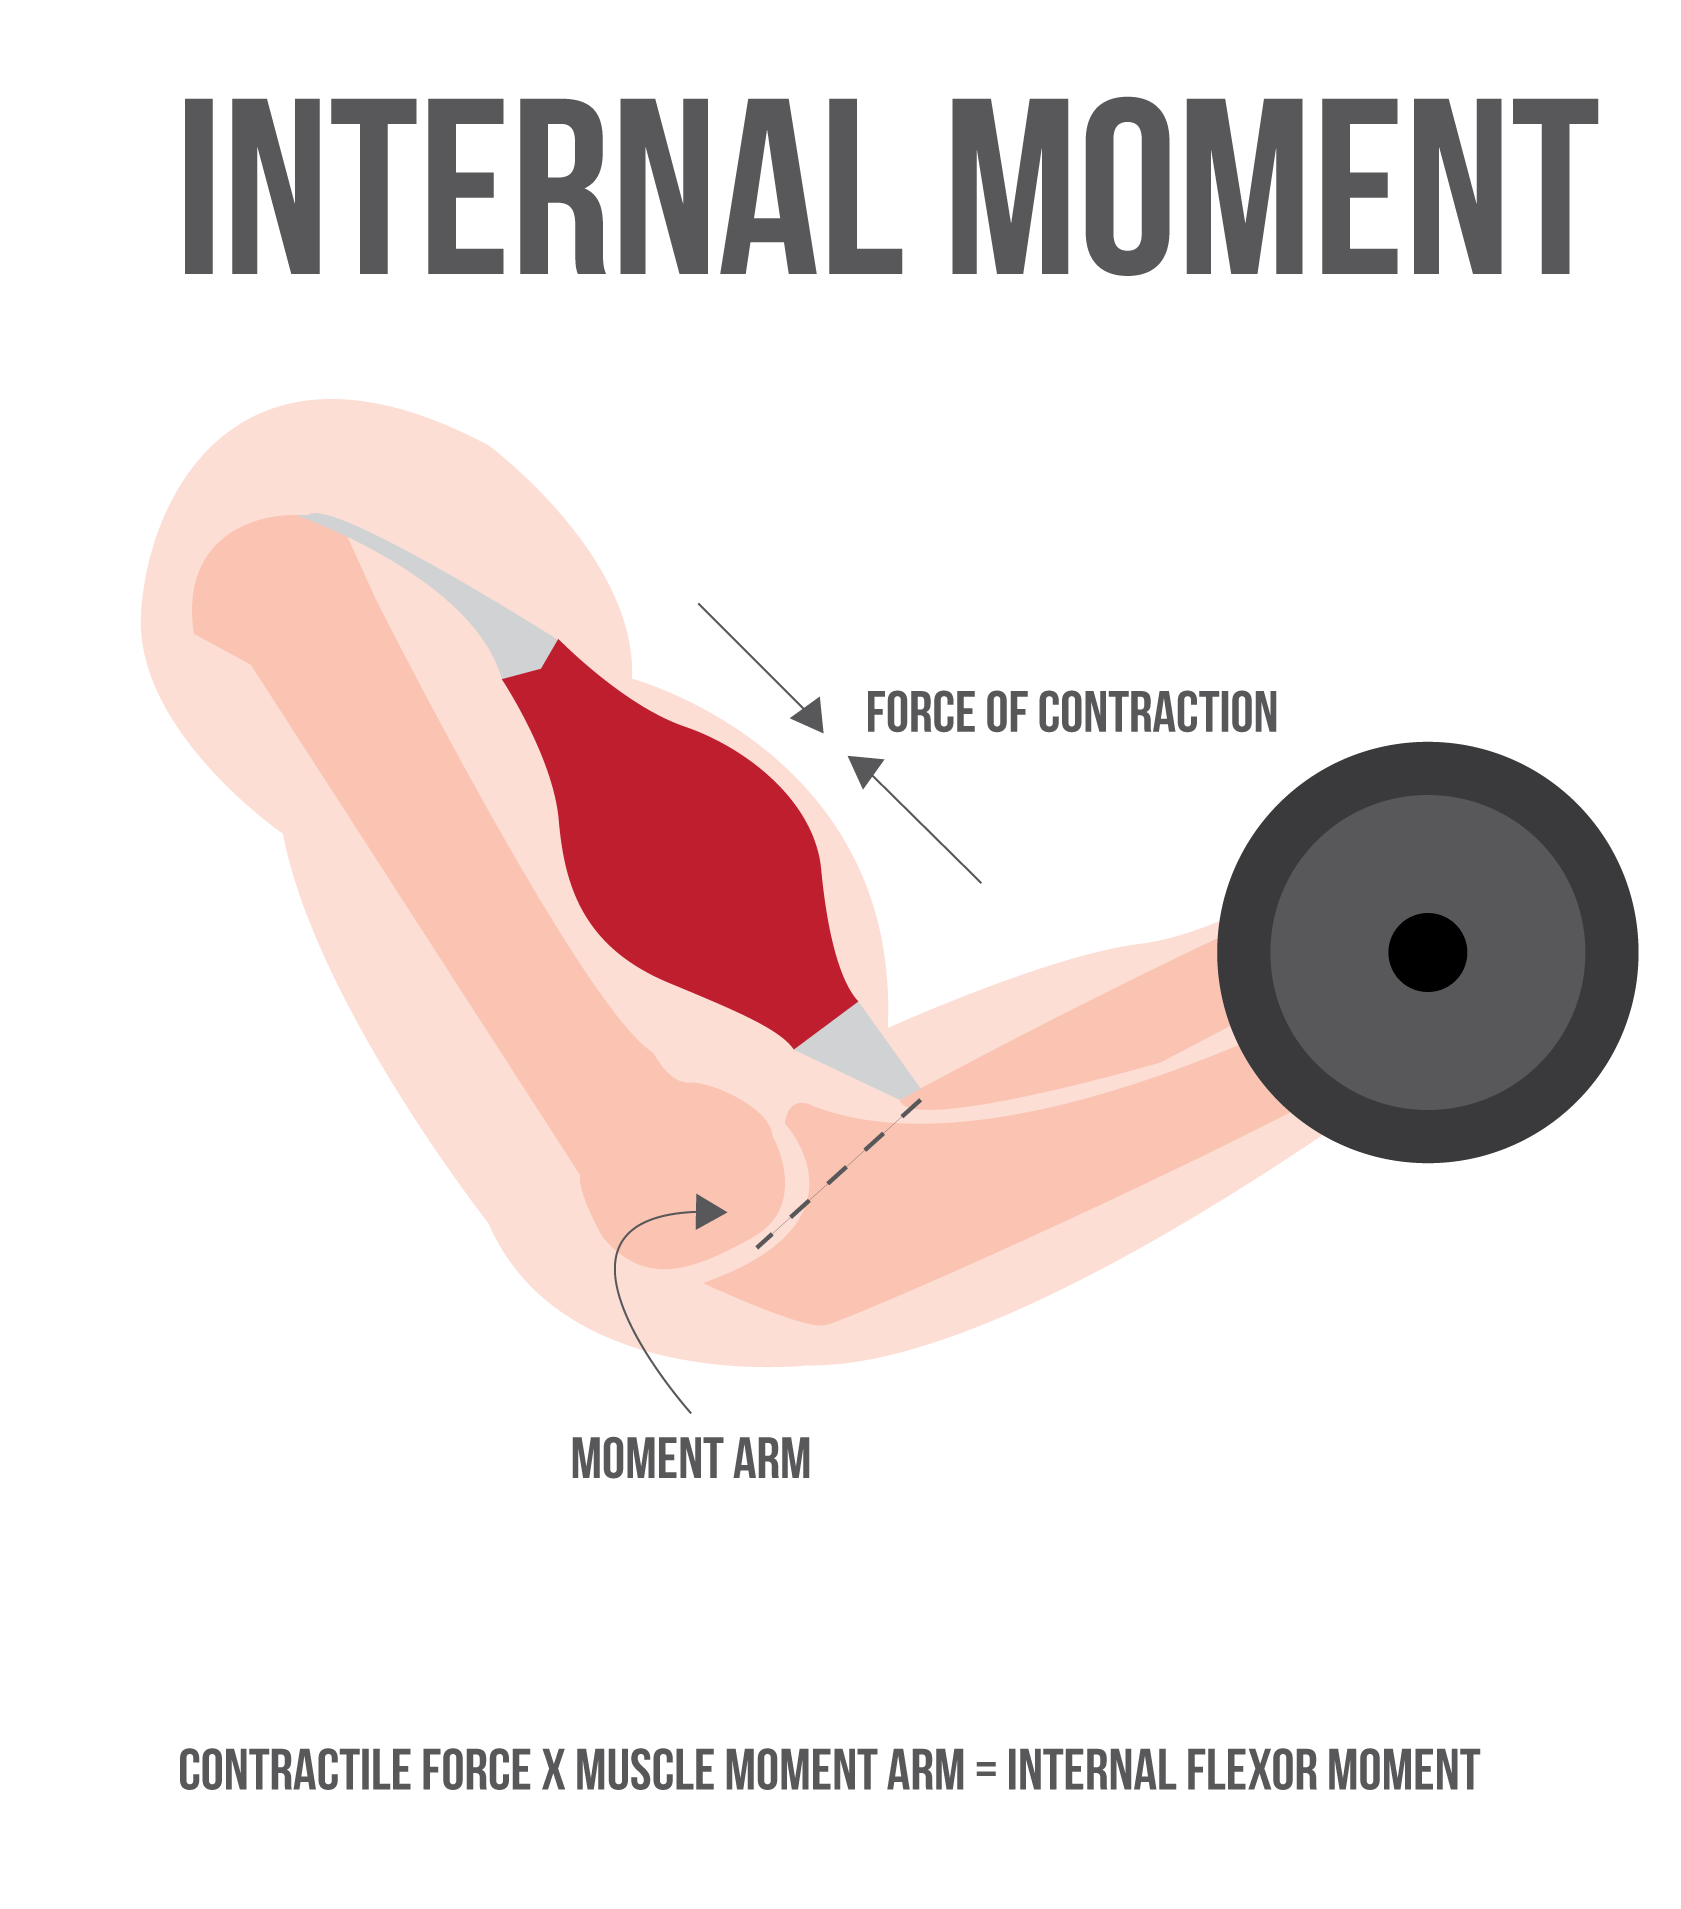
Moment
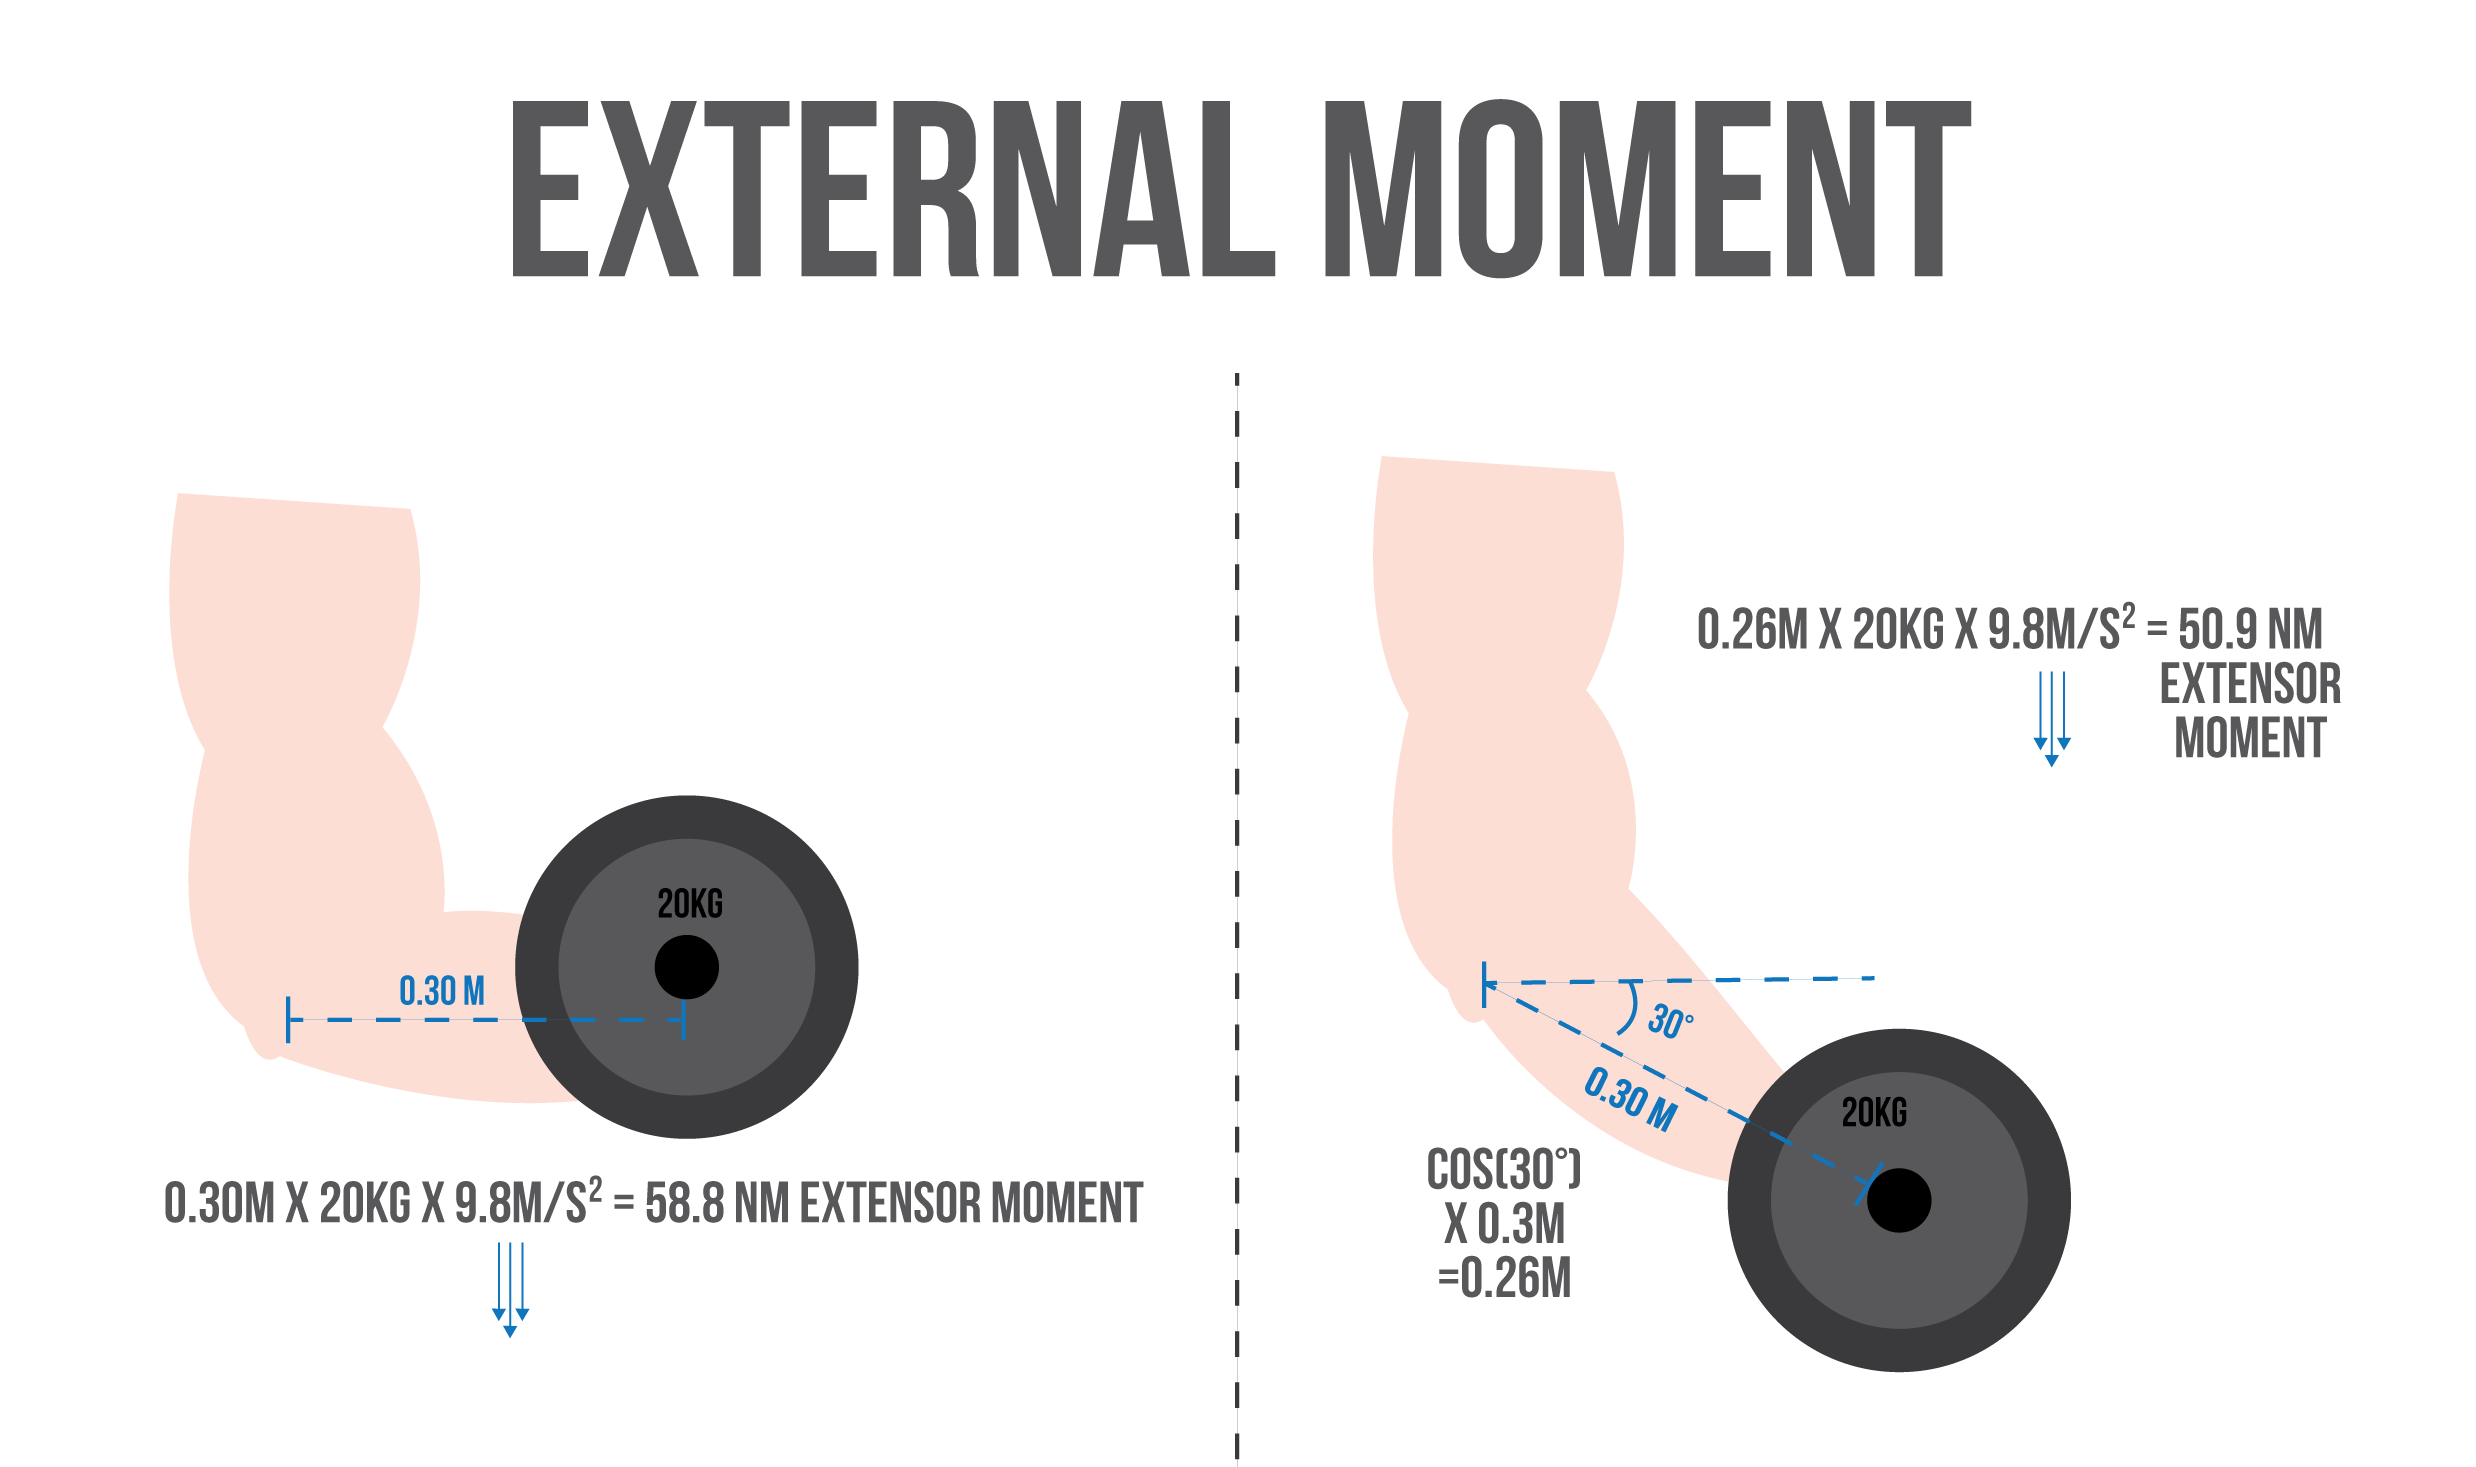
The second is moment. Moment is force applied about an axis, typically calculated in Newton-Meters – the force applied, multiplied by the distance from the axis perpendicular to the direction the force is being applied. While force is linear, moment is rotational.
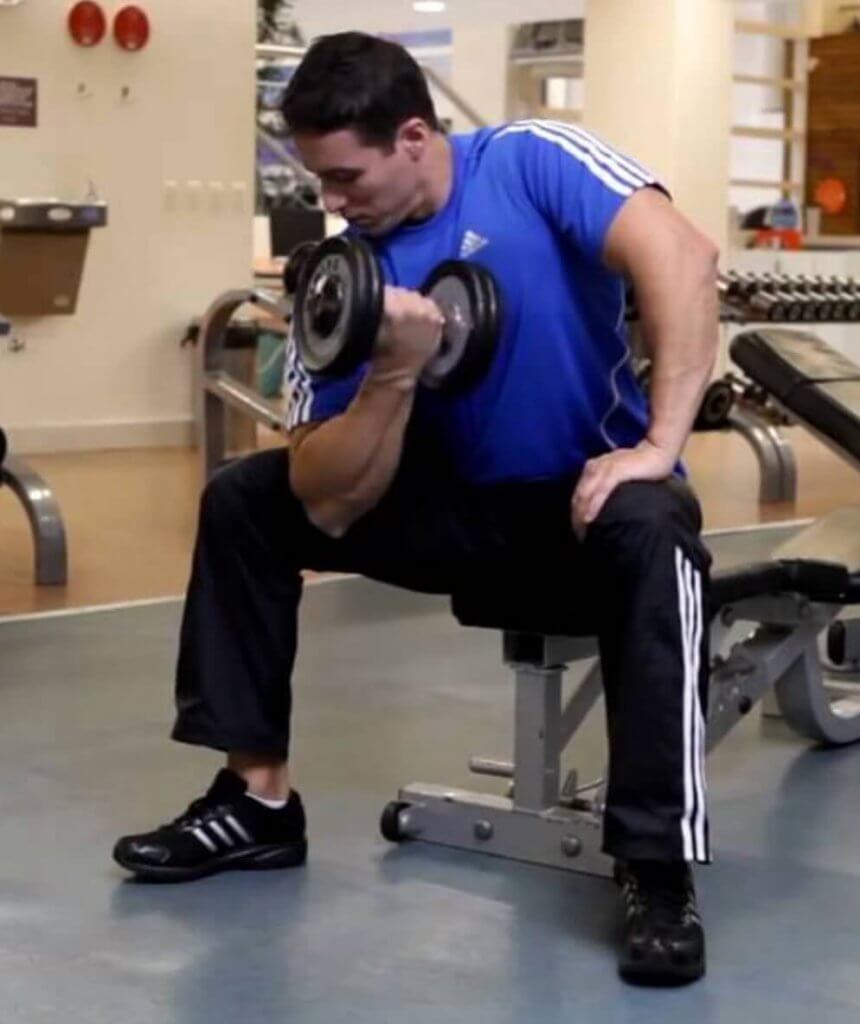
So, let’s say you’re curling a 20kg barbell. Your upper arm is straight down by your side, and your forearm, which is 30cm long, is parallel to the floor. You’d calculate the force the barbell is exerting in the same manner as the example above: 20kg x 9.8m/sec2 = 196N of force, directed straight downward.
Then, to calculate the moment the barbell is exerting at the elbow, you’d multiply 196N by the distance between the barbell and your elbow (called the moment arm) in meters: 196N x 0.30m = 58.8Nm. Since this moment is exerted downward, which would extend the elbow with the forearm in this position, we’d term this an extensor moment.
If you wanted to continue curling the bar upward, you’d need to produce a flexor moment greater than 58.8Nm with your biceps and brachialis. Since the moment arm is the distance between the axis of rotation and the load, measured perpendicularly to the direction the force is being applied, the moment arm would be shorter and the moment would be smaller if the elbows were either a bit more flexed or a bit more extended, even though the forearm would be the same length.
Moments imposed by a load on your musculoskeletal system are called external moments, and moments produced by your muscles pulling against your bones are called internal moments. Internal moments are calculated the same way external moments are. The force component is the contractile force of the muscle, and the moment arm is the distance a muscle attaches from the center (axis of rotation) of the joint it’s moving. So, for example, if the patellar tendon (which transmits the force of the quadriceps to the tibia) inserts 5cm from the center of the knee joint, and the quads contract hard enough to exert 10,000N of force perpendicular to the tibia, the internal extensor moment would be 10,000N x 0.05m = 500Nm.
To produce movement, your muscles contract. By doing so, they produce a linear force, pulling on bones that act as levers, producing flexor or extensor moments at the joints they cross, with joints acting as the axes of rotation. In the case of the deadlift, you’re primarily trying to produce extensor moments at the knee, hip, and spine that exceed the flexor moments at those joints imposed by both the bar and your own bodyweight. If you can do that, you exert a force on the bar that exceeds the force the bar is exerting on your body, and voíla! A successful deadlift.
Putting all of this together, there are a few very basic principles to take away from this:
1. In the deadlift, the load (the barbell and your body weight) applies a downward force that exerts external flexor moments at your hip, knee, and all along your spine.
2. The size of the external flexor moment you have to overcome to lift a weight depends on two things: the load itself and the length of the moment arm. If the load increases and the moment arm stays the same length, if the load stays the same and the moment arm gets longer, or if the load increases and the moment arm gets longer, the external flexor moment that your muscles must overcome increases. This is why lifting heavier weights is harder than lifting lighter weights (duh), and why people who are poorly built to deadlift (generally meaning short arms, which mean they need to start with their hips lower and farther behind the bar) generally have a harder time with the lift.
3. The two factors that determine whether your muscles can produce large enough internal extensor moments to lift a load are the attachment points of the muscles and the force with which they can contract.
4. Attachment points play a huge role because muscles generally attach very close to the joint they move, so small variations can make a big difference. For example, this study found that the patellar tendon moment arm varied from 4cm to 6cm. To produce a knee extensor moment of 500Nm like the example above, the quads of someone with a 6cm moment arm would have to contract hard enough to exert 8333N of force perpendicular to the tibia, whereas the quads of someone with a 4cm moment arm would have to contract with 50% more force to produce the exact same knee extensor moment – 12,500N!
5. Unfortunately, you can’t change muscle attachment points, so the only factor within your control is increasing contractile force. There are only two ways to do that: 1) increase your skill as a deadlifter so your current muscle mass can produce more force during the movement and 2) add more muscle!
Things get just a little more complicated than that, but this should give you a good enough grasp on the terminology we’ll be using moving forward. If this is still hazy for you, you can download a free physics textbook here (legally) that’s actually exceptionally good.
Now, though, it’s time to look at the muscles and bones that play the biggest roles in the deadlift.
Anatomy
The deadlift is a full-body movement, so a multitude of muscles and bones is involved. However, only a few are likely to significantly influence or limit performance. To simplify things, we really only need to look at four bones or groups of bones, seven muscles or groups of muscles, and three joints or groups of joints. This provides us with the basic understanding of the tissues that are carrying out all that physics stuff in the last section, and provides us with some basic information that will help us discuss the biomechanics of the deadlift.
Spine
The spine runs from the base of your head to the top of your pelvis and is made up of 24 vertebrae. The vertebrae are split into three general sections: seven cervical vertebrae in your neck, twelve thoracic vertebrae running from the base of your neck to the bottom of your rib cage, and five lumbar vertebrae running from the base of your rib cage to the top of your pelvis.
Not much movement is allowed at the junction between each pair of vertebrae, but small movements add up to allow for pretty long ranges of flexion, extension, rotation, and lateral flexion up and down the spine.
The spine naturally has three major curves: a lordotic curve (rounded inward) for the lumbar spine, a kyphotic curve (rounded outward) for the thoracic spine, and a lordotic curve for the cervical spine. When we talk about spinal flexion or extension, we’re talking about flexion or extension relative to these baseline curvatures. When the spine bends forward relative to these baseline curvatures, it’s flexed. When it moves from a flexed position back toward these baseline curvatures, it’s extending. When it moves toward an arched position past these natural curvatures, it’s hyperextending. So, for example, when the thoracic spine is fully flat, that means it’s hyperextended, but when it’s super hunched over, it’s flexed. When the lumbar spine is fully flat, that means it’s flexed, but when it’s super arched, it’s hyperextended.
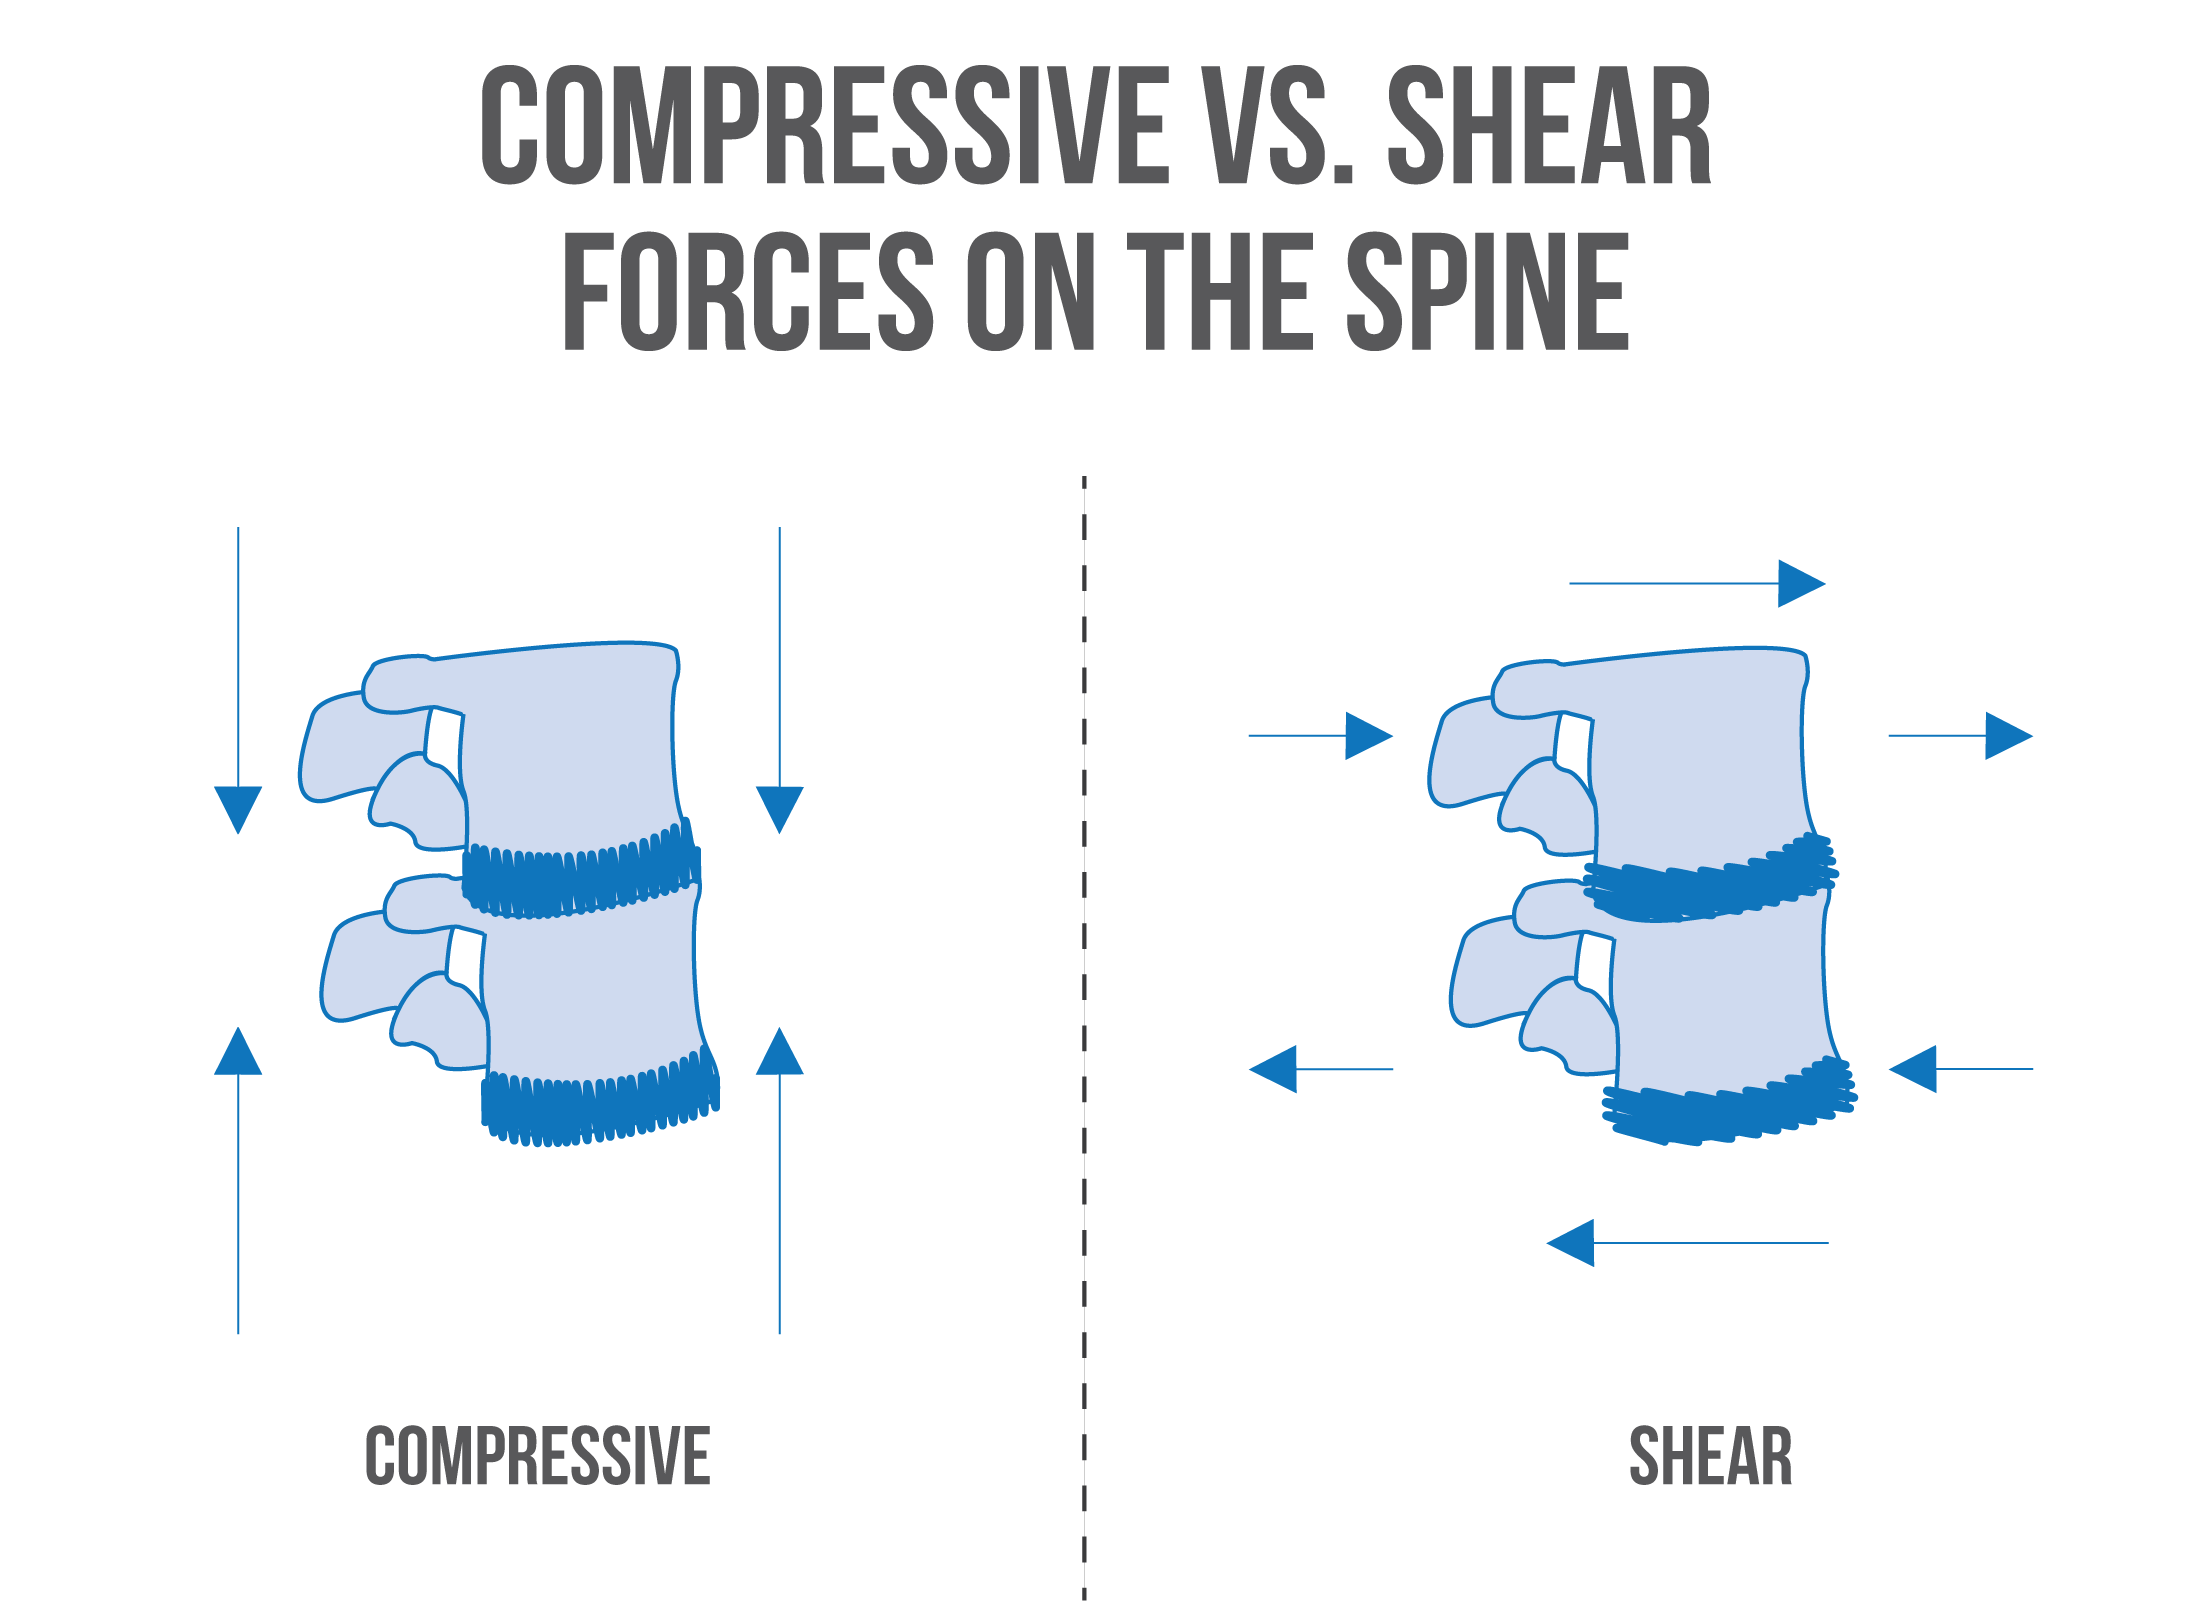
Between each pair of vertebrae is a disc that cushions the spine. These discs hold up really well to compressive forces (pressing the vertebrae together as a result both of the load and the contraction of your spinal erectors). However, the discs can have some issues with shear forces, which attempt to slide the vertebrae past each other as a result of the load, your degree of forward lean, and the degree of spinal flexion taking place. As long as your spine doesn’t flex too much, it should be able to tolerate the loads placed on it in the deadlift without issue if you don’t have pre-existing back issues.
In a properly performed deadlift, there generally shouldn’t be very much flexion or hyperextension taking place, especially in your lumbar spine, though advanced deadlifters can (and do) often get away with a bit of thoracic flexion to help them lift more weight without unnecessarily increasing their injury risk (this will be discussed later). However, especially if you’re new to the movement, your spine should always remain rigid and extended to transfer force from your legs and hips into the bar.
Pelvis
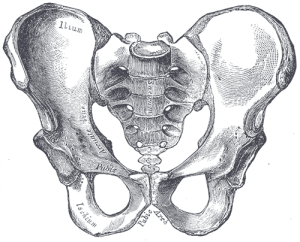
Your pelvis is made up of six bones that are, for all intents and purposes, fused together. Each side has an ilium, an ischium, and a pubis. The ilium is the top of the hip, the bony ridge that you feel on your side just below the obliques. The ischium is at the bottom of the pelvis on the back side, and the pubis is at the bottom of the pelvis on the front side in your groin area.
The point where those three bones fuse together is your acetabulum – your hip socket. Whether it’s located more toward the front of the pelvis or further around the side of the pelvis likely influences whether you’ll do better with the sumo- or conventional-style deadlift.
There are two other features of your pelvis that are relevant for our purposes here. There’s the anterior inferior iliac spine, which is where your rectus femoris (a quadriceps muscle) originates, and there’s the ischial tuberosity, which is where the hamstrings originate and where the adductor magnus primarily originates.
Femur
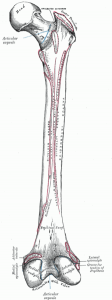
The femur is your thigh bone, running from your hip to your knee.
There are four main parts of the femur: the head, the neck, the shaft, and the condyles.
The head of the femur is that part that fits into the acetabulum (hip socket); the neck shoots off the head of the femur to connect it to the shaft. Near the junction of the neck and shaft of the femur are the greater and lesser tuberosities, where a lot of your hip abductors and rotators insert. The vasti (your other three quad muscles, apart from the rectus femoris) originate on the shaft of the femur, and your gluteus maximus inserts on the back and lateral sides of the shaft of the femur. The length of the shaft of your femur largely determines the moment arms you’re working with at the knee and hip.
The femoral condyles are at the bottom of your femur where it meets the knee. They’re cushioned by your menisci (pads of cartilage in your knee joint) and attached to your tibia by the four major ligaments of the knee: your anterior cruciate ligament (ACL), posterior cruciate ligament (PCL), medial collateral ligament (MCL), and lateral collateral ligament (LCL). Your gastrocnemius (your biggest calf muscle) also originates just above your femoral condyles.
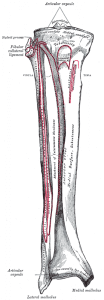
Tibia and Fibula
Your tibia and fibula are the bones of your lower leg, running from your knee to your ankle.
The tibia has its own set of condyles that meet the femur at the knee.
Your hamstrings muscles insert just below the tibial condyles and near the top of the fibula, and your soleus (the other major calf muscle, in addition to the gastrocnemius) originates near the top of the back side of your tibia and fibula.
Intervertebral Joints
Intervertebral joints are those between two vertebrae. To briefly recap: Each intervertebral joint is cushioned by a spinal disc, and each allows for only a little bit of flexion, extension, rotation, and lateral flexion, which add up to large ranges of motion in essentially all planes when addressing the spine as a whole.
Hip
The hip is a ball and socket joint, meaning it allows for movement in all planes, including flexion (bringing your knee to your chest), extension (bringing your knee closer to the floor or pushing it behind you), abduction (bringing your knee away from the midline of your body), adduction (bringing your knee toward the midline of your body), and rotation (internal rotation is rotating the front of your femur toward the midline of your body, and external rotation is rotating the front of your femur away from the midline of your body).
Anatomical variations of the pelvis, hip socket, and femur largely determine how large of a range of motion you’ll be able to achieve in each of those movements.
Knee
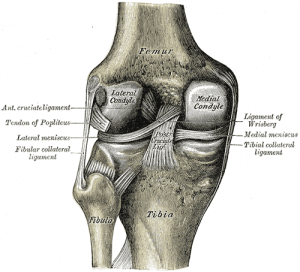
The knee is essentially a hinge joint, meaning it primarily only allows flexion (like a leg curl) and extension (like a leg extension). It can allow for a little rotation, abduction, and adduction, but more than a few degrees of each can put excessive strain on the menisci and your major knee ligaments.
The patella, the knobby little bone at the front of your knee, improves the quads’ leverage to pull against the tibia to cause knee extension.
Spinal Erectors
There are several different sets of individual muscles that make up this muscle group, but they all do essentially the same thing, so they’re not really worth addressing individually.
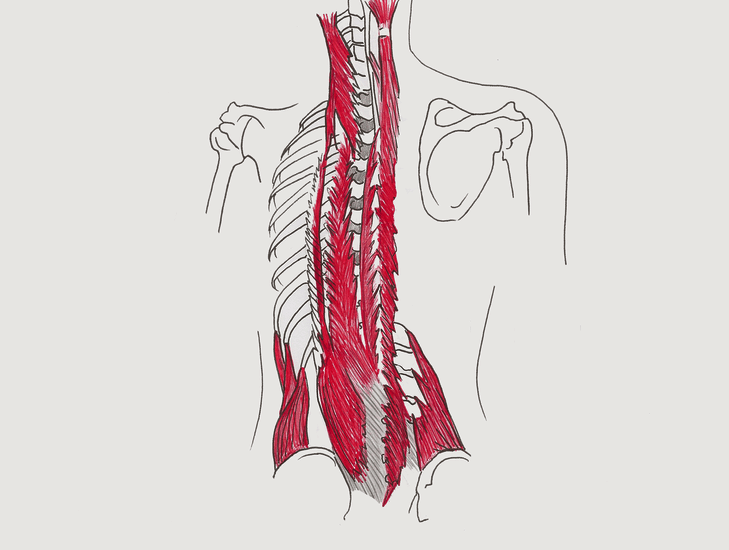
The spinal erectors attach to the top of the pelvis, the ribs, and most importantly, the spine. All of them extend the spine when they contract. Each individual muscle only crosses a few vertebrae, so strength in each region of the spine needs to be addressed specifically. You could have very strong thoracic erectors (upper back) but weak lumbar erectors (lower back) and vice versa.
The “Core”
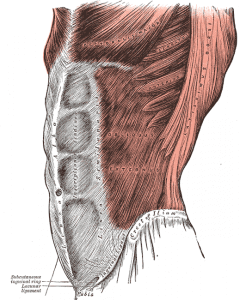
This is a catch-all term for all of the muscles between the neck and the hips that help keep the torso braced and rigid that don’t play quite as direct of a role as the spinal erectors. This would include the obliques, transversus abdominis, rectus abdominis, psoas, quadratus lumborum, and traps (and other muscles stabilizing your shoulder girdle). In the squat guide, I included the lats here as well, but they play a big enough role in the deadlift that they’re worth talking about individually.
Realistically, none of these muscles are worth addressing specifically, since none of them play a massive role individually. They simply have to be able to produce enough tension to aid the spinal erectors in keeping the spine braced and stable. In the case of the obliques, transversus abdominis, and rectus abdominis, that also includes producing intra-abdominal pressure with the help of the diaphragm and pelvic floor.
Gluteus Maximus
The gluteus maximus is your strongest hip extensor. It originates on the posterior surface of the ilium and inserts on both the rear and lateral surface of the shaft of the femur, and on the iliotibial band (a thick band of connective tissue on the lateral surface of your leg).
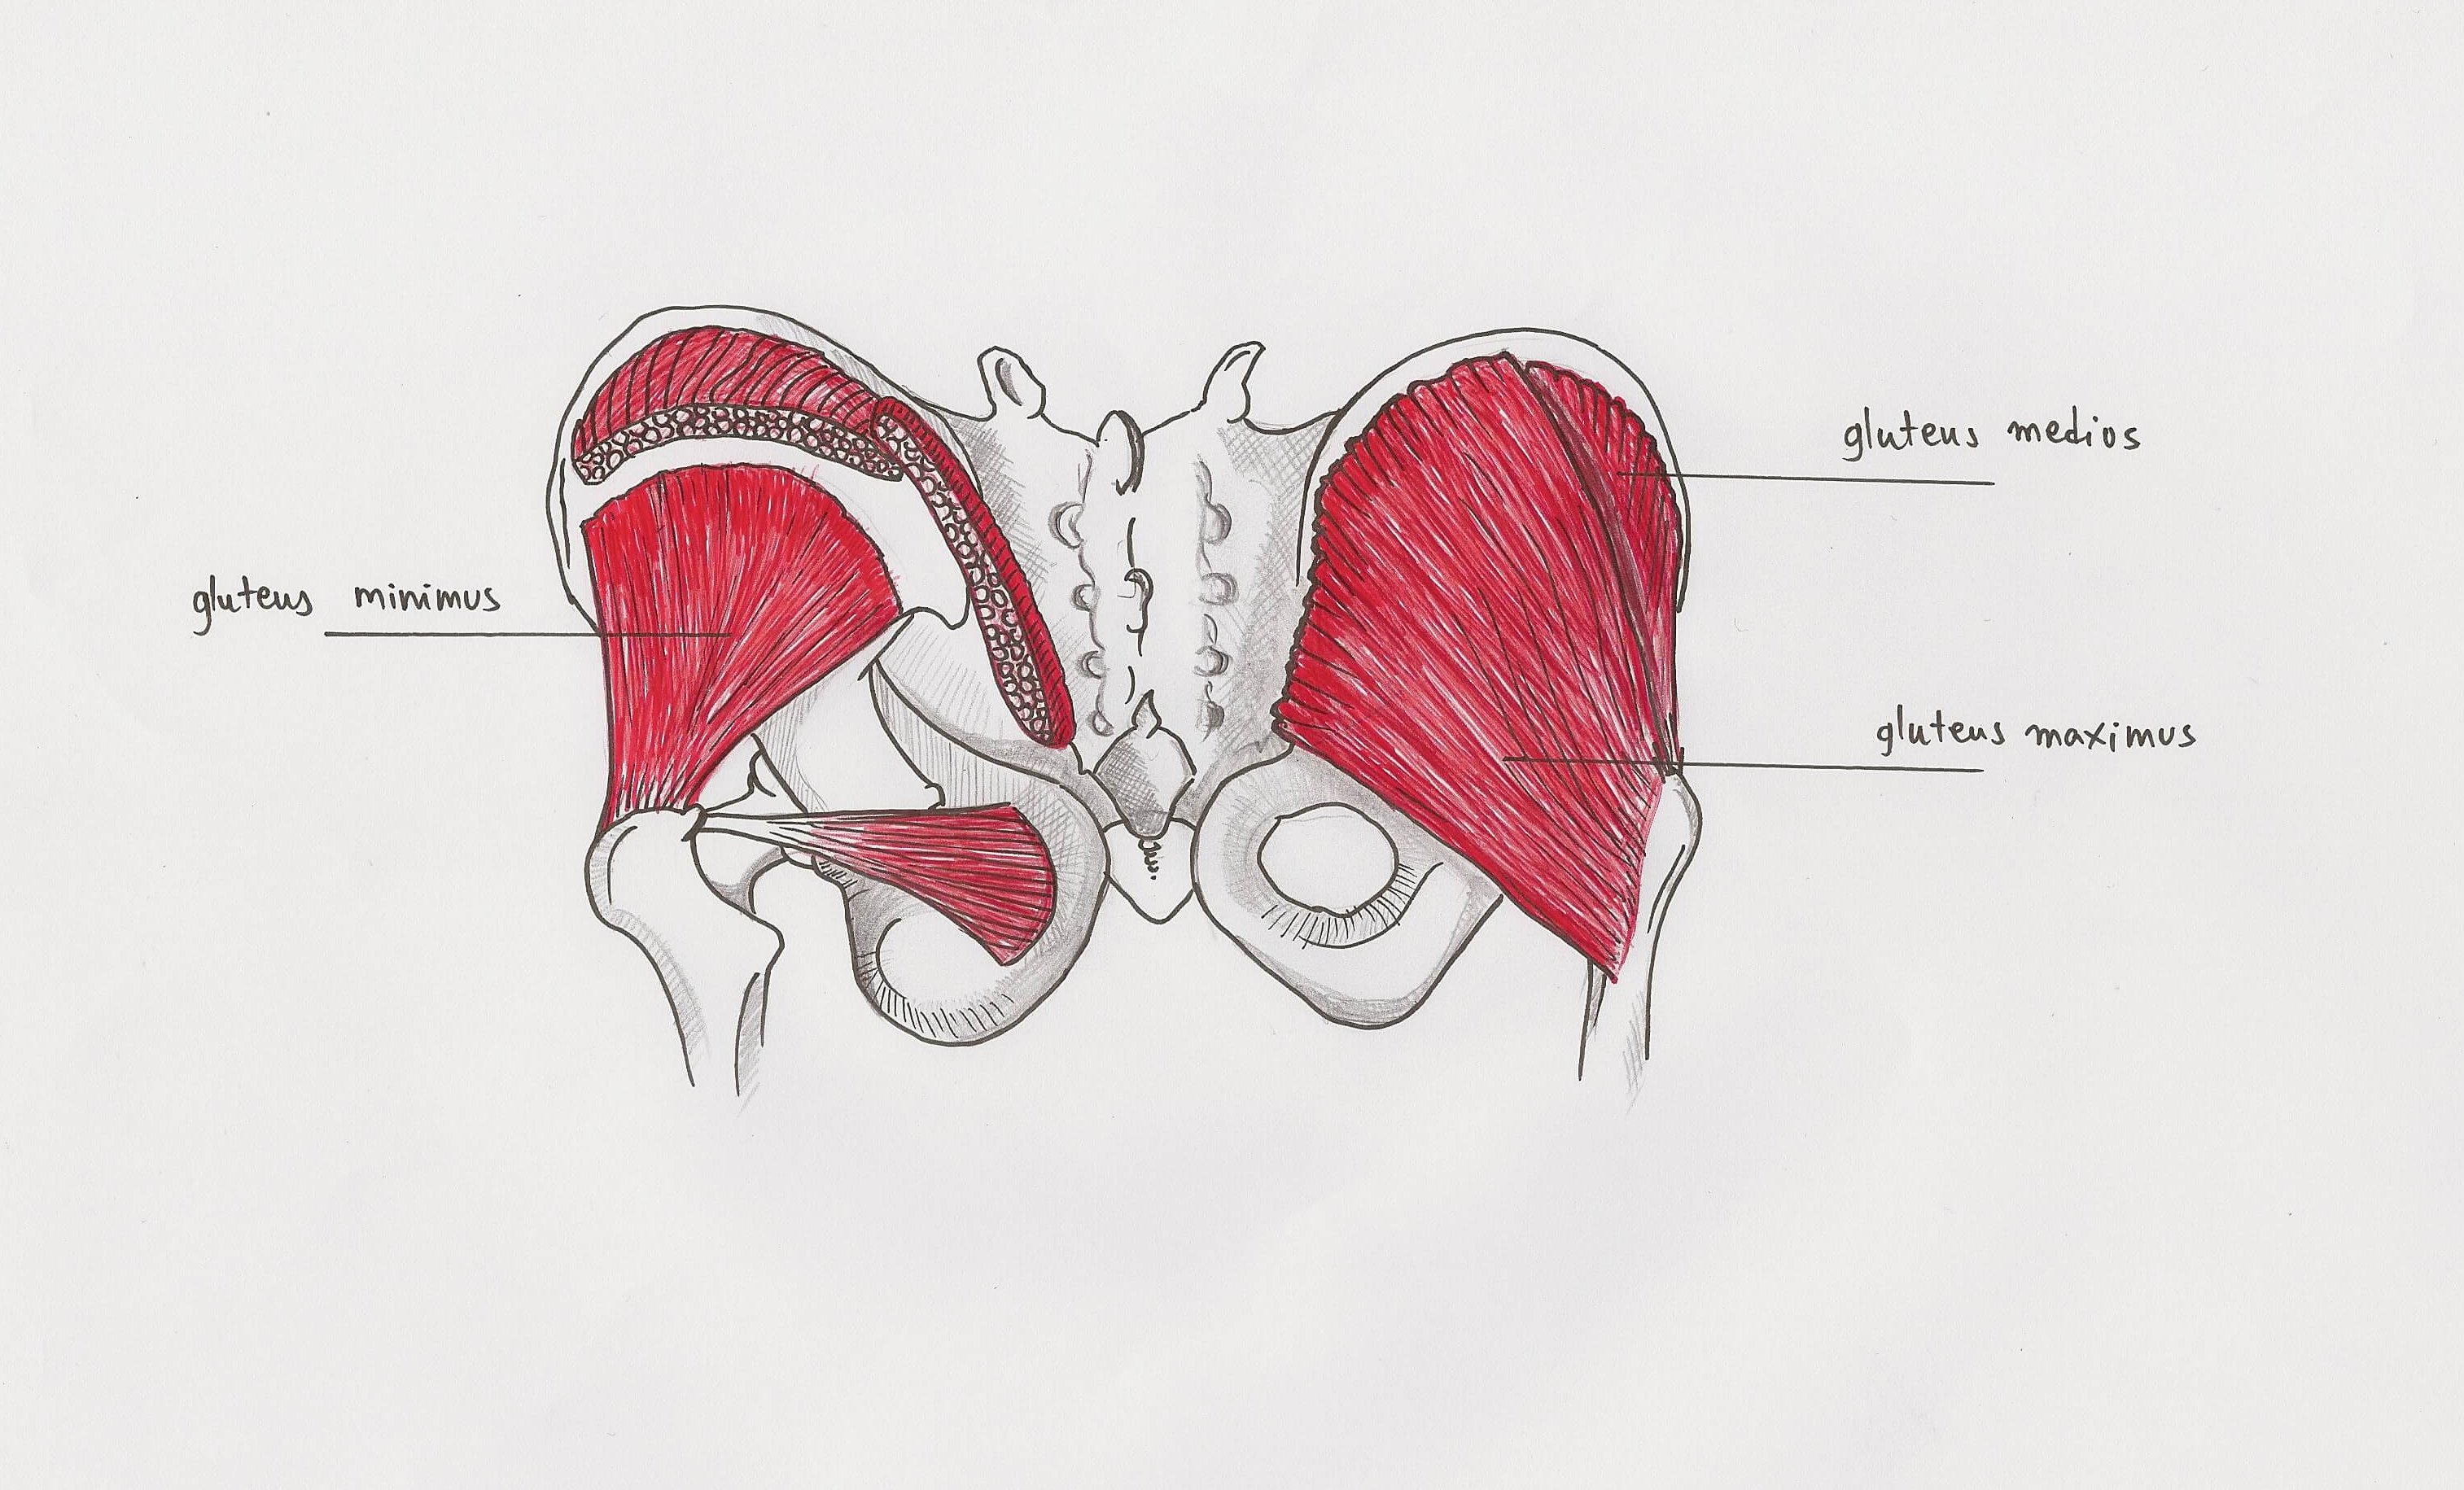
“Origin” refers to the attachment point of a muscle closest to the middle of the body (proximal attachment), and “insertion” refers to the attachment farthest from the middle of the body (distal attachment). When a muscle contracts, it pulls the origin and insertion toward each other.
Hamstrings
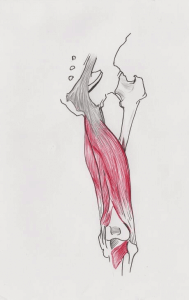
You have three hamstrings muscles – the biceps femoris, the semitendinosus, and the semimembranosus – but for our purposes here, they have essentially the same purpose and can just be treated as one muscle, except for the short head of the biceps femoris, which we don’t really even need to discuss (since it only functions as a knee flexor). They all originate on the ischial tuberosity and insert just below the knee near the top of the tibia and fibula. Since they cross both the hip and the knee, they cause both hip extension (which you want when pulling a deadlift) and knee flexion (which you don’t want when trying to pull a deadlift). Since their insertion is farther from the hip than it is the knee (the internal moment arm is longer at the hip), though, they produce a larger hip extensor moment than knee flexor moment when they contract.
Adductor Magnus
All of your adductors can play a small role in the deadlift, but the most important by far is the adductor magnus. It’s often called the “fourth hamstring” because it originates in essentially the same place on the ischial tuberosity (also extending onto the pubis a bit) and is a powerful hip extensor. Unlike the hamstrings, it inserts on the linea aspera on the back of the femur, so it doesn’t cross the knee and exert a knee flexor moment.
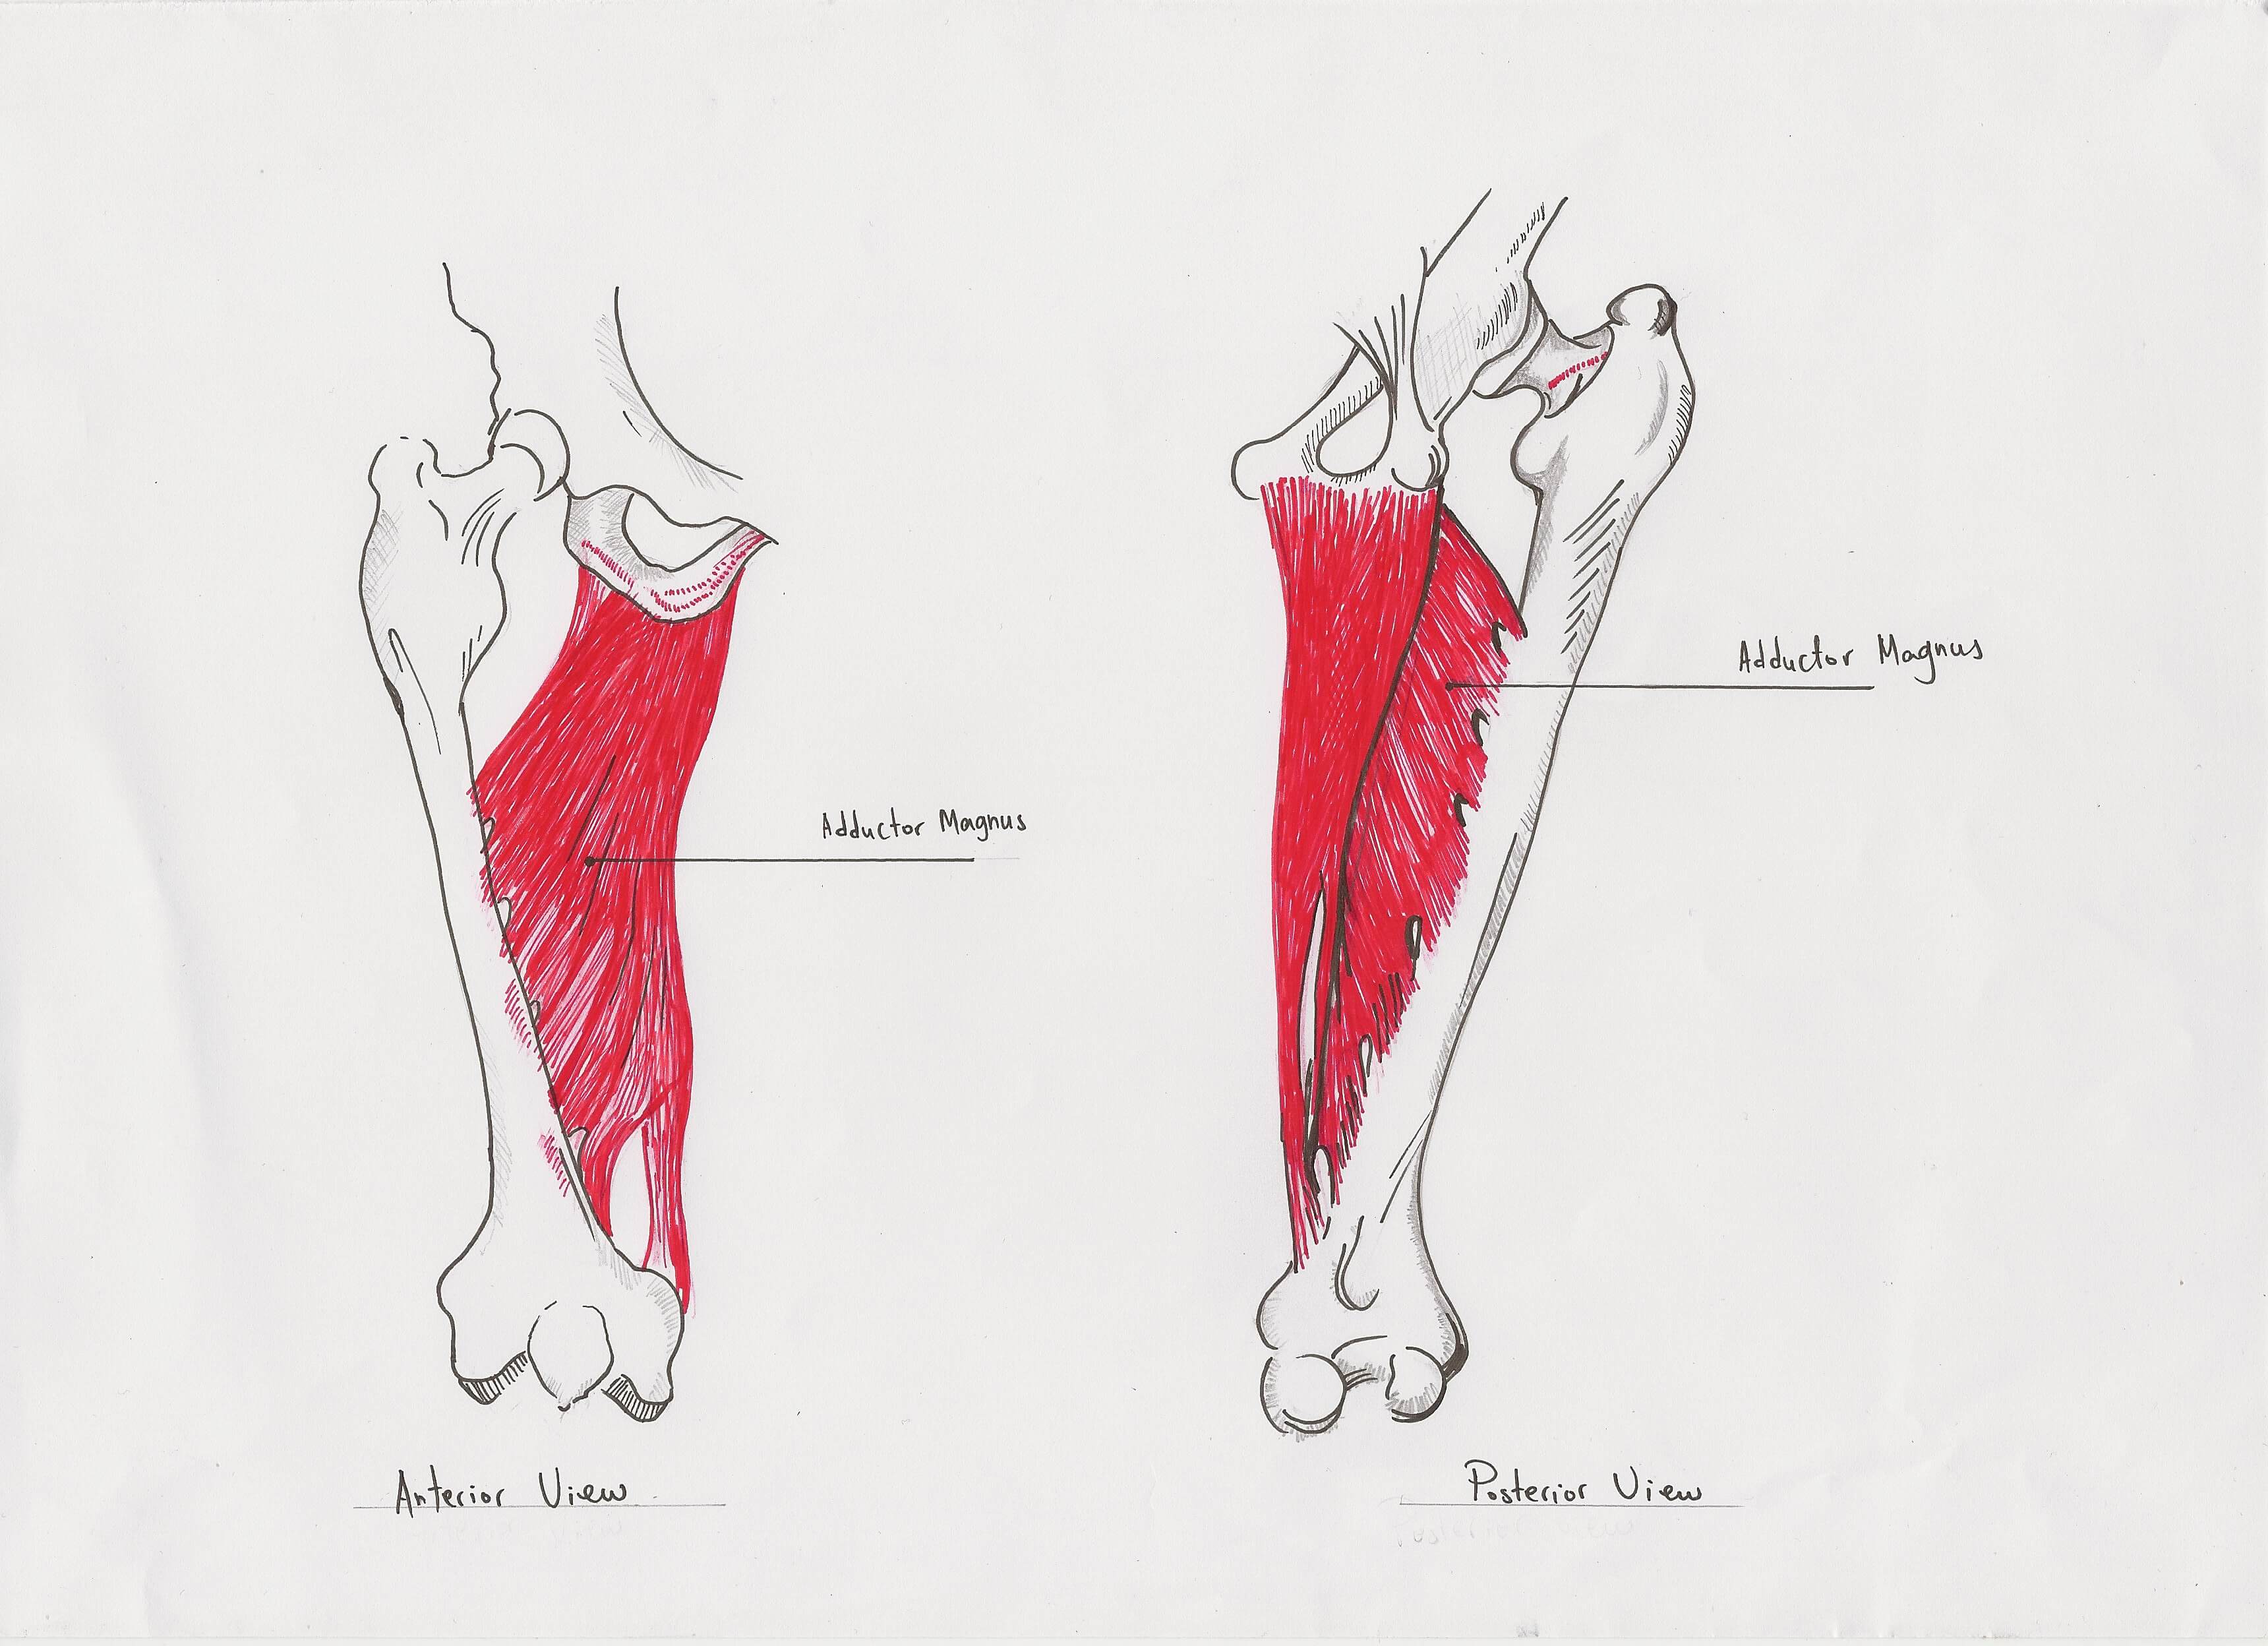
I don’t think the adductor magnus gets quite enough love. When people think hip extension, they instantly think of the glutes and hamstrings, but rarely think of the adductor magnus. However, not to bore you with the details, but it’s also a big, meaty muscle, and it’s in a very mechanically advantageous position to exert a huge hip extensor moment. It just hasn’t been studied directly very much (though a recently published study shows that it likely produces a larger hip extensor moment than the glutes and hamstrings put together at the bottom of the squat; there’s no reason to believe that it doesn’t also play a very large role in the deadlift as well), which is why I think it’s often overlooked.
Quadriceps
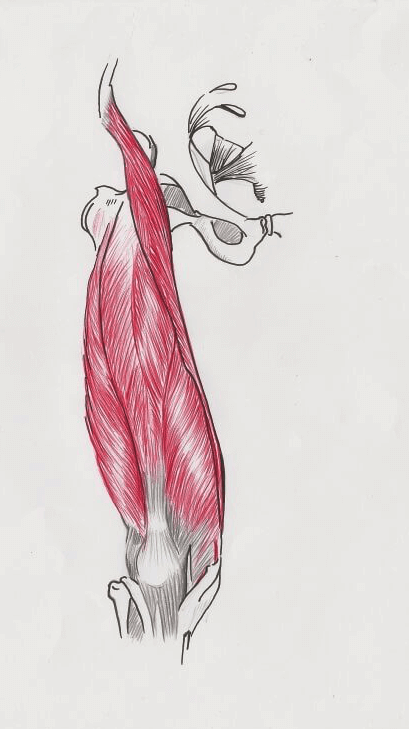
New research has actually shown you have a fifth muscle on the front of your thigh that no one had noticed before, so maybe we should really call these quinticeps. However, that doesn’t sound as good, so we’re sticking with quads.
Three of your quads – the vastus lateralis, vastus intermedius, and vastus medialis – can all be treated the same way. They originate on the shaft of your femur, and insert near the top of your tibia on the tibial tuberosity (that little bump near the top of your shin, just below your knee) via the patella. All they do is extend the knee.
The fourth is a bit different. The rectus femoris is essentially the inverse of the hamstrings. It inserts on the tibial tuberosity via the patella just like the rest of your quads, but it originates on the anterior inferior iliac spine of the ilium (just above the hip), meaning it can both flex the hip and extend the knee. However, much like the hamstrings had a longer internal moment arm at the hip than the knee, making them more effective hip extensors than knee flexors, the rectus femoris has a longer internal moment arm at the knee than the hip, making it a more effective knee extensor than a hip flexor.
Lats
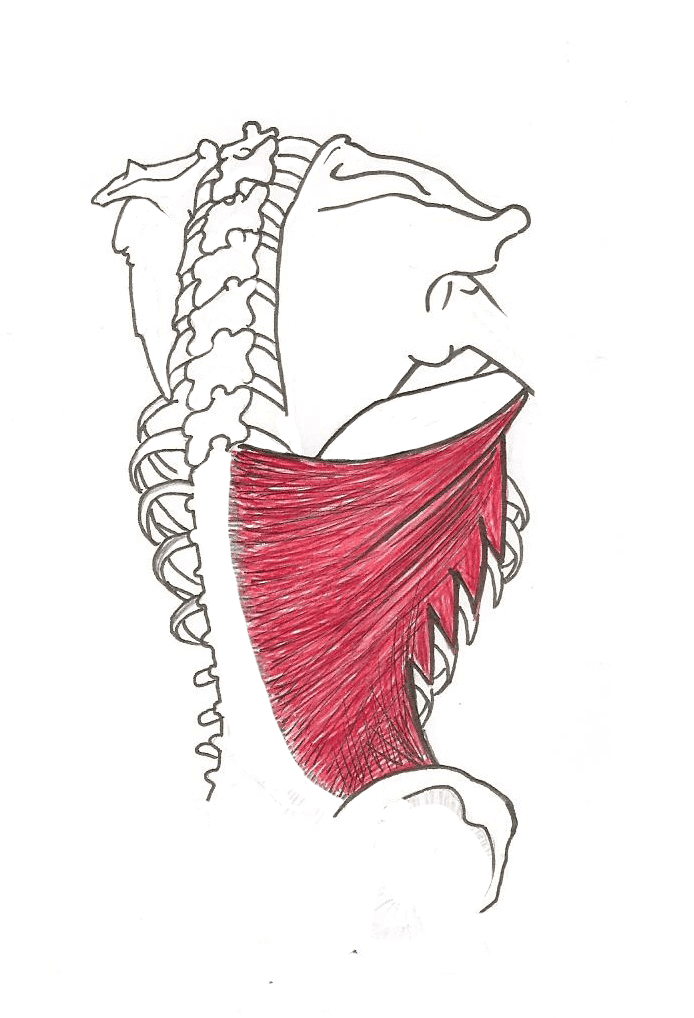
The last group of muscles we need to address are your lats.
They originate on the top of your pelvis, your lumbodorsal fascia, your bottom 10-11 vertebrae, and your bottom 3-4 ribs. They insert on the intertubercular groove near the top of your humerus, right next to your pecs, and some peoples’ lats have a small insertion at the bottom of the scapulae.
They aid a bit in shoulder adduction, and they’re a strong shoulder internal rotator, but their main role is in producing shoulder extension – bringing the arms down to the sides if they started raised over your head.
…
That’s enough physics and anatomy for now. You should have a good grasp of the basic forces at play in the deadlift and the major muscles, bones, and joints that are interacting to complete the movement.
Biomechanics
This is where things get a little bit more technical.
Planes
To make this section a little easier to understand, you need to understand planes of movement. There are three basic planes: sagittal, frontal, and transverse. The sagittal plane cuts something in half top to bottom and front to back, and it’s where flexion and extension take place. The frontal plane cuts something in half top to bottom and side to side, and it’s where abduction and adduction take place. The transverse plane cuts something in half front to back and side to side, and it’s where rotation takes place.
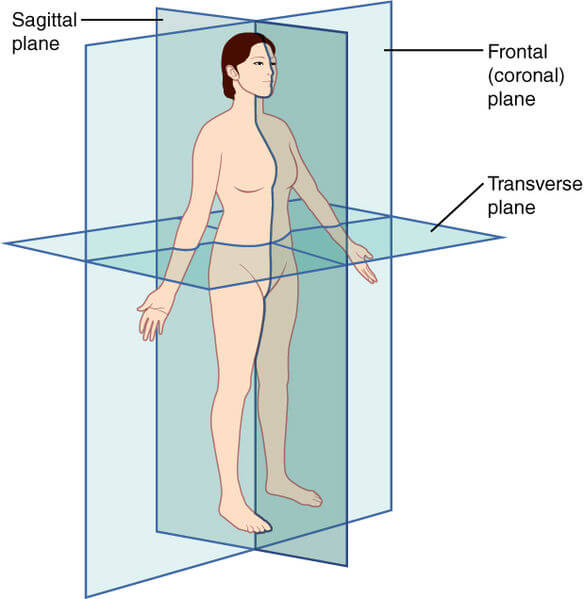
Here’s a crucial point: abduction, adduction, and rotation are defined by the frontal and transverse planes relative to the torso. Flexion and extension, on the other hand, are defined relative to the bones and joints where they’re taking place.
Most importantly for the deadlift, hip and knee flexion and extension are defined by the sagittal plane relative to the femur. Imagine a plane that cuts your femur in half front to back and top to bottom.
If your knees are pointed straight ahead, then the sagittal plane relative to the femur may be parallel to the sagittal plane relative to your torso, so assessing knee and hip flexion and extension demands simply by looking at the lift dead on from the side will be very accurate.
However, if your hips are abducted and externally rotated, the sagittal plane relative to your femur will intersect the sagittal plane relative to your torso, meaning you’d incorrectly estimate knee and hip extensor demands simply by looking at the lift dead on from the side. You need to assess knee and hip extensor demands in three dimensions, not just two.
Escamilla previously demonstrated how assessing knee and hip extensor demands in just two dimensions could produce pretty large errors when analyzing the deadlift.
Here’s an easy way to think about this: There are probably 1,000 types of curls. There are barbell curls, concentration curls, preacher curls, and the list goes on. I don’t think anyone would argue that a curl isn’t essentially pure elbow flexion and extension. However, when the shoulder is internally rotated (as in a concentration curl), the forearm is moving in the frontal plane relative to the body. I don’t think anyone would argue that a concentration curl is actually elbow abduction and adduction. That’s because elbow flexion and extension are defined relative to the humerus, and you’re always performing curls in the sagittal plane relative to your humerus. The exact same principle is in play with the deadlift.
Basic Demands in the Deadlift
There are four basic challenges you need to overcome in the deadlift: a spinal flexor moment, a hip flexor moment, a knee flexor moment, and, obviously, you need to be able to hold onto the bar (grip will be addressed separately later).
The spinal flexor moment increases as the horizontal distance (perpendicular to gravity) in the sagittal plane (relative to the torso) between the bar and any intervertebral joint increases.
The more inclined your torso is and the longer your torso is, the higher the spinal extension demands will be. This is the main reason why more conventional deadlifters are limited by back strength than sumo deadlifters – your torso is inclined farther forward at the start of a conventional deadlift.
In the conventional deadlift, knee and hip extension demands are pretty straightforward.
Knee extension demands are pretty low; odds are very low that quad strength will limit how much someone can deadlift with a conventional stance (feet close together, with the arms outside the knees). The external moment arm for knee extension – the front-to-back distance between the system center of mass (roughly over the middle of your foot) and the knee joint – is always going to be pretty small because your knees simply can’t track forward very far.
If they go too far forward, your shins will get in the way of the bar early in the lift, either forcing the bar to move forward (which would decrease the knee extension demands while also throwing you off balance), or your knees will need to shift back (which would also decrease the knee extension demands).
If you deadlift with perfectly vertical shins, knee extension demands will be lower than they would be if your knees started over the bar or slightly in front of the bar, but the knee extension demands will be pretty low regardless.
The main role of the quads in the conventional deadlift is simply to anchor the tibia in place and keep the knee extending to counter the contraction of the hamstrings. In all likelihood, the hamstrings themselves provide more resistance for the quads in the conventional deadlift than the weight itself does.
The hip extension demands in the conventional deadlift are equally simple – how much weight is on the bar, and how far are your hips behind the system center of mass (again, generally located over the middle of the foot)?
The farther your hips are behind the bar, the harder the lift is for your hip extensors. Although your setup for the lift (to be addressed in a moment) can influence hip extension demands to some degree, the largest determining factor is simply how you’re built. People with longer femurs and/or shorter arms (all other things being equal) will need to incline their torsos farther forward at the start of the lift, and start the pull with their hips farther behind the bar.
In general, hip extension demands are highest at the start of the lift, and progressively decrease throughout the pull. If you start the lift with your knees over the bar or slightly in front of the bar, your hips may drift back slightly as the bar leaves the ground, momentarily increasing hip extension demands, but on the whole, the first ~1/3 of the lift should be the hardest for your hip extensors.
In the sumo deadlift, knee and hip extension demands are slightly more complicated, but not extremely so (the technical explanation can be a little confusing, but the practical interpretation is pretty intuitive).
For starters, keep in mind that knee and hip extension demands are defined in the sagittal (front-to-back) plane relative to the femur, not the sagittal plane relative to the torso. This is an important point to keep in mind, because it’s easy to compare your hip position from the side in a sumo and conventional stance, see that that there’s less front-to-back distance between your hips and the bar in the sumo stance, and then conclude that sumo deadlifts are way easier for your hip extensors than conventional deadlift.
However, when you analyze hip extension demands in the sagittal plane relative to the femur, rather than the sagittal plane relative to the torso, it becomes clear that deadlift style shouldn’t (and doesn’t) influence hip extension demands to a huge degree because the distance from your hip joint to the system’s center of mass (which with a very heavy deadlift, is approximated by the position of the barbell) in the plane of your femur would be approximately the same.
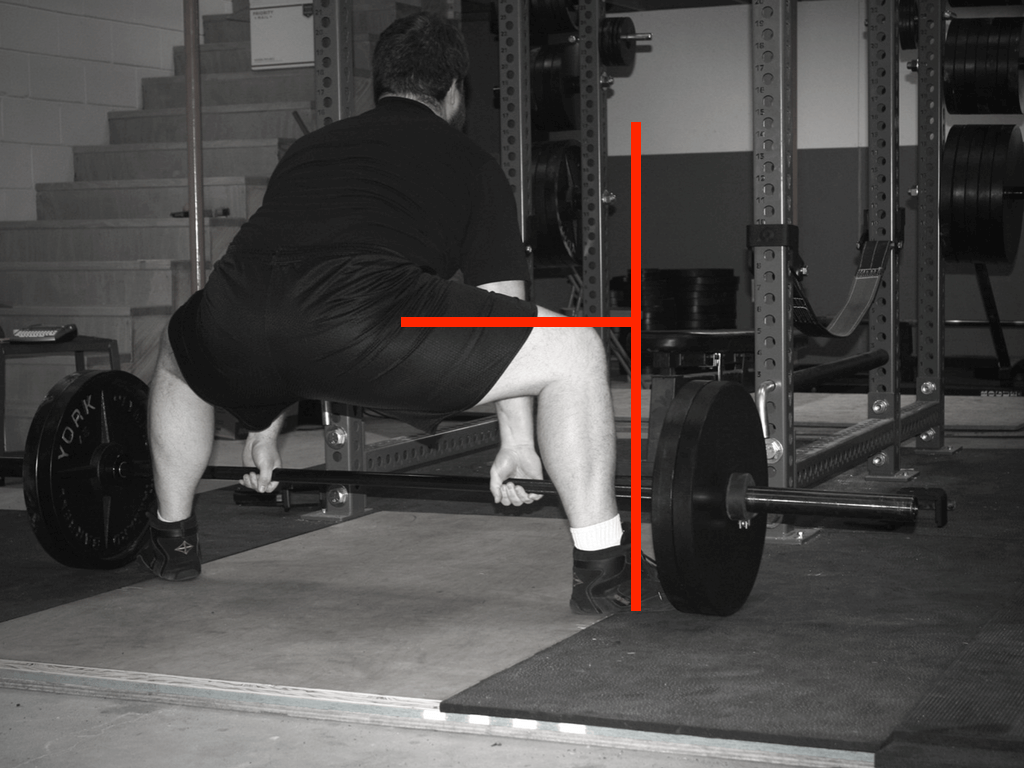
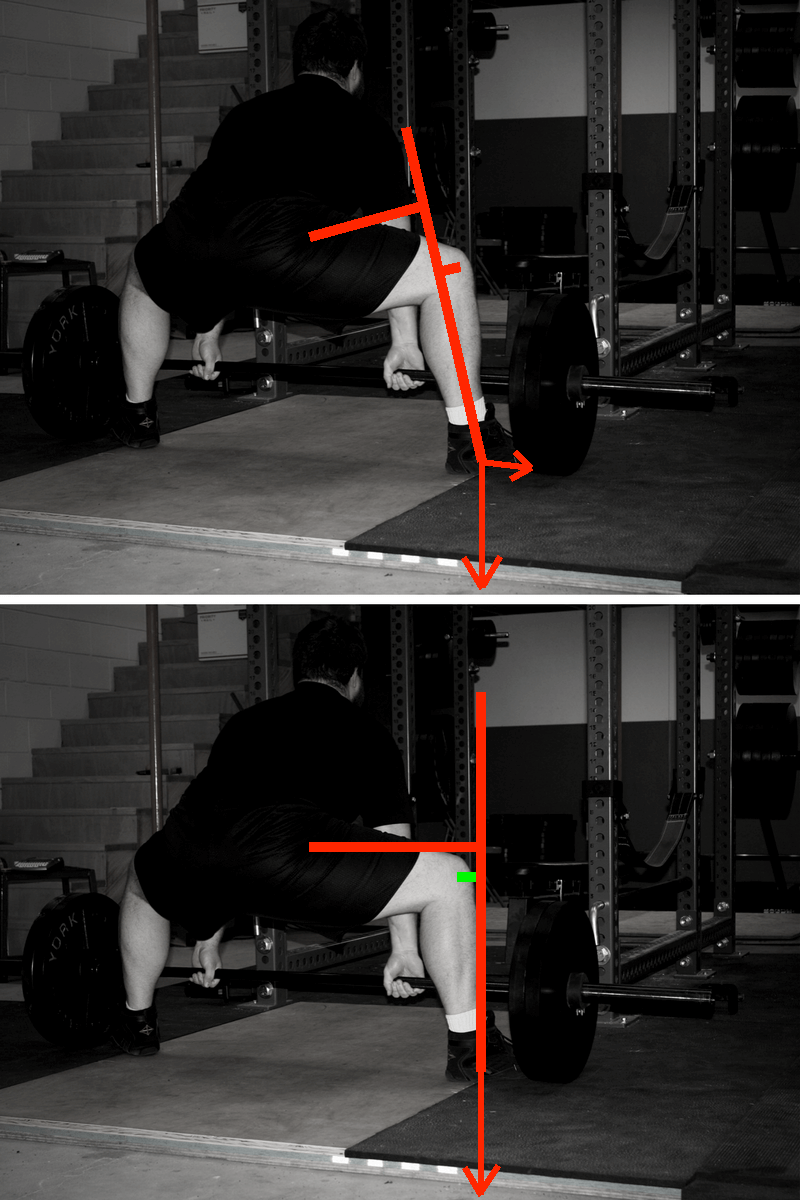
The next thing to account for is lateral force. This is the more technical of the two considerations. In the sumo deadlift, especially with a very wide stance, you don’t just drive your feet straight down through the floor.
You also drive your feet out against the floor (as if you were trying to rip the floor between your feet in half). As a result, you’re creating both vertical and lateral forces against the floor with your legs and hips. Therefore, the resultant force vector would be pointed up and toward the midline of the body, instead of straight up (as it would be for the conventional deadlift, for all intents and purposes).
As far as I know, there’s no published data comparing the magnitude of the lateral forces to the magnitude of the vertical forces to quantify how large of an effect they have; however, these lateral forces would serve to increase the knee extensor demands to some degree, and decrease the hip extensor demands to some degree. In effect, these forces would allow the quads to help out the glutes, hamstrings, and adductors.
If you’ve read my bench press guide, this may sound familiar to you. The role of the quads in the sumo deadlift is very similar to the role of the triceps in the bench press. In the case of the bench press, the lateral forces applied by the triceps allow them to help the pecs by reducing horizontal flexion demands a bit. This is analogous to the role of the quads helping out the hip extensors in the deadlift.
When you take both of these effects into account, the hip extension demands in the sumo deadlift are very similar to those in the conventional deadlift. The hips generally start a bit lower in the sumo deadlift, causing the femur to start a bit closer to parallel with the floor, which would tend to increase the external hip extensor moment. However, the lateral forces applied by your quads and hip abductors would decrease the hip extensor moment a bit while increasing the knee extensor moment, likely nullifying the difference caused by the slight discrepancy in femur angle.
So, at the end of the day, the same factors that increase the hip extensor demands in the conventional deadlift (relatively longer femurs or shorter arms) have the same effect for the sumo deadlift, and the difference in hip extension demands between the two styles is negligible. However, the knee extension demands are much higher for the sumo deadlift, and would largely depend on the lateral forces applied when deadlifting.
Now, it’s worth pointing out that even though sumo deadlifts are harder for your quads than conventional deadlifts, your quads still probably aren’t going to be your limiting factor. In two studies by Escamilla, the knee extension demands were roughly 15% higher in the squat vs. the sumo deadlift with 1rm loads in similarly skilled lifters, so quad strength probably isn’t going to limit most sumo deadlifters, though it may limit some.
And, of course, knee, hip, and spinal extension demands increase as you add more weight to the bar, but that part should be self-explanatory.
Deadlift: The Setup and Execution
Pulling a lot of weight depends, of course, on being jacked enough and having enough muscle to produce the required force against the bar. I’ll also readily admit that the deadlift is probably the least technical of the Big Three. However, to maximize both performance and safety in the deadlift, it’s of utmost importance to pay appropriate attention to your deadlift setup and technique.
There are several key technique differences between the sumo and conventional deadlifts, but I think it’s important – or at least useful – to be proficient with both techniques.
Since the conventional deadlift technique is a little simpler, it will be the “base” for the next few sections covering setup and execution. I’ll contrast aspects of the sumo deadlift that differ from the conventional deadlift at the end of each section.
Stance Width
The first order of business is finding your ideal stance width.
As a general heuristic, the best place to start is simply by performing a vertical jump, and noting what stance you naturally gravitate toward (hat tip to Brandon Lilly for the idea). This will be the position where your body generally feels the strongest and most comfortable for producing a lot of vertical force with a pretty close stance; that’s exactly what you’re looking for with the conventional deadlift. Now, there’s no guarantee that this will end up being the best stance for you, but it’s a great place to start.
In general, you’ll find that you’ll feel the strongest and most comfortable in this test with your feet right around hip width. This makes sense because in both a vertical jump and the conventional deadlift, you’re trying to apply force straight down through the floor. Setting up with your feet directly beneath your hips will facilitate that.
From that starting point, simply experiment with slightly wider and narrower stances until you find what feels best for you. There’s no one-size-fits-all prescription. Some unbelievably strong deadlifters, like Vince Anello and Lamar Gant, have pulled with their heels almost touching.
Other very, very strong conventional pullers set up considerably wider. This tends to be especially true for heavyweight strongmen who are renowned for their pulling prowess, including Eddie Hall, Brian Shaw, and Mark Felix. Generally, larger people who have a bit more of a gut to fit between their thighs pull with a slightly wider stance than smaller conventional deadlifters.
Once you find your strongest stance width, the next factor to address is toe angle (hip abduction/external rotation). Anecdotally, turning your feet out a little farther helps a bit with breaking the bar off the floor and generating a bit more speed at the start of the lift, and pointing your feet straighter ahead helps a bit with lockout strength. I’m not entirely sure why that is; it may be that turning your feet out a bit more lets your glutes start at a slightly shorter muscle length (at very long muscle lengths, glute activation tends to drop off a bit), allowing them to give you a little more drive off the floor.
At lockout, on the other hand, having your toes pointed a bit farther forward would mean your glutes weren’t quite as close to full contraction (the closer a muscle gets to full contraction, the less force it’s capable of producing). I’ll admit that turning your feet out a bit more or keeping your toes pointed a bit farther forward isn’t going to make a night-and-day difference, but it’s a detail in your setup that you can play with to help you through the portion of the lift you struggle with most.

Stance Width: Sumo Contrast
The biggest difference between the sumo and conventional deadlift is stance width, with all the other smaller differences arising from the difference in stance.
In the conventional deadlift, the hands are outside the feet. In the sumo deadlift, the feet are outside the hands. Therefore, the sumo deadlift requires a much wider stance.
Much like the simple heuristic for finding a conventional deadlift stance to try initially – feet around hip width, or roughly where you’d set them for a vertical jump – there’s a simple heuristic for finding a starting point for pulling sumo: Your shins should be roughly perpendicular to the floor at the start of the pull when looking at them from the front or back when you drive your knees out as far as you can.

Much like the heuristic for the conventional deadlift, this is just the starting point. A few people may need a narrower stance than that, and quite a few people pull better with an even wider stance. Once you get pretty comfortable with a “normal” width sumo deadlift, simply experiment with slightly narrower and wider stances until you find what feels strongest and most comfortable for you.
Much like the squat, let your stance width dictate how far out you turn your feet. Your knees should be roughly in line with your first or second toe. So, if you pull with a “moderate” sumo stance (roughly 2x shoulder width, with your hips each abducted 45 degrees), your feet should both be turned out about 45 degrees. With a narrower sumo stance, you shouldn’t turn your feet out quite as much. With a much wider sumo stance, you may need to turn your feet out even more.
The only time I’d recommend not having your knees stay in line with your toes is if you pull with a super wide sumo stance (toes almost touching the plates) and turning your feet out far enough to stay in line with your knees causes balance issues. As you turn your feet out more, they get “shorter” front-to-back, which can make it a little easier for a slightly misgrooved deadlift to tip you forward or backward. If that happens, turn your feet back in slightly, to the point that you can comfortably keep your balance.
Gripping the bar
Once you’ve got your feet set (both stance width and toe angle), it’s time to set your grip.
There are two main considerations with grip: grip width, and how you actually grip the bar.
Grip width is pretty straightforward: Take the narrowest grip you can without forcing your knees to cave in, or without causing undue friction between your arms and thighs at the start of the lift. If you take too wide of a grip, it does nothing but increase the distance you have to pull the bar, making the lift slightly less efficient (I’m not aware of anyone who can snatch grip deadlift more than they pull with a narrower grip). If your arms are brushing your thighs but not really grinding against them, your grip width is solid.
The next consideration is the type of grip you should take. There are four main grips you can take on the bar: double overhand, mixed grip, hook grip, and double overhand with straps.
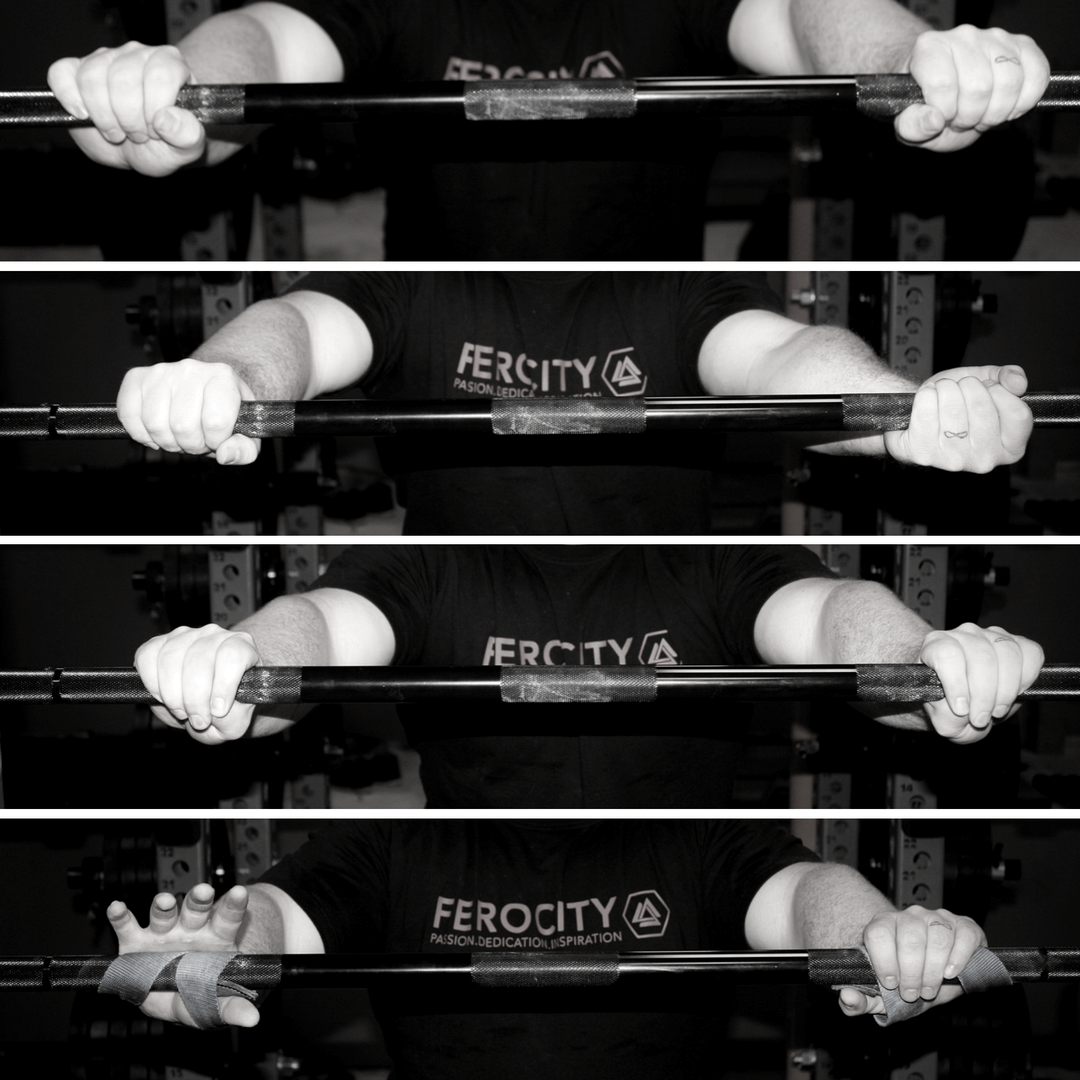
Double overhand grip is generally a no-go. Of the four grips you can take on the bar, double overhand is the one that allows you to grip the least amount of weight. When you’re brand new to the deadlift you may be able to hold on to challenging weights with a double overhand grip, but your pulling strength will outrun your grip strength pretty quickly, turning the deadlift into a movement that maximally challenges your grip without challenging your back and hip extensors very much.
The mixed grip (also called the over-under grip) is the most popular in competitive powerlifting. It involves having one hand over the bar, and one hand under the bar (one forearm supinated, and one pronated). This allows you to grip heavier weights than the double overhand grip because the bar is much less prone to rolling in your hands.
With a double overhand grip, the bar is pulling straight down trying to open your hands, and it can also roll farther down into your fingers, back toward your body, further pulling your hand open.
With the mixed grip, the bar is still pulling straight down trying to pull your hand open, but it can’t also try to pull your grip open by rolling. If it rolls toward your fingers in one hand, it just rolls toward the palm of the other hand, which will keep it from rolling further and continuing to rip your grip open (i.e. it can’t just keep rolling further and further until the bar starts rolling up one of your wrists).
There are two common mistakes people make when setting their grip when using a mixed grip.
The first mistake is setting the bar too high in their hand. If you grip the bar deep into your palms, it’s going to pull itself down into your fingers anyways, tearing your hands up without actually letting you grip heavier weights. Instead, set the bar either just above or just below the calluses at the base of your fingers.
The second mistake is pulling on the bar too much with their arms. Most people do get away with pulling with their arms, but doing that can increase your risk of a biceps tear. Biceps tears in the deadlift are pretty rare, but when they happen, it’s almost always on the underhand (supinated) arm when someone’s pulling the bar with their arms. Grip the shit out of the bar, but leave your upper arms relaxed. Don’t try to row the bar when you’re deadlifting it.
Many people are concerned that pulling with a mixed grip will create muscle imbalances. For whatever reason, most people do tend to shift their weight slightly to the overhand side, and research has shown that you get a pretty fair amount of biceps activation on the underhand side (and some people are also concerned that they’ll get trap imbalances). I honestly don’t think it matters all that much, assuming the deadlift isn’t the only movement you’re using to train your back. We’re naturally asymmetrical creatures anyways. However, if this is a concern you have, all you need to do is alternate your grip on each set – right hand under on half your sets, and left hand under on half your sets.
One final tip for pulling with a mixed grip: Always grip the bar harder than you need to. If you grip 200lbs as if it was 1,000lbs, the lift will feel easier than if you gripped it just hard enough to hold onto the 200lbs. I’m honestly not sure why that’s the case; maybe it’s due to muscle irradiation, maybe it has something to do with proprioceptive feedback, or maybe it’s purely psychological. Regardless of why it works, it does work like a charm. #brotip
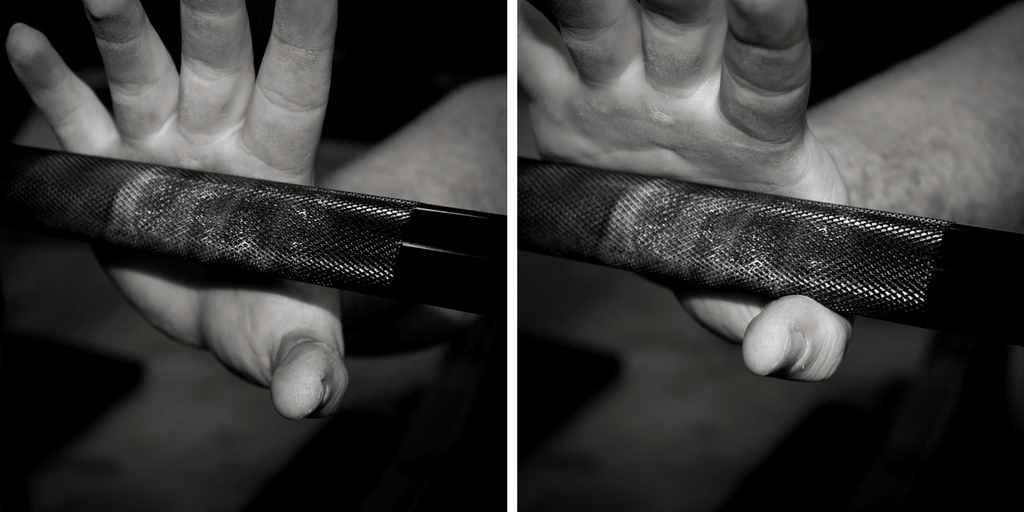
The hook grip is the third major grip style. It’s universally used in weightlifting, but it’s only recently started gaining popularity in powerlifting. With the hook grip, you grab the bar with a double overhand grip, and then you wrap your fingers around thumb, pinning it between your fingers and the bar (instead of putting your thumb on top of your fingers).
If your fingers are long enough, the hook grip will probably let you grip heavier loads than you could grip with a mixed grip. Since you can grip the bar with both hands pronated, the risk of uneven development and biceps tears is substantially mitigated as well.
There are two major downsides to hook gripping:
- If your fingers aren’t long enough, you probably won’t be able to get your hook grip “set” well enough.
- It hurts. A lot.
The second consideration is the main reason hook grip isn’t more popular. As you hook grip more often, you’ll gradually deaden the nerves in your thumb, helping it get a bit more comfortable. However, it’s hell initially. Your thumb doesn’t particularly like being crushed with every rep.
But, if you can deal with the initial discomfort and learn to hook grip, that should take care of any grip issues with deadlift. If you can get a hook grip set well, you can hold on to basically an infinite amount of weight (only a slight exaggeration).
Finally, you can deadlift with straps. The straps work basically the same way a mixed grip does: if the bar tries to roll down your fingers, it’ll roll back “up” the strap, forcing the bar to pull straight down and rip your grip open if you’re to drop the lift. I’ll address straps usage later in the guide.
Grip: Sumo Contrast
The information about grip styles (double overhand vs. mixed grip vs. hook grip) applies to the sumo deadlift the same way it applies to the conventional deadlift.
The biggest difference between gripping the sumo and conventional deadlifts is that your knees won’t be in the way of your arms when pulling sumo. As such, you can take a narrower grip on the bar. Grip the bar with your hands directly below your shoulders. That will allow your arms to be at their “longest,” thus minimizing how far you need to pull the bar.
If placing your hands right below your shoulders would cause you to grip on the smooth part of the bar, then you’ll probably be better off widening your grip slightly so your hands are on the very start of the knurling. This will increase the distance you have to pull the bar slightly, but the added ease of holding onto the bar will likely entirely make up for the additional inch or so of extra ROM.
Breathing
The next consideration is breathing properly for the deadlift. If you’d like a more in-depth treatment of breathing and bracing, check out the corresponding section in the squat guide. However, with the deadlift, the biggest consideration is simply making sure you’re primarily taking a deep, diaphragmatic breath (breathing into your stomach/obliques) instead of breathing into your chest (relying more on your accessory respiratory muscles, like your intercostals and scalenes, and not getting much torso expansion with your breath).
Hold that deep, diaphragmatic breath throughout the lift, performing the valsalva maneuver. If you need to exhale and get a fresh breath, do it at the top of the lift or with the bar resting on the ground between reps. That will help you create more intraabdominal pressure, which will make the lift a bit safer by helping to support your spine.
Beyond that, most people do a pretty decent job bracing their torsos for the deadlift. It’s a pretty “natural” movement; we’ve been picking stuff up off the ground our whole lives, so bracing for the movement comes easily for most folks. For people who simply can’t figure it out, troubleshooting that motor control tends to be a person-by-person process. However, if you’re looking for a general recommendation, taking that diaphragmatic breath and then tensing like you’re about to get punched in the stomach generally braces your torso relatively well to start with, and your ability to brace will generally improve as you get more practice deadlifting.
Most people feel best taking their deep breath when they’ve already got their hands on the bar, but if you feel like you can’t take a deep enough breath that way, it may work better to get your breath while you’re standing up, then set up quicker for the pull (before you start feeling lightheaded).
This advice applies for both styles of deadlift.
Setting Up For the Deadlift: General Strategies
Now the easy stuff is out of the way: You should know where to grip the bar, how to grip it, and how to brace for the pull. Now it’s time to actually set up for the lift.
There are, by my count, six different primary ways to set up for a conventional deadlift. I’ll present them roughly in order of popularity and ease of use. I’ll say on the front end that I don’t think any of them are inherently better or worse (once you get comfortable with them). It’s a matter of personal preference. If you don’t feel like you have a strong, tight, consistent setup, it may be worth experimenting with some of the other styles.
Technique 1: Tension your hamstrings, and then pull your back tight as you get down to the bar.
Step 1: Approach the bar, and set your feet. The bar should be an inch or two off your shins, roughly over your shoelaces.
Step 2: Bend over and grab the bar by pushing your hips back with only a very slight bend in your knees, and your spine flexed. You should feel a lot of tension in your hamstrings.
Step 3: Take your deep, diaphragmatic breath and tense your core (if you feel like you can’t get a deep enough breath at this stage, then swap steps 2 and 3).
Step 4: Keeping that tension on your hamstrings, push your hips farther back and pull them lower as your extend your spine. You should feel like you’re loading your hamstrings like a bow string, ready to recoil as soon as you start pulling.
Step 5: Pull your chest high, find a place to focus your eyes, and pull.
This technique is recommended for people whose deadlift is more of a pure hinge movement – generally people with long limbs relative to their torso who need to deadlift with a higher hip position.
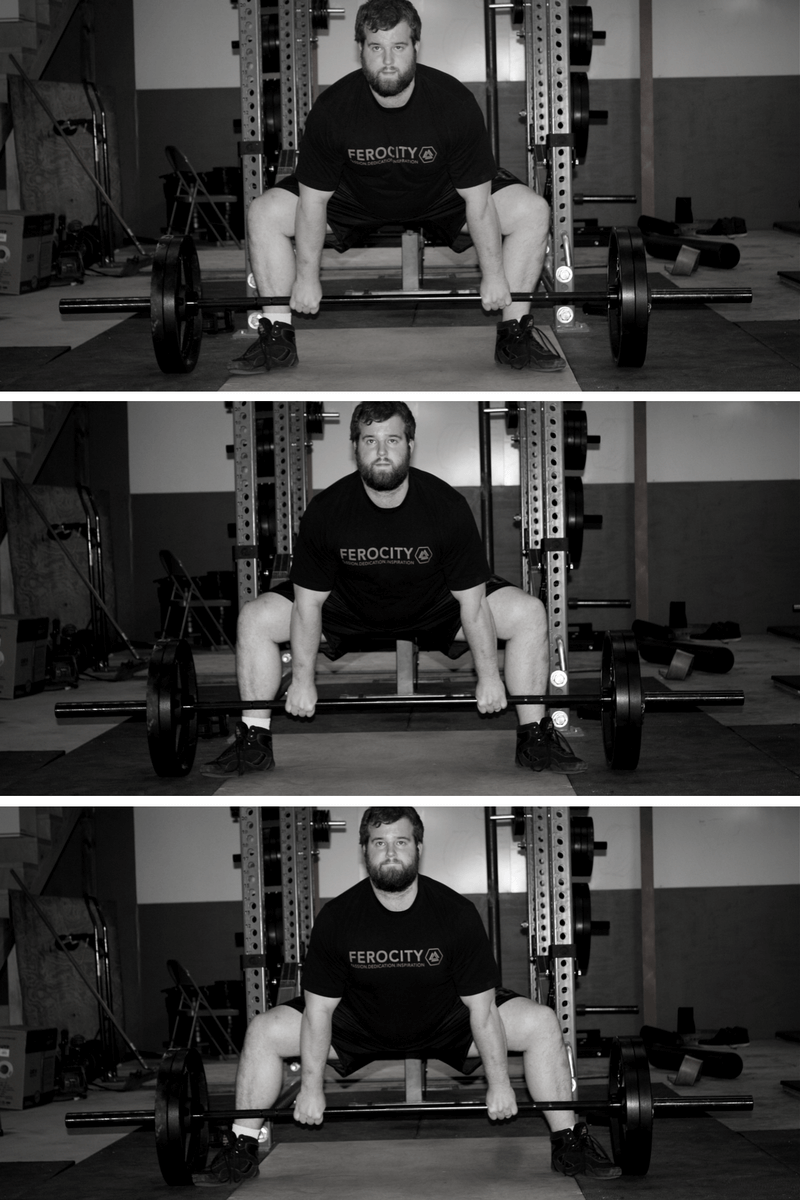
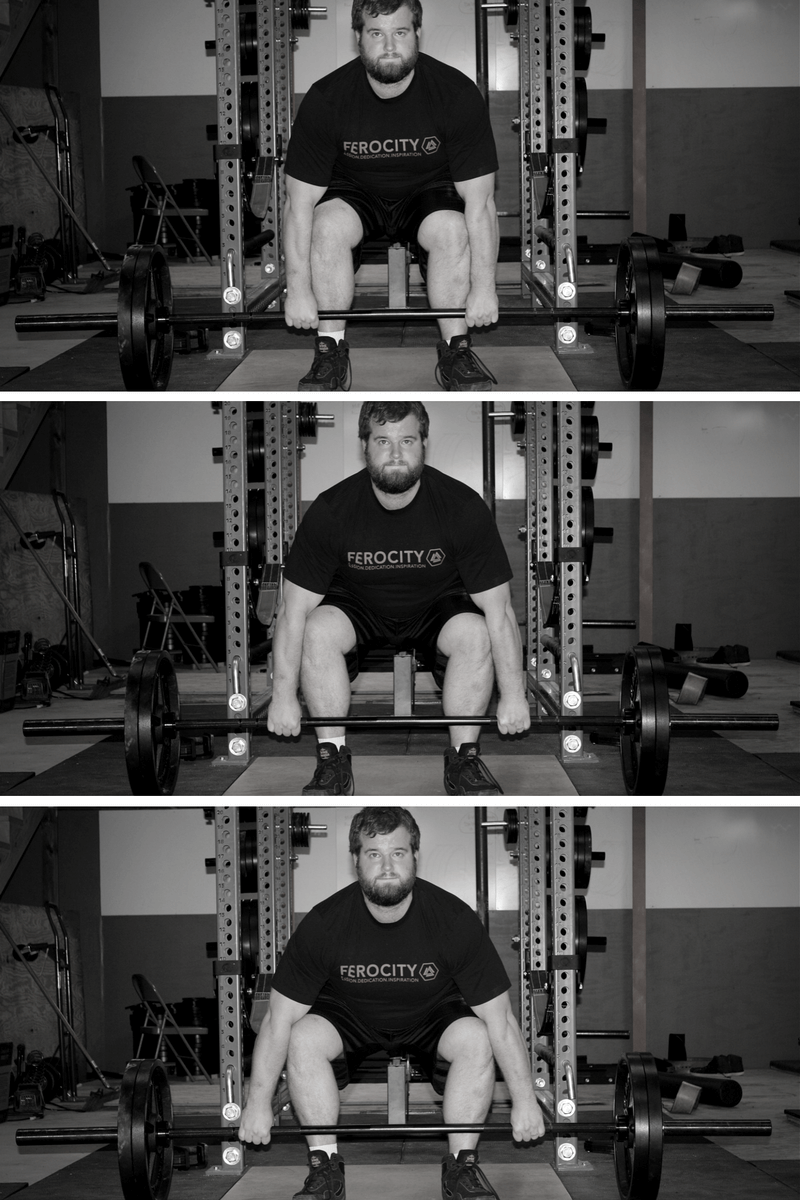
Technique 2: Start with your back tight, then “compress the spring” as you get down to the bar.
Step 1: Approach the bar, and set your feet. The bar should be an inch or two off your shins, roughly over your shoelaces.
Step 2: Extend your spine, push your chest high, hinge at your hips, and bend your knees until you can grip the bar.
Step 3: Take your deep, diaphragmatic breath and tense your core (if you feel like you can’t get a deep enough breath at this stage, then swap steps 2 and 3).
Step 4: Keeping your back tight, pull your hips lower into position. You should feel like your legs (as opposed to just your hamstrings) are compressing like a spring, ready to recoil as soon as you start pulling.
Step 5: Find a place to focus your eyes and pull.
This technique is recommended for people with shorter limbs who need to pull with a lower hip position, and rely on their quads a bit more to start driving the bar off the ground.
Technique 3: Set up over the bar, then rock your hips back into position.
Step 1: Approach the bar, and set your feet. The bar should be an inch or two off your shins, roughly over your shoelaces.
Step 2: Extend your spine, push your chest high, hinge at your hips, and bend your knees to squat down to the bar, gripping it with your weight forward on your feet, in front of the bar.
Step 3: Take your deep, diaphragmatic breath and tense your core (if you feel like you can’t get a deep enough breath at this stage, then swap steps 2 and 3).
Step 4: Rock your hips back, shifting your weight back over mid-foot, directly over the bar.
Step 5: Find a place to focus your eyes and pull.
This technique is recommended for people who have issues being consistent with the first two, more dynamic options. Since you can set up over the bar without as much tension throughout your body, it’s easier to find the hip and knee positions that feel the most comfortable for you. After that point, you just need to rock your weight back a bit, and you’re ready to pull.
Technique 4: “Clean pull” style with your hips starting low
Step 1: Grip the bar and sit back into a squat position with your spine extended, your weight behind the bar, and the bar resting against your shins.
Step 2: Take your deep, diaphragmatic breath.
Step 3: Keeping your spine extended, drive through the floor with your legs. Your hips will naturally rise and your weight will shift forward until it’s right over the bar; that’s when it’ll break off the floor.
This technique may feel more natural to people with a weightlifting background. It’s not incredibly popular in powerlifting, and (in my experience with it) it doesn’t let you get quite as tight as the first three techniques, but it certainly gets the job done.
Technique 5: Grip and Rip
Step 1: Walk up to the bar, take a deep breath, hinge down to the bar and grab it in one motion, and start the pull.
I don’t recommend this technique for new lifters. When you still need to consciously focus on keeping your spine extended and getting tight, gripping and ripping doesn’t give you enough time to make sure your setup is solid before you start pulling.
However, it can certainly work for people who’ve been deadlifting long enough that it’s become second nature. It can also help people who tend to psych themselves out before they deadlift since this technique doesn’t give you much time to think about the lift before you have to start pulling. Anecdotally, some people report that they can get more pop at the bottom of the pull using this technique, perhaps from taking advantage of the stretch-shortening cycle.
Technique 6: Rolling the bar
Step 1: Set up farther behind the bar than you typically would, with the bar at least 4-6 inches from your shins.
Step 2: Bend forward and grip the bar. Take a deep diaphragmatic breath.
Step 3: Roll the bar toward you as you extend your spine and sink your hips into position. Start pulling as soon as the bar nears your shins, with your weight over the bar.
This is also a viable technique for people who’ve been pulling long enough that the technique has become second nature. However, since it adds an unnecessary timing element (initiating the pull when the bar gets to the right position, but not before or after), it just adds one unnecessary complication for a newer lifter.
Much like the grip and rip technique, it can be useful for lifters who psych themselves out before a deadlift (when the bar rolls into position, you have to pull). It can also help people who take a bit longer to set up, and consequently can’t get their breath at the top of the pull (which would require them to hold their breath so long they got lightheaded), but who also don’t feel like they can get a deep enough breath with one of the first four techniques. Since you set up with the bar a little farther in front of you, you don’t need to bend quite as far forward to grip the bar, making it a little easier to get a full breath.
Setting up: Sumo Contrast
There are fewer options for setting up for the sumo deadlift.
The two most common styles mimic options 1 and 2 above. The sumo deadlift doesn’t allow quite as much room for error; if you get slightly out of your groove on a heavy conventional deadlift, you can generally save the lift. However, misgrooving a sumo deadlift – especially right off the floor – generally guarantees a missed lift with heavy loads.
Options 1 (tensioning your hamstrings, and then pulling your back into position as you pull your hips down to the bar) and 2 (starting with your back arched, then pulling your hips down into position) tend to work best for sumo deadlift because there aren’t as many moving parts. Your bar stays in the same place through the setup (as opposed to the rolling strategy with conventional), you pull your hips into the correct position right away instead of letting them rise into position (as opposed to the clean pull style of deadlifts), and you can be a bit more intentional about finding your balance and making sure you’re in the correct position (as opposed to the grip and rip style).
The steps of the setup are identical to options 1 and 2 for the conventional deadlift above, with one addition: As you pull your hips into position, focus on actively trying to rip the floor in half between your feet.
Imagine there was an earthquake, a fault in the earth’s crust opened between your feet, and you’re trying to rip the crust of the earth apart by using your hips to drive your feet apart. You should feel tremendous tension in your hips when you use this cue, and also feel your quads engage.
Maintain that tension as your pull your hips down to the bar, and as your start driving the bar off the floor.
Creating tension instead of jerking the bar
Before you really bear down and rip the bar off the floor, you need to make sure your body is tight enough that your form won’t disintegrate as soon as you start lifting the bar. This is often called “pulling the slack out of the bar.” I prefer to think of it as “pulling tension into your body,” because there’s not really any “slack” in the bar (the bar won’t flex when you start pulling against it) until you have a pretty fair amount of weight on it, but everyone can benefit from this tip; in fact, it’s probably even more important for newer lifters.
Unlike the squat and bench, the deadlift starts with the bar on the floor. You don’t have an eccentric (lowering phase) in the first rep to ensure you’re tight and ready to exert maximal force during the concentric (lifting phase).
A lot of lifters have a tendency to set up for the first rep, and then jerk the bar as hard as they possible can from the very start of the lift. If they’re not tight enough, this sudden jolt of force has a tendency to make their butts shoot up and their backs round. They try to drive both their shoulders and hips up, and their hips keep rising, but their shoulders don’t move much because the bar doesn’t move much, putting them in a bad position (from both a safety and performance perspective) for the rest of the lift.
Instead, you should create as much tension throughout your body as humanly possible before adding the extra force required to start pulling the rep. You should already be pulling so hard on the bar when it’s still on the floor that adding just a tiny bit of extra force will get the lift moving. I tend to cue this “compress the spring” for people who start the deadlift with their hips lower (setup #2), and “pull back the bowstring” for more hamstrings-dominant deadlifters who pull with their hips higher (setup #1).
That’s the main reason I recommend the first two deadlift setups (above) for most lifters – especially new lifters. Creating that necessary tension is built into the setup, whereas it’s easier to “jerk” the bar with the other four setups.
Now, as you get more practice and experience deadlifting, creating tension for your pull will become second nature. More experienced lifters can get away with “jerking” their deadlifts because they can instantaneously create the necessary tension the instant they start pulling, preventing them from losing their technique.
However, as you’re learning how to deadlift (or if you’re a more experienced deadlifter retooling your pull because you’re having issues with the lift), you need to walk before you run. Go out of your way to create as much tension as possible through your whole body before the bar breaks the floor, gradually pulling harder and harder until the bar feels like it’s about to start moving before finally shifting into the next gear and breaking the bar off the floor.
Bar Positioning/Finding Your Balance
The deadlift requires some degree of balance. Obviously you can’t complete the lift if you fall over, but balance considerations go beyond that simple requirement.
If your center of pressure shifts too far forward or too far back, it may make lockout excessively difficult.
If your weight is too far back on your heels, it’s hard to keep driving your shoulders back and chest up, lest you lose your balance and fall backward. If your weight is too far forward toward the balls of your feet, you have to delay driving your hips forward to complete the lift to ensure you don’t fall forward. Your spine is also more likely to flex as your weight starts shifting forward.
Furthermore, if you actively have to focus on keeping your balance as you’re pulling, that takes your attention away from your primary goal: putting as much force into the bar as possible to lift really heavy stuff off the floor.
Maintaining your balance through the lift should be effortless and second-nature. Not only should you not get thrown off balance when deadlifting, but you also shouldn’t even need to think about maintaining your balance. All your focus and effort should be put toward pulling heavy weights.
If you do have balance issues with the deadlift – if you find yourself missing lifts because your weight shifted too far forward or back on your foot, or if maintaining your balance throughout the lift doesn’t come naturally to you, causing you to focus just as much on your balance as the lift itself – you can address the issue with a few simple drills.
Throughout the lift, you want to be able to drive through the middle of your foot to avoid the aforementioned problems that arise when the center of pressure shifts too far forward or too far back on your foot.
That being the case, it’s important to make sure the bar starts in the right position relative to your feet/shins. As a general rule of thumb, the bar should start about an inch or two from your shins, or roughly over your shoelaces. However, that may not work for some people, especially with lighter loads relative to your bodyweight.
To keep your center of balance over midfoot, the bar serves as a counterbalance to your body. When you set up to pull, most of your bodyweight will be behind midfoot, so the bar should be very slightly in front of midfoot. If you’re a hefty person or if you’re lifting a really light weight (either because you’re new to the movement, or because you’re just warming up for the day), the bar will either need to start a little farther in front of midfoot to provide an adequate counterbalance for your body, or you’ll need to shift your bodyweight slightly farther forward so your own body’s center of mass isn’t quite as far behind midfoot.
Does that sound like something you want to actively think about before deadlifting? No? Good, me either.
Here’s the first drill you can try to make sure the issue isn’t simply a lack of balance or improper positioning of the bar at the start of the pull:
Set up to deadlift as you typically would, get tight, pull tension into your body (or pull the slack out of the bar, if you prefer that terminology), and then barely break the bar off the floor – just an inch or so. Hold it in that position for about two seconds, and reposition the bar and your body to the position that feels the most natural. If you feel all the weight on your heels, either raise your hips a bit farther or bend your knees a bit more to shift your body and the bar slightly farther forward. If you feel the weight on the balls of your feet, rock back, raise your hips slightly, and extend your knees a bit to reposition the bar slightly farther back.
Once you find that point of balance, sit the bar back down, and pull the first rep of your set.
If this drill sorts out your balance issues, and the pull feels balanced and smooth just by fixing the position of the bar and your body at the start of the lift, just do this little drill before all of your warmup and work sets for a few weeks until you no longer need to reposition the bar/your body when you break the bar off the floor initially for the brief isometric hold.
However, some people still feel off balance through the middle and top of the lift even after addressing balance issues at the start of the lift. They can find their balance initially, but they have issues maintaining it.
If that’s the case, here are two more drills you can try to help build balance through the full lift:
1) Deadlifting with 2.5lb/1.25kg plates under the middle of your foot
This forces you to keep your weight over mid-foot. I picked this tip up from this article (though the linked article uses it for squats), and it works like a charm. If your weight shifts too far forward to backward, you’ll feel more and more pressure against the lip of the plate, providing immediate tactile feedback that you need to reposition yourself
2) Paused deadlifts
When you start the pull, pause when the bar is just an inch off the ground (as you would with the first drill), and shift your weight forward or back to find your balance. Then, pull the bar to just below knee height. Again, shift your weight forward or back to find your balance. Then, pull the bar to lockout. If you want, you can pause in those same positions again on the way down.
For most people, just doing paused deadlifts for sets of 3-5 reps for their first 3-4 warm-up sets will be sufficient to ingrain the groove for the subsequent heavy sets. After a couple of months, you should be able to drop the pauses as the balance becomes second-nature (or you can leave them in your warm-up, as I do, just to make sure you don’t lose the groove again).
However, some people start losing their balance again as soon as they drop the pauses. If that happens to you, you can stick with the paused deadlifts as your primary deadlift movement for 2-4 weeks until you reach the point that you always feel balanced at the point of the pauses, no longer needing to reposition yourself.
After that, you can progress to deadlifts with slow concentrics and eccentrics – taking 3-5 seconds on the way up and on the way down with each rep. This will ensure that you can focus on maintaining your groove through the reps, keeping you from being thrown off balance at high speeds.
Then, over the course of 2-6 weeks, gradually increase rep speed as you’re able while still maintaining your balance. Try to go faster, but if you find yourself losing your balance again, slow things back down a bit. Eventually, ripping the bar off the floor at maximum velocity should be very comfortable. Some people will need longer than others to find their balance with faster and faster reps, but by the end of this process, keeping your balance through the lift should be second nature, which will pay big dividends in the long run.
With all of these drills, the eventual goal is to get to the point that you no longer need them. If your positioning starts feeling wonky again at some point in the future, you can always come back to these drills.
The goal is for balance in the deadlift to become second nature. Using the lift itself (via pauses or tactile feedback from plates under your feet) to correct the issue generally works better than using a ton of cues that likely won’t make sense if you’re not sure what a well-balanced deadlift is supposed to feel like in the first place.
The Importance of the Lats
I seem to have gotten a reputation as the dude who hates on lat training.
I don’t think that characterization is entirely fair. Thus far, I’ve really only delved into the role of the lats in the bench press on this site (tl;dr – they play a small stabilization role at best, and lat strength probably won’t ever limit your raw bench press).
However, while they don’t play much of a role in the bench press, they do certainly play a meaningful role in the deadlift, and I do certainly think you should train your lats.
Before we get rolling, I want to make it clear that the lats aren’t a prime mover in the deadlift – that title would apply primarily to your hip extensors, your spinal extensors to a slightly lesser degree, and your quads in the case of the sumo deadlift. However, even though your lats aren’t the star of the show, they do play a very important role, and properly engaging your lats will help you deadlift more weight.
In spite of the lats’ importance in the deadlift, the role of the lats in the deadlift is often misunderstood. People talk about how lat tension helps keep the back tight in the deadlift (the upper back especially), preventing it from rounding excessively, with the implication that the lats themselves help keep the upper back extended. However, the lats aren’t actually capable of producing a (meaningful) spinal extension moment since individual lat fibers don’t attach to multiple vertebrae (though their ability to tense the thoracolumbar fascia may play a very small role aiding in lumbar extension), and they certainly couldn’t help with keeping the upper back extended since they don’t have attachments on your higher thoracic vertebrae.
Instead, I think the idea of “lat tension” accomplishes a much more basic purpose: Instead of the lats actually helping keep the spine extended, repositioning the scapulae and engaging the lats actually work to decrease the required hip and spinal extension demands of the lift.
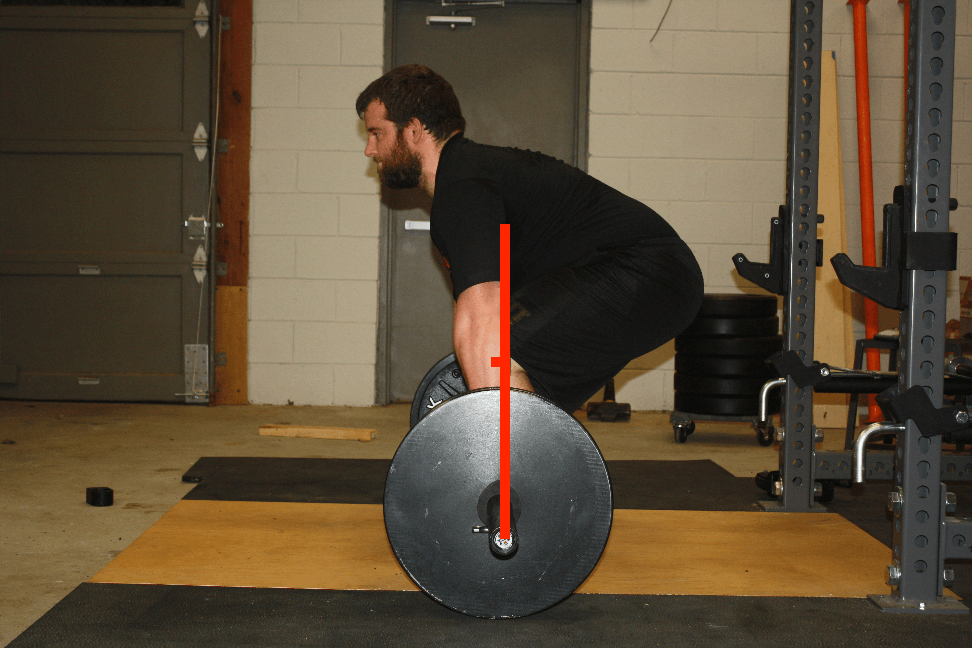
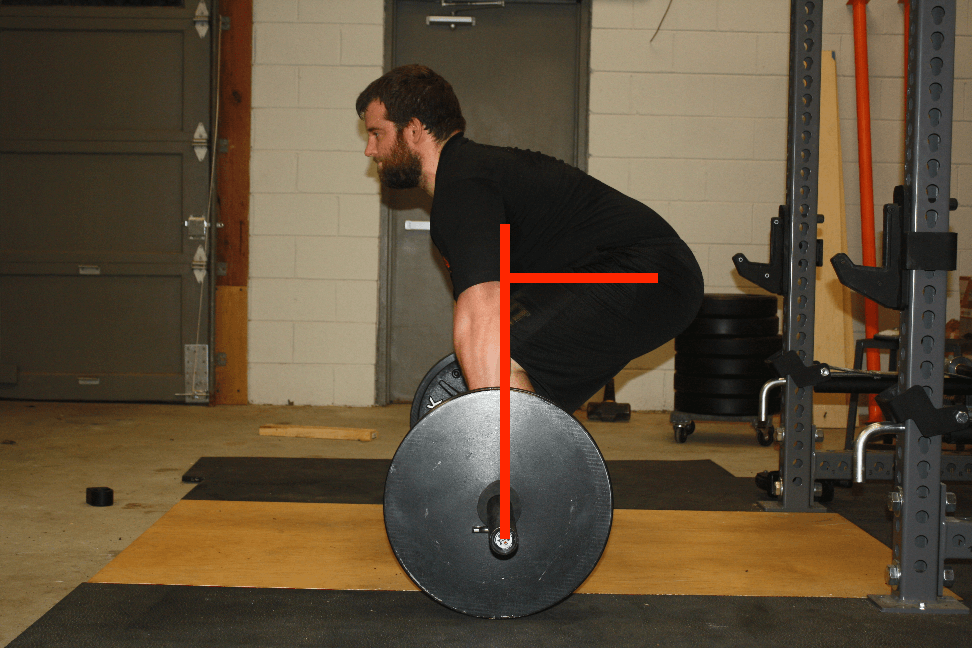
The hip extension moment arm in the conventional deadlift is the horizontal distance between the center of mass of the system (we’ll just assume mid-foot) and the hip joint. The biomechanics are slightly more complicated for the sumo deadlift, so this article will just illustrate with the conventional deadlift, though the same basic principles would apply to both variations.
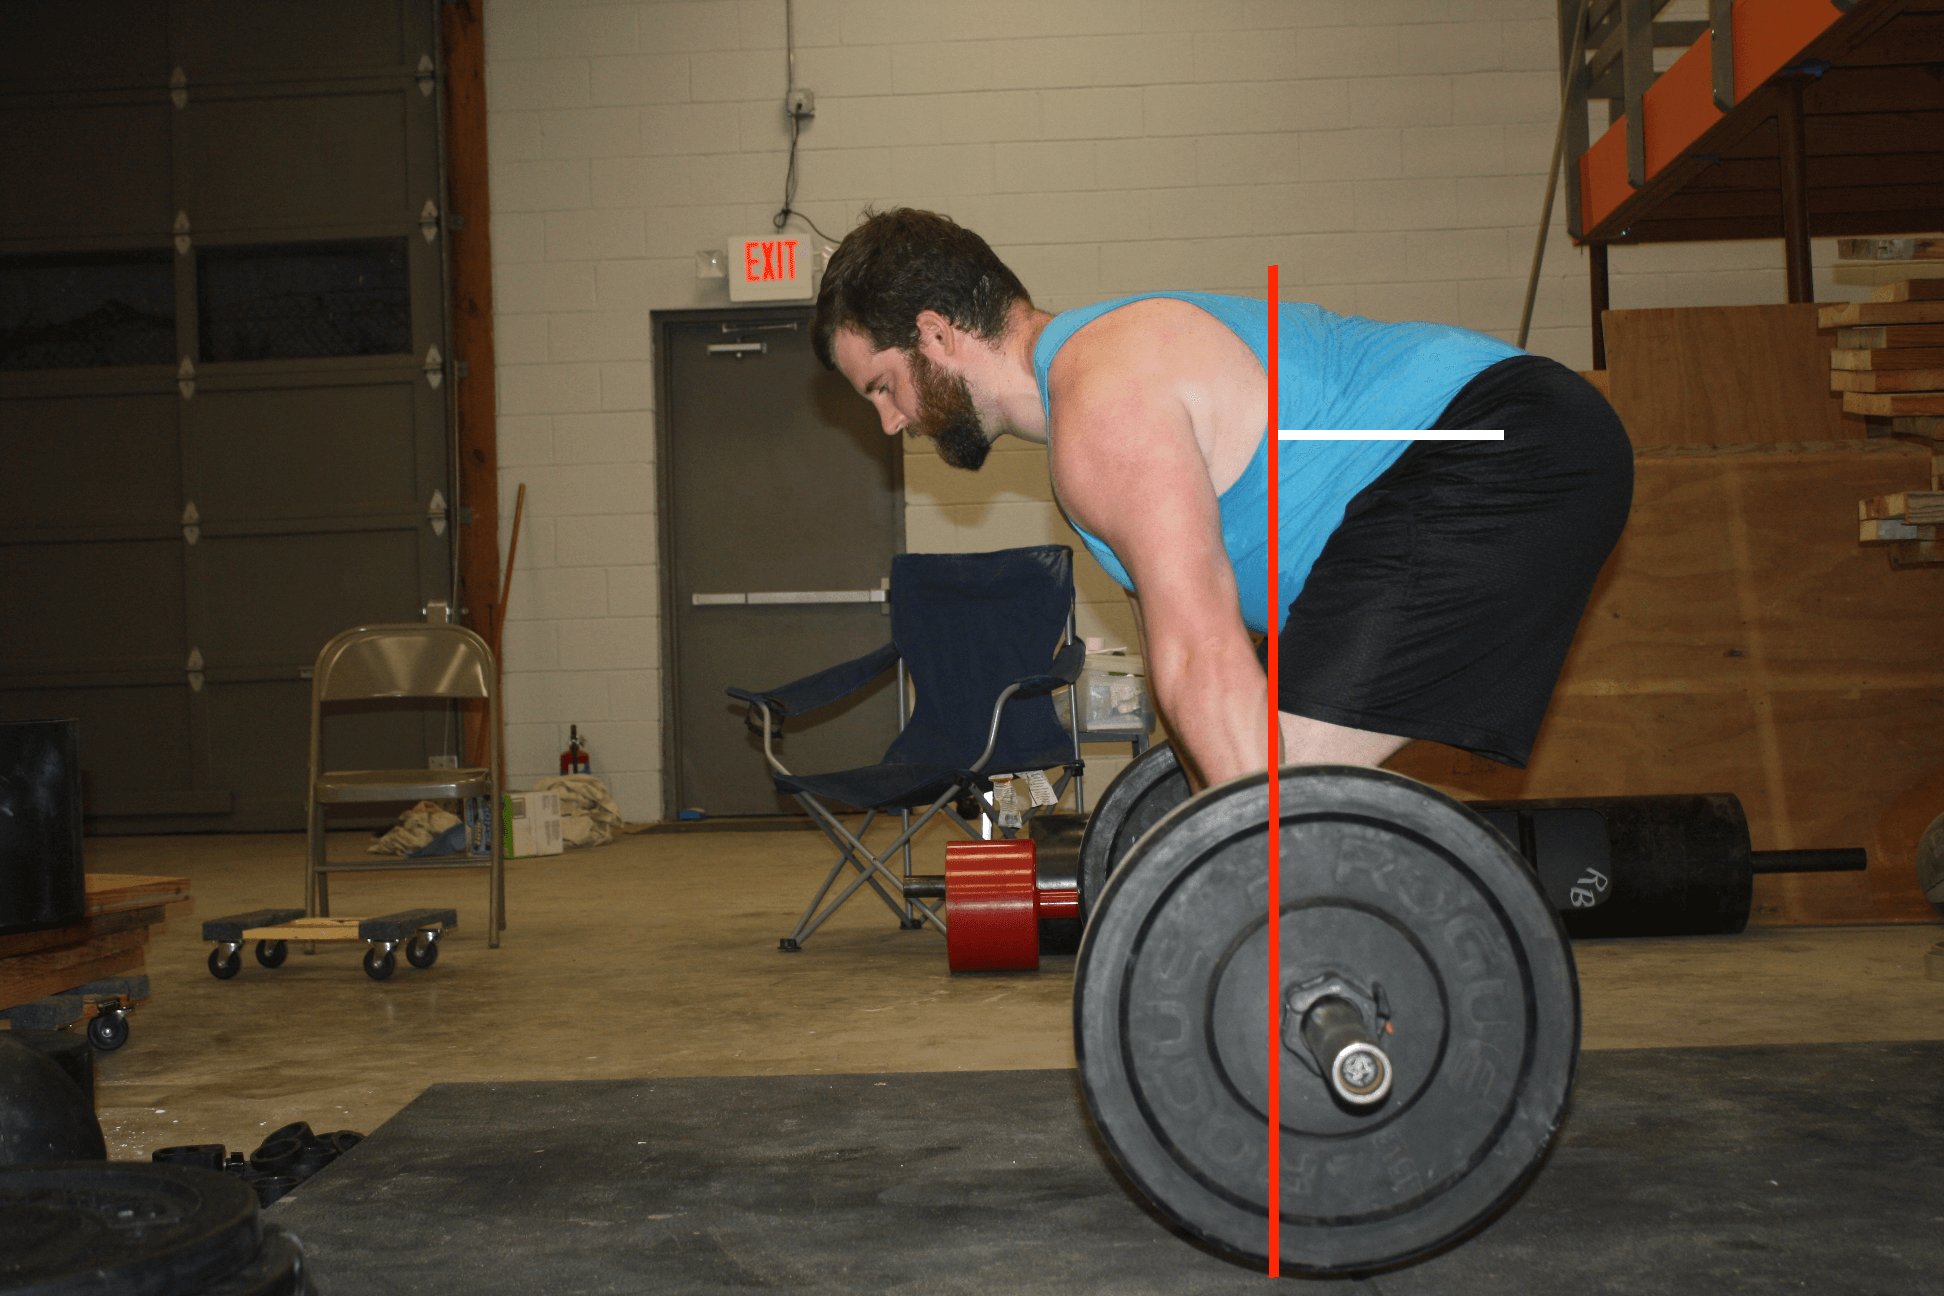
By engaging the lats more, you can extend the shoulder a bit, letting your shoulders move slightly forward relative to the bar. This also lets your hips move slightly forward, decreasing the hip extension moment arm. Depressing the scapulae serves the same basic purpose: It doesn’t extend the shoulder, but it positions the shoulder joint itself a shade further down your torso, bringing it closer to the hips.
Now, don’t expect a night and day difference from these little tweaks. You’ll maybe get a 3-5% decrease in hip and lumbar extension demands in total. That’s definitely enough to help you pull a bit more, but not a night-and-day difference. However, the place it would make a big difference is your upper back, helping you keep your thoracic spine extended (or at least keeping it from flexing too much).
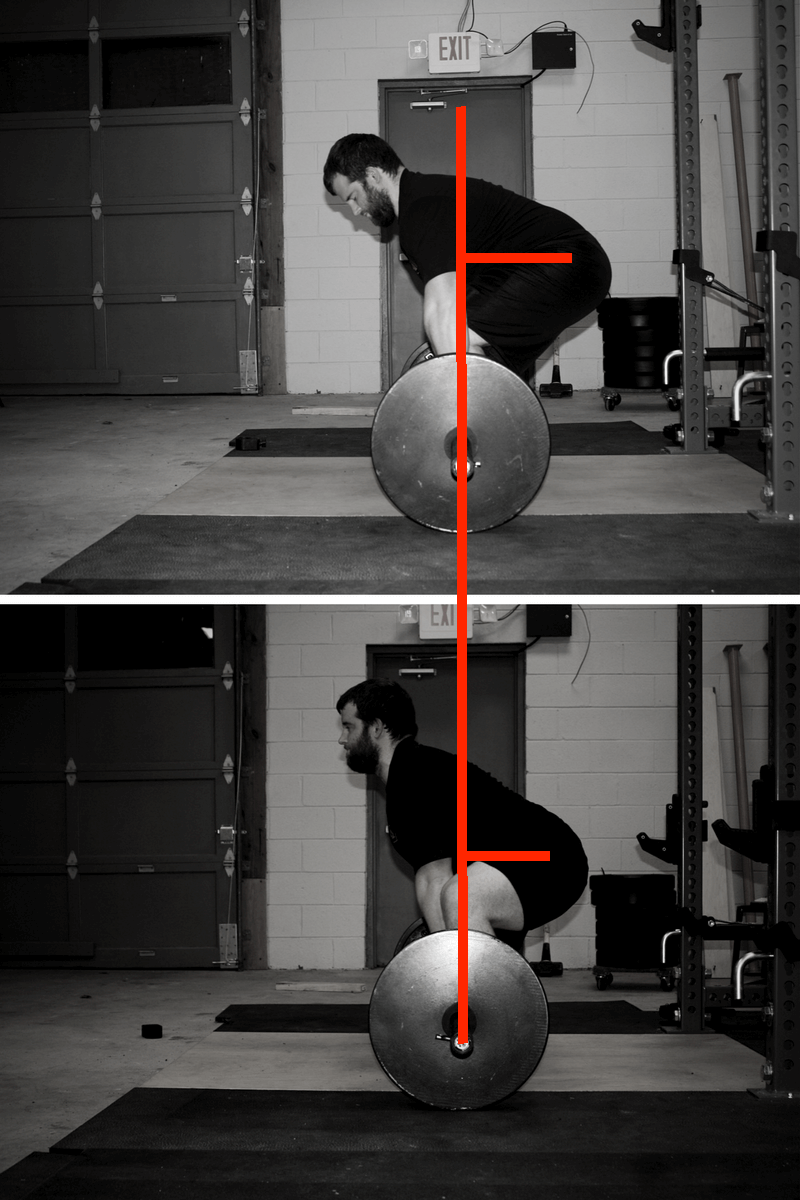
Here’s why: The hips are going to be at least 18-24 inches behind the bar through the first part of the pull, so engaging the lats and depressing the scapulae simply can’t make a huge difference at the hips. With near max loads, the position of the bar relative to the shoulder (and thus relative to the hip and every point along your spine) may only change by 1-2 inches. Yes, that’ll make a difference at the hips and lower back, but the difference would be pretty small (just assuming the hip extension moment arm was 20 inches before, reducing it by one inch would be a 5% decrease).
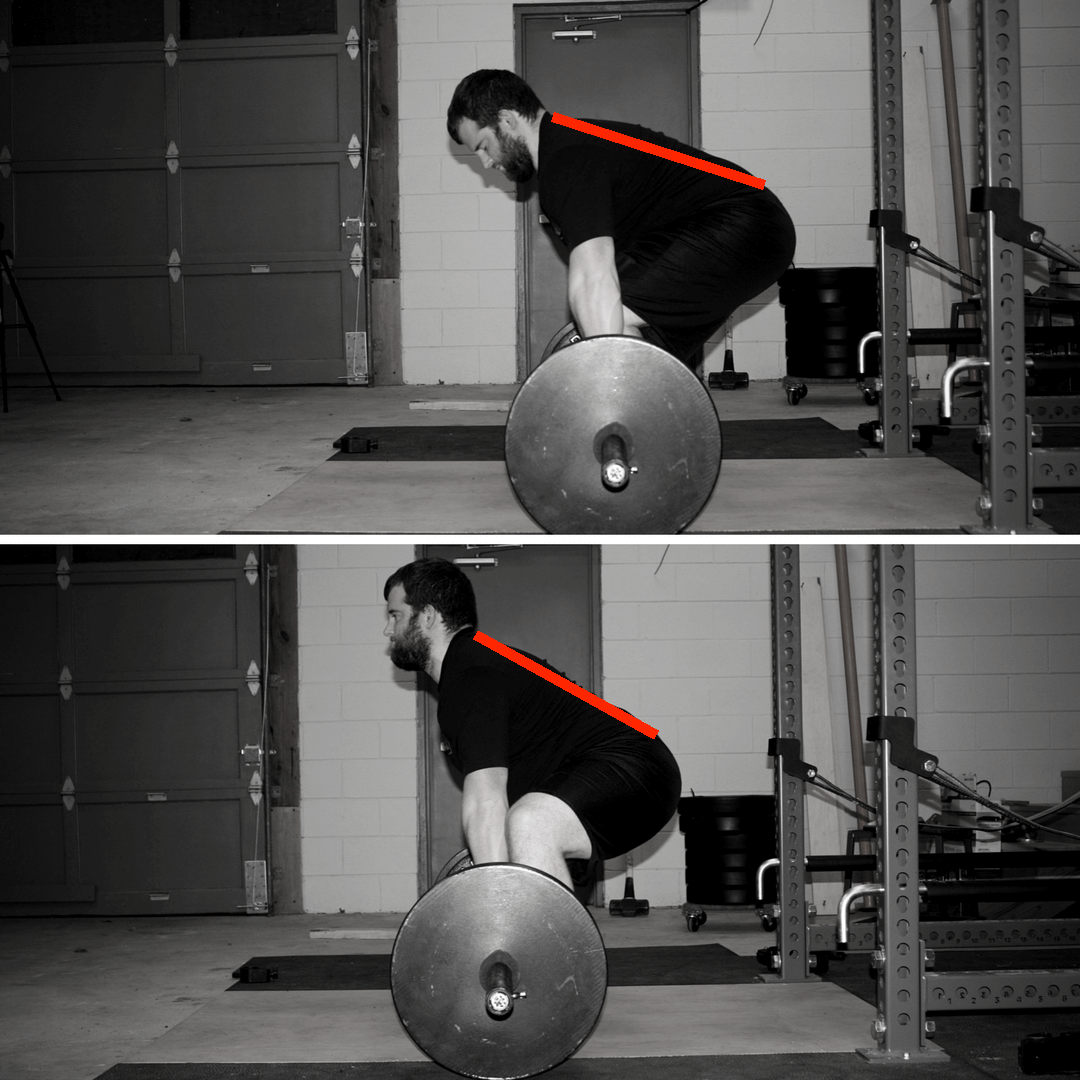
However, every thoracic vertebra is much closer to the shoulder than your hips or lumbar vertebra. If the T9/T10 junction was 5 inches behind the center of mass (the spinal extension moment arm at that joint) before engaging the lats and depressing the scapulae, it may only be 4 inches behind the center of mass after engaging the lats and depressing the scapulae, leading to a 20% reduction in thoracic extension demands at that joint. And if the T4/T5 junction was 1 inch behind the center of mass initially, after engaging the lats and depressing the scapulae, it may be in line with the center of mass, reducing the spinal extension demands at that joint (the middle/top of your thoracic spine) to nearly zero.
That should be pretty obvious from the image above. As joints get closer and closer to the red line (center of gravity), shoulder extension (lat engagement) and scapular depression make a larger and larger relative difference.
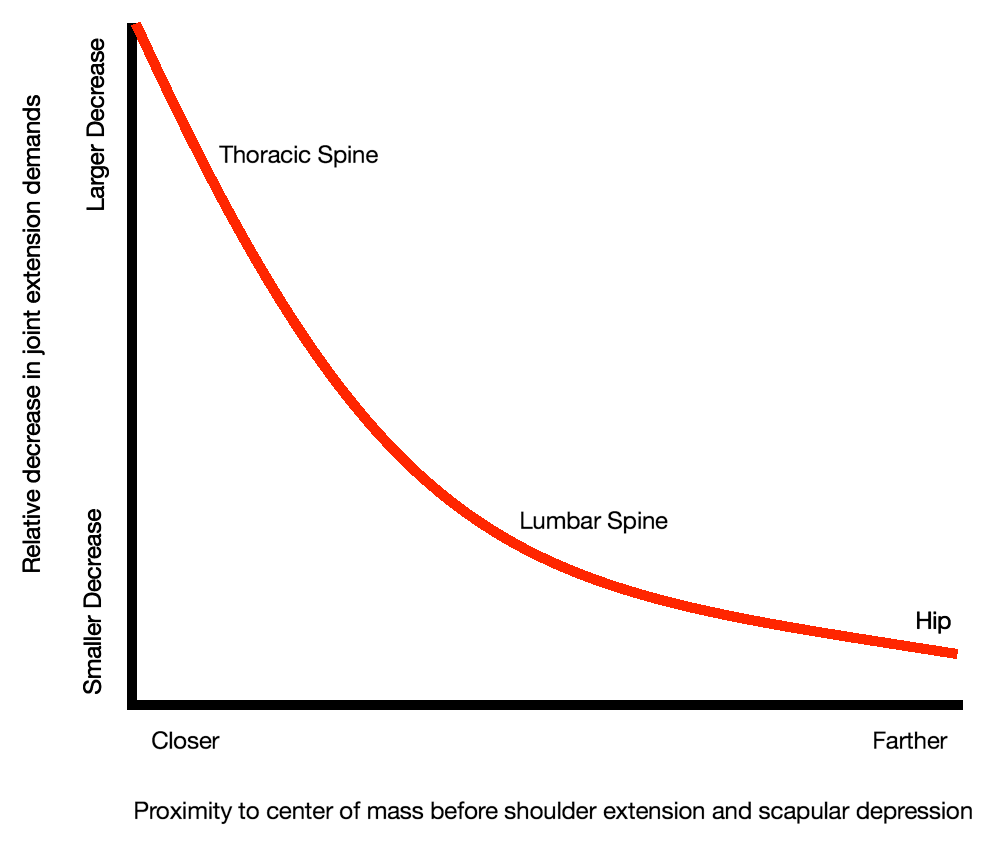
This should explain the general observation that engaging the lats and depressing the scapulae help the upper back stay tight when deadlifting, even though the lats don’t actively extend the spine, and the position of your scapulae doesn’t impact how well your spine can extend. The simplest explanation is that the slight repositioning of the bar (and the slight repositioning of your body over the bar) via these strategies actually makes the lift a bit easier on your upper back by reducing the spinal flexion moment imposed by the bar.
If you read this site consistently, all of this should sound pretty familiar. It’s very similar to a previous discussion of bar position in the squat; while variations in bar position (high bar vs. low bar vs. front squat) don’t make a huge difference for the lower back and hips (assuming you use similar cues), they do dramatically affect the demands placed on the thoracic spinal extensors.
Some useful cues for engaging your lats and depressing your scapulae are “put your shoulder blades in your back pocket” (I think I picked this one up from Tony Gentilcore) and “pull the bar into your shins” (focus on doing so from the shoulder like a straight arm pulldown; it’s easy to just sit way back behind the bar so that it scrapes your shins). Just simply focusing on pointing your elbows toward the wall behind you tends to help as well. This article has some more good cues.
If you’re not quite sure what engaging your lats in the deadlift should feel like, here’s a great drill I learned from Dean Somerset:
You can even make this drill a little more specific by putting the band around your wrist to free up your hands, and actually doing your first few deadlift warmup sets with anterior band tension to get your lats firing in the deadlift.
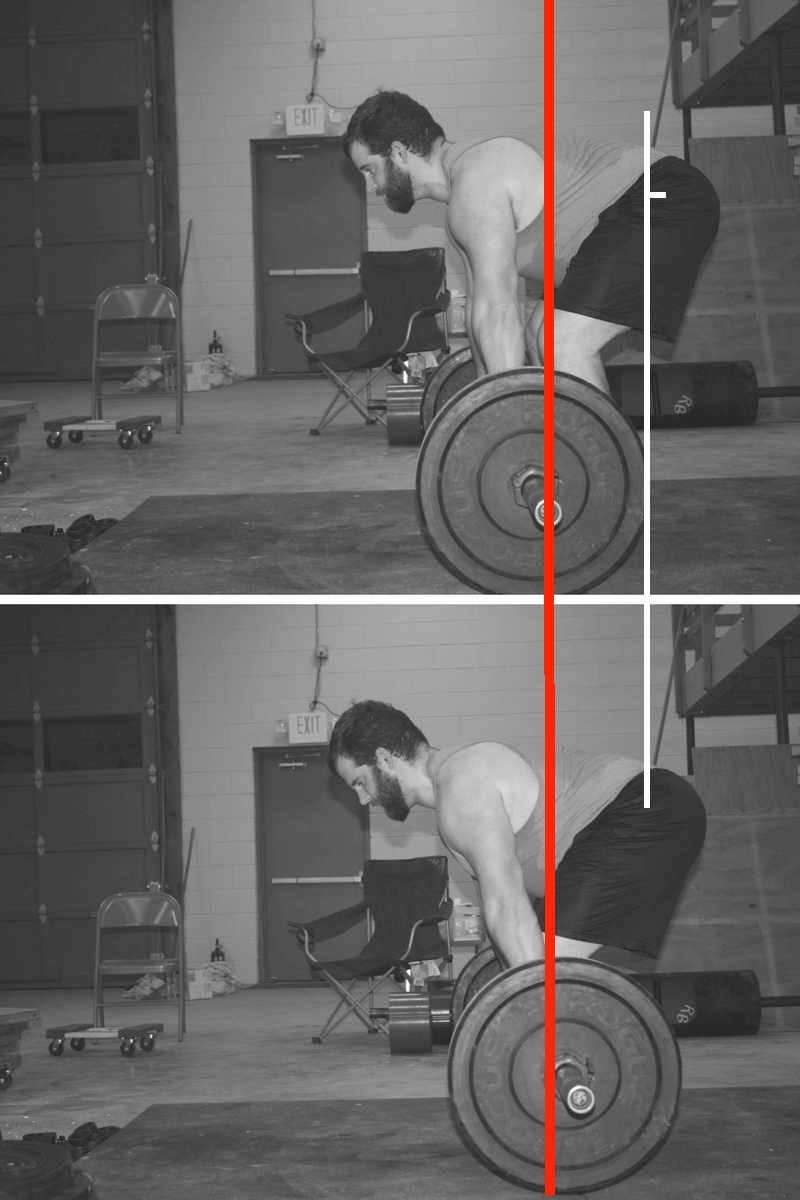
Bar Path
This slight technique shift should also make the deadlift slightly more efficient, with a bit less front-to-back deviation in bar path.
The center of gravity for the system needs to stay over midfoot. If the bar hangs straight below your shoulder, more of your bodyweight will necessarily be behind the bar, meaning the bar will need to start a bit farther in front of mid-foot, and the center of mass of your body will be a bit farther behind mid-foot. As you lift, the bar will need to drift back toward your body as your hips extend and your body’s center of mass shifts forward.
By engaging your lats, depressing your scapulae, and extending your shoulders a bit, you’re repositioning your body’s mass forward slightly, allowing the bar to shift backward a bit at the start of the pull, positioning the center of masses for both the bar and your body closer to the system’s center of gravity. As you extend your hips, your body’s center of mass won’t need to shift forward quite as much, so the bar won’t need to drift back quite as much, leading to a more linear bar path.
Indeed, this has actually been studied with intermediate-level weightlifters (average deadlift max was ~170kg/375lbs, though the image below is from a subject with a 1rm of 275kg/605lbs). Starting with the shoulders slightly more extended and the bar slightly closer to the ankle yielded 43-44% less front-to-back movement of the barbell versus starting the pull with the bar slightly farther forward, directly beneath the shoulder joint.
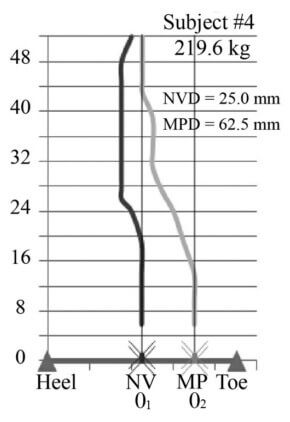
Now, it’s debatable whether a slightly more linear bar path really matters (since you’re trying to overcome gravity, which is pulling straight down, the additional effort required to move the bar front-to-back is negligible; as long as the system COM stays over mid-foot, deviations in bar path shouldn’t be a big deal), but if you’re more of a stickler about bar path than I am, this is another point in favor of actively engaging your lats in the deadlift.
Just to sum up this section: The primary role of the lats and scapular position in the deadlift is not to actively keep the upper back extended or “tight,” but rather to actively make the lift a bit easier on your entire posterior chain – a little easier for your hip extensors and lumbar extensors, and considerably easier for your thoracic extensors.
Engaging the lats in the deadlift seems to come fairly naturally for most people. Indeed, when you see a deadlift video dead on from the side (especially with experienced lifters), you’ll generally see that the bar is a bit behind the shoulder, meaning the lats must be engaged to extend the shoulder under load, even if the lifter isn’t consciously thinking about engaging their lats.
(This video shows a good example of how this looks with heavy weights: you’ll see that the bar isn’t very far behind the shoulder – because that would take ungodly strong lats – but it’s very clear that the bar isn’t directly under the shoulder until the bar passes the knee.)
However, if this is a topic you haven’t previously thought about much, it’s probably worth actively engaging your lats in your next few deadlift sessions to see if this little tweak helps the lift feel a bit easier, especially for your upper back. Make sure you don’t overdo this adjustment, though, shifting your weight way too far forward. Let your lat strength dictate where the bar goes, and the position of the rest of your body should naturally adjust accordingly.
If you want to get the most out of your lats in the deadlift, then you’d better train your lats! The heavier the weights get, the harder it is for you to extend your shoulder to a meaningful degree; the stronger your lats are, the more this little tweak will help you. Heavy rows of all sorts are your friend.
Shin angle
The last tiny consideration when setting up for a conventional deadlift is shin angle: Should you start the pull with a perfectly vertical tibia, or should your knees track forward a bit at the start of the pull?
This is something I mostly chalk up to personal preference, and I think its impact is very easy to overstate.
The vast majority of people miss the deadlift between a couple of inches off the floor and knee height (generally you can break the bar off the floor unless you took too big of a weight jump, and generally you can lock out a weight if you can get it past your knees). Even if you start the pull with your shins inclined forward a bit, they’ll have to get out of the way after the bar starts moving a bit. Otherwise, the bar will have to drift forward and you’ll lose your balance. Assuming you do a reasonably good job of keeping the weight balanced over mid-foot, your shins will be essentially vertical through the most critical part of the pull (if they’re inclined at all, it will only be by a few degrees), regardless of whether you start with vertical shins or a bit of forward knee travel.
With that in mind, degree of shin inclination at the start of the pull depends mainly on how you feel strongest breaking the bar off the floor.
Some people feel the strongest with more of a pure hinge pattern. Starting with their torsos more inclined and their knees a bit more extended gives them a little extra hamstrings tension that they can use to get the bar moving off the floor. These folks tend to feel strongest starting the pull with a vertical tibia.
Other folks (generally people with shorter arms, making it a little harder to get down to the bar in a pure hinge pattern) feel strongest with their knees over or slightly in front of the bar at the start of the pull. The decrease in hamstrings tension is compensated for by a little extra help from the quads to start driving the bar off the floor.
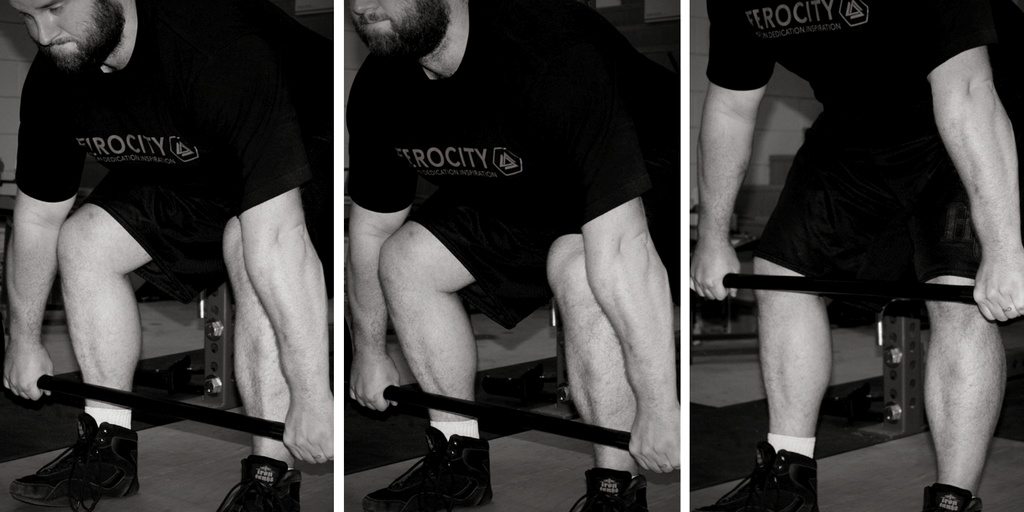
Again, once the bar starts moving, the knees are going to drift back, and the shins will move toward vertical regardless of shin angle at the very start of the lift. The difference in positioning is only meaningful for the first couple of inches of the pull. If you feel stronger breaking the bar off the floor with a more hamstrings-driven hinge, start with a vertical shin. If you feel stronger getting a little boost from your quads to get the bar moving, start with your shins inclined a few degrees and your knees over the bar.
Shin Angle: Sumo Contrast
As mentioned earlier, a general heuristic for finding your sumo stance is to start with a stance width where your shins are vertical when viewed from both the side and the front. You may feel strongest with a slightly narrower or (more often) slightly wider stance, but that’s a good starting point.
With the sumo deadlift, unlike the conventional, forward knee travel is much less common, and probably a bit more of a detriment. Theoretically, the same principles should still apply, but in practice, since maintaining your balance and staying in a perfect groove tend to be both more important and more challenging for the sumo deadlift, your shins getting in the way of the bar at the start of the lift or through the midrange – even slightly – is much more likely to make you fail a lift. So, with sumo, I think your best bet is to set up with vertical shins (viewed from the side – more leniency when viewed from the front/back) and maintain that vertical shin position throughout the lift, or at least until the bar clears your knees.
Lifting the damn bar
By this point, you should have everything related to the setup squared away. You should have your stance and grip set, have your deep breath, found your point of balance, engaged your lats, and pulled tension into your body. Now it’s time to actually pull some heavy weights.
The biggest key to picking a heavy bar up off the ground is … to pay as little attention to the bar as possible. Beyond gripping the bar and pulling the bar into your body to keep your lats engaged, your focus should not be on the bar itself.
When you focus on moving the bar, it’s easier to lose focus on what your body is doing. Generally, when people who are relatively new to the movement think “pick the bar up,” all the work they put into their setup goes out the window; their hips shoot way up, their back rounds, and they find themselves in a generally shitty (and less safe) position.
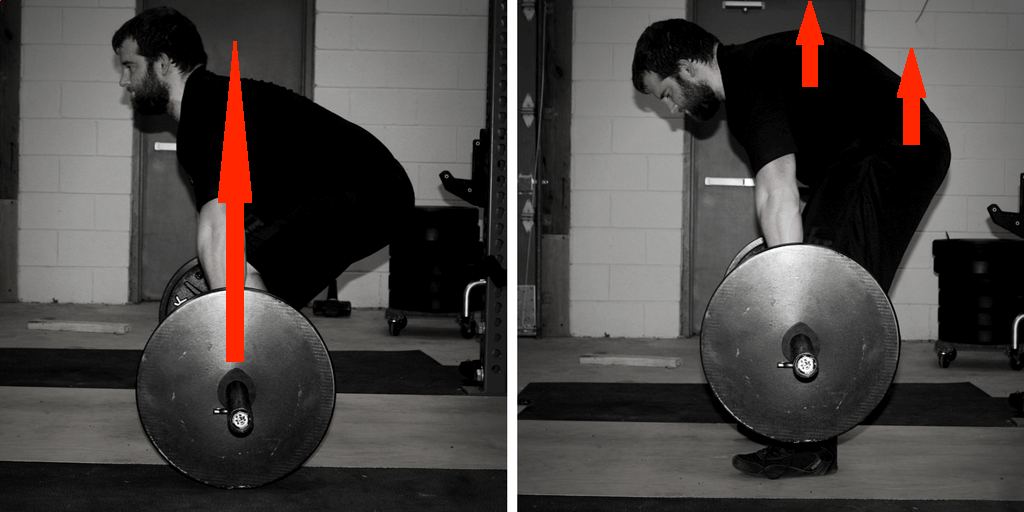
Instead, focus primarily on what your body is doing to ensure that 1) you don’t squander the setup you put so much attention into 2) you execute the lift as efficiently as possible.
To complete the lift, you need to extend your knees and hips while keeping your spine stiff.
Generally thinking “chest up” will help keep the spine stiff through the pull. That requires you to, at the very least, attempt to extend your thoracic spine. Most people will naturally extend their lumbar spine as well when attempting to extend their thoracic spine. Drive your chest up as you’re engaging your lats while setting up, and keep trying to drive it up throughout the pull. If your spine (lumbar, specifically) still has a tendency to flex when trying to drive your chest up, check out the section below in the FAQ about this problem.
To initiate the pull, think “drive the floor away.” For whatever reason, focusing on pushing the floor away instead of picking the bar up helps people keep their hips from rising too quickly at the start of the pull. This is the cue for just the first 3-4 inches of the pull; after that, it’s all about hip extension.
Once the bar’s moving off the floor, the quads aren’t going to be a major player anymore. At this point, it’s all about extending your hips without letting your spine flex excessively. The classic cues “shoulders back” and “hips forward” get the job done for most people.
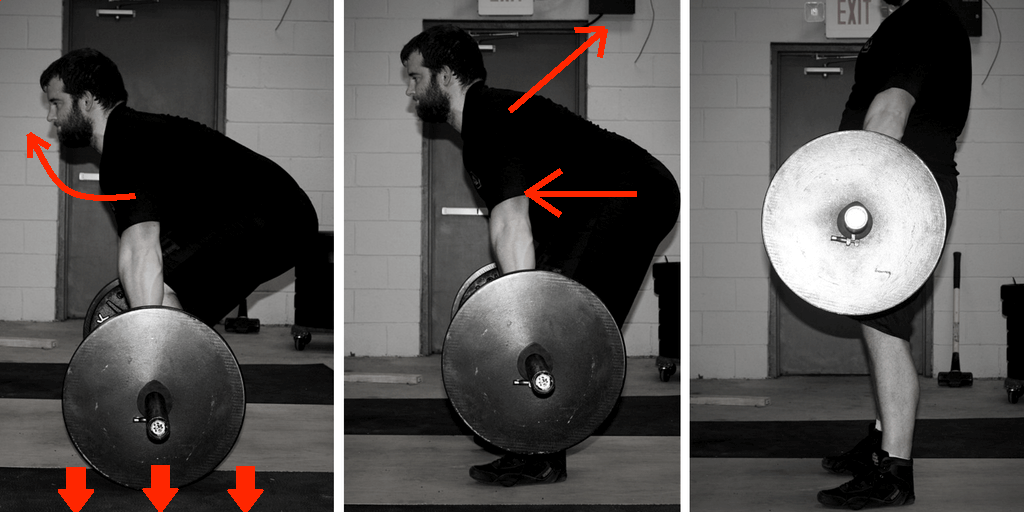
If you don’t understand what you’re going for with the “shoulders back” cue, try some high bar good mornings. The way you have to drive your traps back into the bar at the bottom of the good morning to initiate the ascent should give you a feel for “shoulders back.” Alternately, you can try some light deadlifts with a band around your upper back to accentuate the way the bar tries to pull you forward; the way you need to drive your shoulders back to resist the band is the same way you should drive them back with just the barbell.
If you don’t understand what you’re going for with the “hips forward” cues, two great exercises to try are hip thrusts and deadlifts with a band around your hips. Both require you to forcefully drive your hips forward in the same way you have to when deadlifting.
So, just to recap, use the cues “chest up” (in conjunction with a cue to engage lats if needed) through the entire pull, “drive the floor away” to initiate the pull off the floor, and “shoulders back, hips forward” once the bar starts moving. By focusing on these cues, which all relate to how your body moves through space instead of focusing on the bar itself, you’ll keep yourself in good positions to pull safely, powerfully, and efficiently.
When learning the movement, generally “chest up” (to keep the back tight) is the first cue to focus on. Once you don’t have any issues with keeping your spine extended with submaximal loads, move on to “push the floor away” if you have bigger issues at the bottom of the pull, and “shoulders back, hips forward” if you have bigger issues locking weights out. It’s very hard to focus on more than one (or two, at most) cues at a time, so pay the most mind to the one that addresses the biggest issue you’re having with the movement, and then move on to others once you’ve addressed the first problem.
One final consideration: Perform each rep as aggressively as possible, applying maximal force throughout the lift. Research has shown that lifting at maximal velocity causes roughly twice the strength gains of lifting at purposefully slower velocities. If you need to slow down the reps as you’re learning the movement, that’s totally fine. However, once you have the technique ingrained, rip every rep as powerfully as possible.
On top of the research backing this strategy, two of the strongest deadlifters of all time – Andy Bolton and Eddie Hall – both swear by “speed deadlifts” (still with 700-800+ pounds) for building their world record deadlifts.
Performing the pull: Sumo Contrast
With the sumo deadlift, the same basic cues apply, with two exceptions:
- The “drive the floor away” part tends to last a bit longer, since the lift is slightly more quad dominant and since your torso will be a little more upright through the whole lift.
- Just as with the setup, focus on forcefully “ripping the floor in half,” at least until the bar clears your knees. This will help you keep your knees out and keep your hips from drifting back.
In general, it’s a bit less likely for a sumo DL to pull you forward and round your spine excessively since your torso will be more upright throughout the entirety of the lift, so most people don’t need to focus on “shoulders back, hips forward” until the bar has cleared their knees and is nearing lockout.
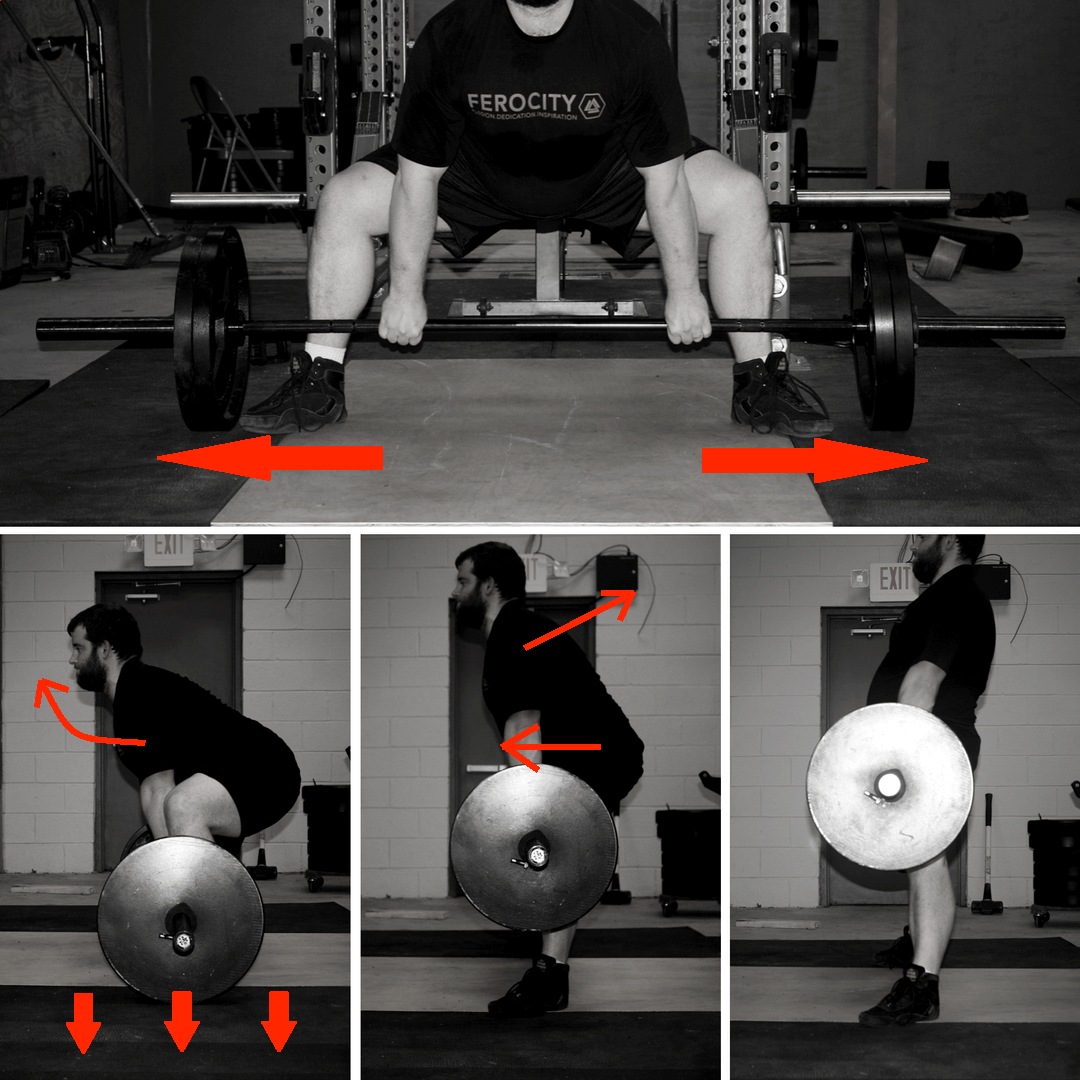
Locking out
To complete the lift, your spine, hips, and knees need to be straight – that’s all. You should just be standing upright in a pretty natural, neutral position.
Many people have a tendency to hyperextend their hips and spines at lockout. This is unnecessary for competitive purposes, and it’s unnecessary to gain the training effect you’re aiming for with the lift. It makes the lift harder without any real payoff.
Moreover, you’ll be more likely to re-flex your knees if you hyperextend at lockout, which will get your lift disqualified in competition.
Below are pictures of how your lockout should look, and what a hyperextended lockout looks like.
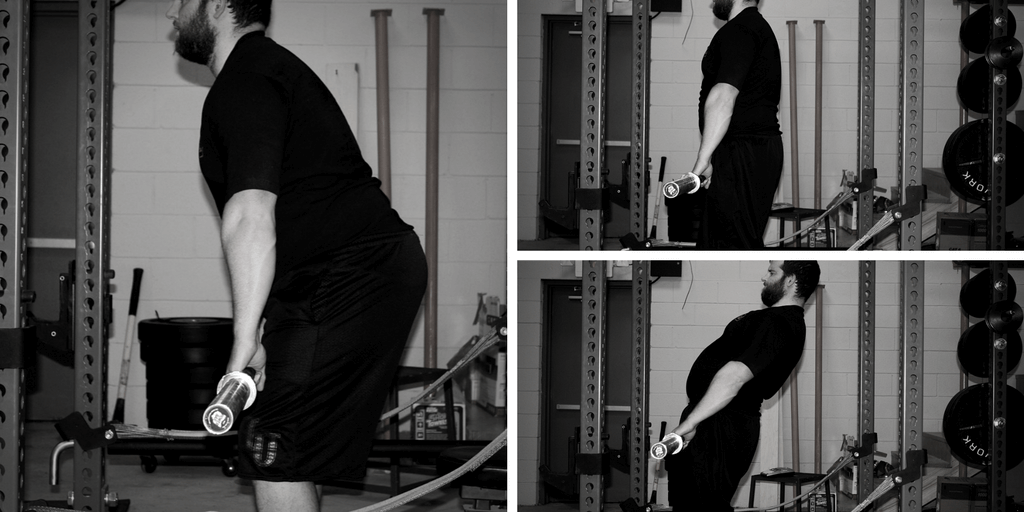
Many people who have issues locking out heavy pulls (and who are prone to hyperextending at lockout, even if they’re not trying to) can fix their problem simply by engaging the glutes properly.
A lot of people with lockout issues pull with anterior pelvic tilt and a very hamstrings-driven hinge pattern. When they’re reaching lockout, their lower backs are super arched, and the bar just stops moving right before the hips are fully locked out. If they do finish the pull, they’ll have to hyperextend to lock out the hips. By simply squeezing the glutes and bringing the pelvis back toward neutral alignment, they’ll be able to pop their hips forward to complete the lockout and avoid having to hyperextend at the top of the lift.
When you’re nearing lockout, you should still be thinking “shoulders back, hips forward,” but you should make sure the “hips forward” aspect is mainly accomplished by squeezing the glutes.
Put another way, the deadlift lockout is basically just a loaded pelvic thrust.

Simply practicing locking out forcefully with lighter loads will generally ingrain this pattern well enough, but adding in cable pull-throughs or kettlebell swings with a focus on squeezing the glutes and finishing the movement vertical instead of over-arched can help as well.
Lowering under control
Once you’ve completed the lift, the final step is sitting the bar back down.
You should sit the bar back down the same way you picked it up: under control and with your spine extended.
I frequently see one of two bad habits with sitting down deadlifts:
- Dropping the bar (this is a bad habit I’ll admit to having)
- Letting the back round and just generally not controlling the bar on the way down.
There are four main reasons I advocate for lowering deadlift reps under control:
1. Eccentric exercise seems to give a more potent hypertrophy (growth-promoting) stimulus than concentric exercise. At the very least, combined eccentric and concentric exercise seems to cause larger gains in size and strength than concentric exercise alone. This isn’t something you really need to worry about when performing most exercises, since the majority of exercises you’d perform in the weight room – squats, presses, pullups, rows, curls, etc. – have both an eccentric and concentric component unless you purposefully exclude either portion of the lift. With deadlifts, on the other hand, there’s no eccentric before the first rep, and you can effectively cut out the eccentric between reps by either completely dropping the bar, or by lowering the bar so quickly you’re really not resisting it on the way down. By doing so, you’re cutting out half of each rep, and losing some of the strength and growth-promoting potential.
2. Safety. This isn’t an issue if you just drop the bar, but if you don’t pay much mind to the eccentric part of each rep, your form can break down, your back can round, and you can unnecessarily increase your risk of injury.
3. Respect for the equipment. Some bars and weights are made to withstand being dropped (bars made for Olympic weightlifting, and rubberized plates used for Olympic weightlifting). Most standard power bars, however, will weaken and wear out faster if they’re frequently dropped (or effectively dropped, if you’re leaving your hands on the bar but not really resisting it on the way down), and metal weights can chip from being dropped repeatedly.
4. Preparing your body for the next rep. Your muscles and nervous system will be better-prepared to exert maximal force on each rep following a meaningful eccentric phase via the stretch shortening cycle. This would definitely apply for pulling touch-and-go style, but it would likely apply even if letting the bar rest for a moment and resetting between reps (the distinction will be discussed more later) since some of the components of the stretch shortening cycle seem to stick around for a couple of seconds after the initial stretch.
So, to lower the bar, simply sit it back down the same way you picked it up: chest up, hips back until the bar is to knee height, and continue pressing through the floor as you lower the bar back to the ground. Keep control of the bar, and make sure it only lightly makes contact with the floor.
I have a quick anecdote about using controlled eccentrics in the deadlift. I’ve mostly trained in “hardcore” gyms catering to powerlifters, Olympic weightlifters, or bodybuilders (at various times). Most of those places didn’t care much about dropping bars or about making a lot of noise sitting the bar down loudly (from not lowering it under control).
However, the two times I’ve made the fastest deadlift progress were when I trained at commercial gyms with strict rules about controlling the bar and not making much noise when deadlifting.
At first, these rules annoyed me since I was used to being a “hardcore” dickhead and making a ton of noise when I deadlifted, but I sucked it up and was respectful to other gymgoers, controlling my deadlifts and making sure I set the bar down gently between reps.
Even though my bench and squat have tended to make faster progress in gyms with a more “hardcore” environment conducive to heavy lifting, I’ve realized my deadlift increased much faster when I was training in those commercial gyms where I was forced to control the eccentric phase of the deadlift.
Obviously, there are plenty of confounding variables since my training style has also changed over time; however, that realization was enough to make me pay more attention to my deadlift eccentrics, even though I’m now training at another gym that’s more amenable to loud noises and dropping bars.
Diagnosing Weaknesses in the Deadlift
Diagnosing weaknesses for the conventional deadlift
Before we dive in: Poor technique can obviously limit your deadlift. Maybe you have issues maintaining your balance or getting in a good starting position, or maybe you’re struggling with cuing the lift to maintain your positioning and groove through the lift. Poor technique can cause issues at any point in the lift. In this section, I’m assuming you have good technique and are being limited by actual muscular weaknesses. Muscular weaknesses can cause technique issues with heavy weights, but you should be able to comfortably maintain good technique up to at least 70-80% 1rm before assuming your deadlift is being limited by specific muscular weaknesses and not simple technique issues.
Remember, there are four basic demands in the deadlift:
- Keep the spine extended (or re-extend the spine if you pull with some thoracic flexion).
- Extend the hips.
- Extend the knees.
- Hold onto the bar.
From the start, I’ll lead by saying that weak quads (issues extending the knees) are very rarely the limiting factor for conventional deadlifts. In two similarly well-trained cohorts of lifters, peak knee extension demands were roughly 5-6x as high for the squat than they were for the conventional deadlift. If your quads are just absurdly weak, they may limit deadlift performance, but assuming you’re doing some quad-dominant lifts in your training (squats, split squats, leg press, hack squat, etc.), your quads are probably never going to limit conventional deadlift performance.
Furthermore, if you’re limited by grip strength, that should be obvious: You just have issues holding onto heavy deadlifts. You shouldn’t have any issue diagnosing your weakness in that scenario.
So, in this section, I’ll mainly be discussing how you can know whether your spinal extensors or your hip extensors are limiting your deadlift.
It can be challenging to figure out when you’re being limited by your hips or your back. Generally when people miss a lift, their back starts to flex (or they stop the rep because they can tell their back is about to start flexing). The natural assumption is that the issue must be the spinal extensors because, after all, the back is rounding. However, when the spine flexes, it actually brings the hips slightly closer to the bar, making the lift a little easier on the hip extensors (this will be discussed in more detail later).
So, the challenge is to tease out whether the spine is flexing (or feels like it’s about to flex) because it’s not strong enough to hold the required isometric contraction/re-extend after flexing, or whether the spine is flexing a bit in an effort to aid the hip extensors by making the lift slightly easier on them.
Before addressing weaknesses, it’s important to first understand what’s “normal.”
For the conventional deadlift, midrange seems to be the weakest position. Highly trained lifters lifting max loads have a progressive drop-off in force output starting around mid-shin, with minimum bar velocity occurring around knee height.
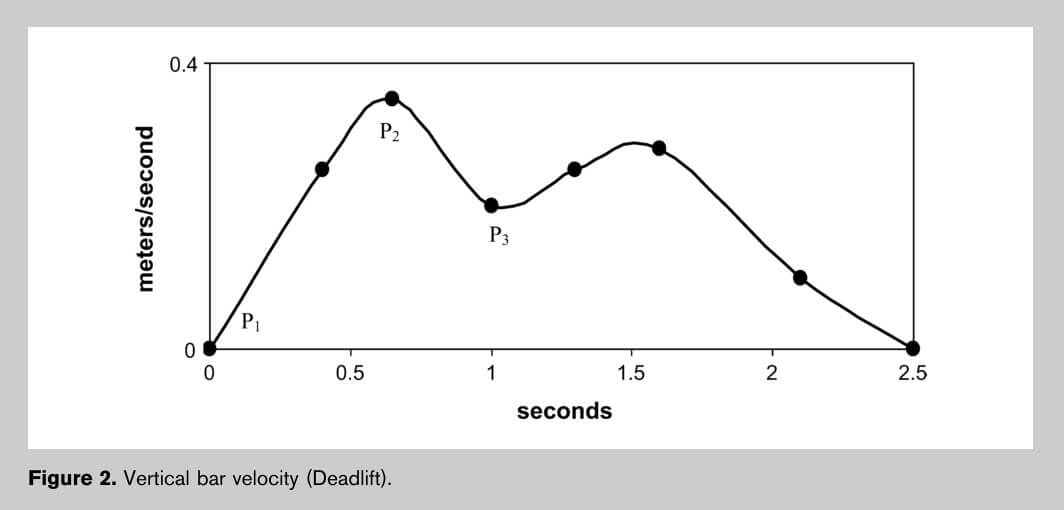
This research finding is borne out in practice as well. If you watch missed lifts from very strong deadlifters, most of them will be able to break the bar off the floor, but fail the lift at or below knee height. Generally, if they can get the bar more than an inch or two past their knees (without being pulled into a bad position), they can lock the lift out.
So, if that’s where you tend to miss conventional deadlifts, that’s not a specific, atypical weakness. You’re just missing lifts at the biomechanically weakest position, which is what “should” happen.
With that in mind, let’s examine the other ways you can miss a conventional deadlift and strategies you can use to address those issues:
Missing at the floor
Some people miss deadlifts because they either can’t move the bar off the floor, or the bar barely breaks off the floor and immediately stalls within the first couple of inches.
Now, there’s one obvious thing that can contribute to this sticking point: simply taking too big of weight jumps. If you’d be capable of grinding out a 500lb deadlift, but you take a jump from 475 to 550, then of course you aren’t going to be able to move the bar much (if any).
However, some people can grind out a 500lb deadlift, but a 510lb lift stays stapled to the floor or barely moves.
There’s a simple test you can use to see whether you’re being limited by your hips or your spinal extensors:
Warm up thoroughly, and deadlift full reps from the floor up to about 85% of your 1rm, controlling the eccentric of every rep.
Once you reach 85% of your max, set up hooks on a squat rack or set up blocks that would put the bar a couple of inches below lockout. Do eccentric-only reps with 90%, 95%, and 101-103% of your concentric 1rm (you’ll have to strip some weight between sets to re-rack the bar between sets). Unrack the bar, take a tiny step forward with your deadlift stance, and do a controlled eccentric rep while trying to keep your spine extended as your #1 priority. If you have partners, you can do these in a power rack instead. Pick the bar up off the safety pins, have your partners pull the safety out, and then perform the eccentric rep.
If the bar still causes your spine to start flexing on any of the reps, then you’re likely limited by back strength. (If your spine starts flexing at 90%, then there’s no need to do the reps at 95% and 101-103%.) Since your spinal erectors are primarily working isometrically, the eccentric and concentric should be similarly challenging. If they can hold up and keep your spine extended through a controlled eccentric, they should be strong enough for the concentric as well.
If you don’t have any issues keeping your spine extended on any of the reps, you’re probably limited by hip strength. Muscles are stronger eccentrically than concentrically, so being able to lower a weight under control that you can’t lift probably tells you that the muscles that are actually working concentrically and eccentrically (glutes, hamstrings, adductors) are limiting you.
And if you just can’t control the weight when lowering it? Then you need to stop being lazy and dropping your deadlifts in training. (And much like the scenario of your spine flexing, if you’re having trouble controlling one of the reps, there’s no point in continuing to add weight.) Building general eccentric strength for the deadlift should probably be a higher training priority than extra accessory work aimed specifically at the hip extensors or spinal erectors.
If this test told you that you were being limited by back strength, then back raises and heavy barbell rows are your best bets for accessory work. Reverse hypers and rack pulls/block pulls are good options as well.
If the test told you that you were being limited by hip strength, RDLs, good mornings, and hip thrusts are your best bet for accessory work. Back raises, hyperextensions, reverse hypers, and glute-ham raises are good options as well.
If you simply couldn’t control the eccentric, then just do your deadlift work sets with a controlled eccentric for a few months. That should be your highest training priority in the short term, since an eccentric strength deficit can increase your injury risk.
Now, this is all assuming you do actually have a strength deficit. If you have issues with your setup, that can cause issues off the floor as well. If you can’t get into the starting position without your lower back flexing (which is pretty common for people with big guts), or if you just feel incredibly uncomfortable when setting up for a deadlift, then your setup may be to blame for your strength deficit from the floor. If a big gut is causing setup issues, try pulling conventional with a slightly wider stance (so your stomach can go between your legs as it would in a squat), give sumo a shot, or lose some weight. If it’s simply a lack of comfort in the starting position, give paused deadlifts a shot; barely break the bar off the floor, hold it there for 2-3 seconds, and then pull the rep. That should help build comfort in that position.
It’s also possible that your hip extensors are strong enough in a general sense, but aren’t quite strong enough through the range of hip flexion required at the start of the deadlift; once you can extend your hips a tiny little bit, the bar moves just fine. However, in my experience, this isn’t incredibly common since you are regularly training your hip extensors through the required range of motion, assuming you regularly train the deadlift.
Missing at lockout
There are two characteristic ways to miss a conventional deadlift at lockout:
- You can get your hips fully extended (or almost fully extended), but you can’t re-extend your spine. This really only applies to round-backed deadlifters.
- You can keep your spine extended/re-extend your spine, but you can’t fully lock your hips out.
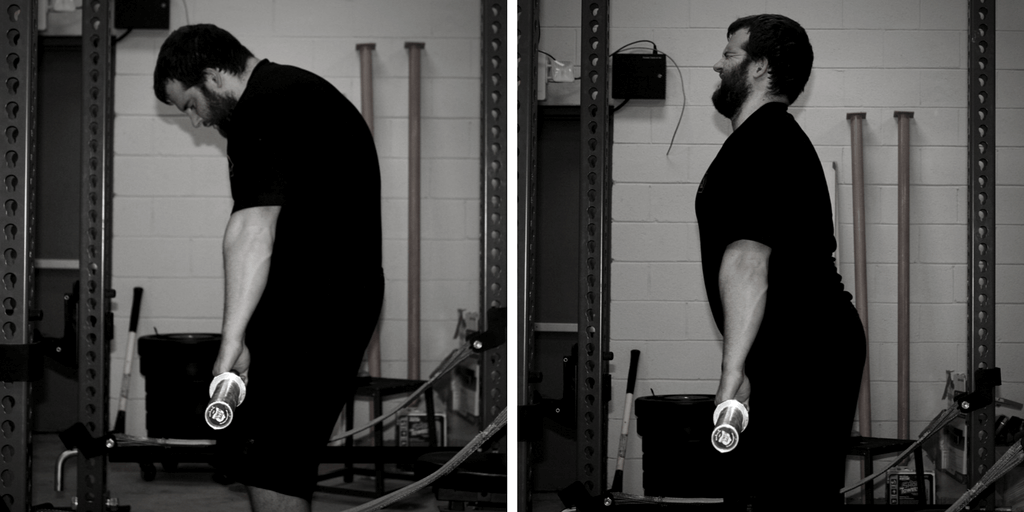
More often than not, the first issue is caused by spinal erector issues, and the latter issue is caused by hip extensors that are weak as they near full extension.
Simply because you’re more upright near lockout of a deadlift, demands on your spinal erectors are considerably lower at lockout than they are through the first part of a pull. However, muscles can produce more force isometrically (without changing length) than concentrically (shortening). This may be especially true of the spinal erectors, as there’s evidence that their maximal muscle activation drops off when the spine is considerably flexed.
To correct this issue, your best bet is simply to strengthen your spinal erectors, especially your thoracic erectors (since inability to re-extend your upper back is most common). The best exercise for this purpose is the front squat. High rack pulls/block pulls (from above the knee) can help as well, as long as you make sure your rack/block pull form mimics your deadlift form, and you don’t “cheat” the movement by turning it into what basically amounts to a squat.
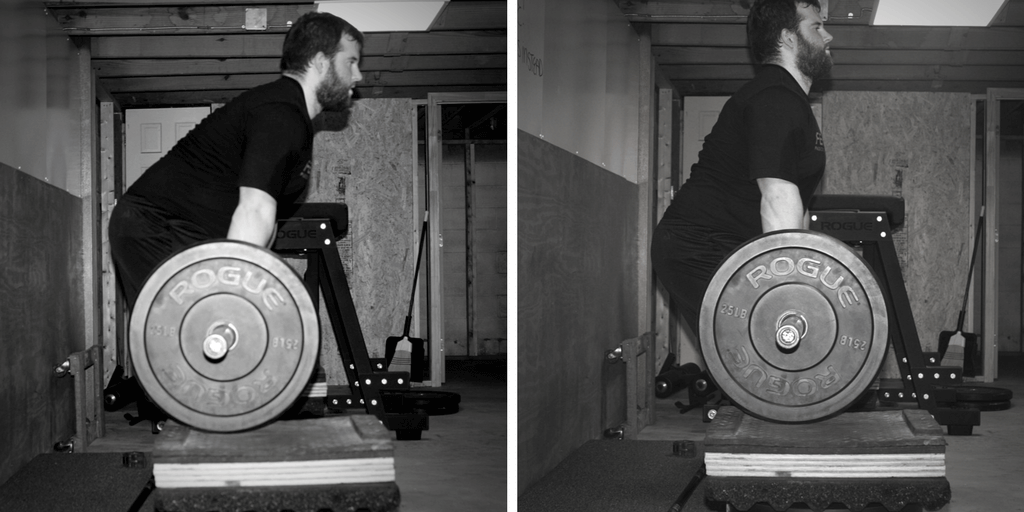
It may initially seem strange that hip strength could limit you at lockout. After all, your hips are considerably closer to the bar at lockout than they are off the floor, so the hip flexion moment imposed by the load is much smaller.
However, the amount of force your hip extensors can produce drops off as your hips get closer to full extension. So while the hip extension demands of the lift drop off, your capacity to produce a large hip extension moment is also dropping off. For most people, that’s not a big deal. The hip extension demands drop off faster than does their capacity to produce a hip extension moment, so lockout is a breeze. Some people, on the other hand, simply lose some “pop” from their hips faster as they approach lockout, so they have trouble locking their hips out at the top of the deadlift.
The two best exercises to address this issue are hip thrusts and kneeling squats with a band around your waist
Diagnosing weaknesses for the sumo deadlift
As with the conventional deadlift, weaknesses in the sumo deadlift are often simply the result of poor form. This is doubly true for the sumo deadlift, because balance can be more challenging since your feet are turned out. For example, you’ll sometimes see people miss heavy sumo deadlifts near where the bar clears their knees, not because they’re too weak to lock out the lift, but because they’ve let the weight drift too far forward, so they’ve wound up on their toes (not an ideal position to produce a lot of force). Again, this section presupposes that you have good technique, so you are limited by a specific muscular weakness and not simply by a technique issue.
As with the conventional deadlift, it’s first important to know what “normal” is. For the conventional deadlift, most people are weakest through the midrange of the pull. For the sumo deadlift, on the other hand, most people are weakest off the floor. If you talk to many sumo deadlifters, most will tell you that they’re sure they’ll complete the lift as soon as the bar breaks off the floor, or at least moves a couple of inches.
With this in mind, if you miss off the floor in a sumo deadlift – if the bar just won’t break the ground, or only moves an inch or two before stalling – you likely don’t have a specific weakness. You’re just too weak in general to lift the weight. Continuing to train the deadlift, potentially with some extra work for your hip extensors and quads, should keep your numbers moving up.
However, if you miss through the midrange or lockout, there may be some problems worth addressing.
Midrange
If you consistently miss sumo deadlifts through the midrange of the lift – in the vicinity of knee height – for reasons other than balance, then your quads and glutes are most likely at fault.
In general, I find that people who miss through the midrange of a sumo deadlift start the lift with their hips too high. However, this often isn’t a technique flaw; they don’t set up with their hips too high, but rather their hips shoot up and back as they initiate the pull.
Remember, you don’t want to start the lift with your hips too low. However, starting the lift with your hips too high can also be problematic, essentially turning the lift into a sumo stiff-legged deadlift.
Starting with your hips too high is a bigger disadvantage for the sumo deadlift than the conventional deadlift. In the conventional deadlift, your quads do play a role, but it’s a relatively small role. In the sumo deadlift, on the other hand, the quads play a crucially important role. The demands on the quads are roughly as large as the demands on the hip extensors when the bar’s on the floor, and still roughly 80% as high when the bar clears the knees.
When your hips shoot up and you take your quads out of the lift to some degree, that makes the lift unnecessarily difficult, especially through the midrange.
So why would someone wind up in this position?
The most likely explanation is that they have strong hamstrings relative to their glutes and quads. When their hips shoot up and their knees straighten a bit, it puts more tension on the hamstrings, allowing the lifter to rely on their hamstrings to play a larger role in breaking the bar off the floor.
However, once they’ve put themselves in a position that lets their hamstrings aid in the initial pull, they’ve also put themselves in a poor position to drive the bar through the midrange of the lift with an assist from the quads.
Extra glute and quad work tends to help with this problem. Once the glutes and quads get stronger, they can carry out their role of breaking the bar off the floor without needing the hips to shoot up. As soon as the lifter can maintain a good position when the bar breaks the floor, midrange is typically a breeze.
The most direct way to combat this issue is simply to use light enough weights in your working sets that you can maintain good positioning off the floor. If you can keep your hips in a good position with 80% of your 1rm, but your hips start to shoot up at 85%, then do your deadlift training with weights at or below 80%. If you can pull 5 reps with a given weight without your hips shooting up, but they start shooting up on the 6th rep, then do sets of 5 or fewer reps with that weight. Get in a lot of quality reps with proper technique to strengthen your quads and glutes for breaking the bar off the floor.
Another accessory lift you can try is bottom half paused deadlifts. Set up in your normal sumo stance, pause for a second as soon as the bar breaks the floor, pause at knee height, lower the bar back toward the floor under control, and pause again just above the floor. That’s 1 rep. Do sets of 5-10 reps with a strict focus on proper positioning.
Lockout
Much like the conventional deadlift, lockout weakness in the sumo deadlift could simply be an issue with lack of ROM-specific strength. If that’s the case, hip thrusts with a wide stance should help the issue dramatically (it may not be practical to do them with a stance as wide as your sumo deadlift, so just go as wide as is comfortable). You may also benefit from rack pulls or block pulls from knee height.
Furthermore, if you deadlift sumo with a rounded back and have issues re-extending your spine at the top of a pull, everything I said in the conventional deadlift section about that issue would apply here. However, that’s very, very rare.
In my experience, however, the most common causes of weak and failed lockouts in the sumo deadlift are technical.
The most common technical issue that leads to weak lockouts is having the weight too far forward when the bar clears the knees. With your weight on your toes, it’s hard to drive your hips forward to the bar, because doing so can shift your weight even farther forward and force you to drop the weight. Since you obviously don’t want to lose your balance forward, you’re forced to really pump the brakes as you try to lock the lift out, making lockout unnecessarily difficult. Refer to the sub-section about finding and improving balance in the setup and technique section above if this sounds like the problem you’re having with lockout.
The second most common issue is simply pulling with a stance that’s too wide. I see this more and more from new lifters who are trying to minimize range of motion at all costs, or mimic their powerlifting idols who deadlift with a super wide sumo stance.
Some people can simply produce a lot of power from their hips with a wide stance, and some people can’t (probably due to the shape of their pelvis and the location of the hip sockets). Some people can’t even get to full hip extension with a super wide stance in the first place! Someone like Andrey Belayev clearly has hips that allow him to lock out super wide sumo deadlifts with ease. However, other great sumo deadlifters, such as Ed Coan, needed a narrower stance.
To see if stance width is your issue, try some rack pulls or block pulls from just below knee height. Start with your normal sumo deadlift stance, and then try a few reps with a slightly narrower stance, or with your feet pointed slightly more forward. Just continue experimenting with stance widths and toe angles until you find the combination that produces the most powerful lockout.
One final note on weaknesses in the sumo deadlift:
You’ll notice I didn’t say anything about the spinal erectors in this section. That’s because the sumo deadlift is limited by spinal erector strength much less often than is the conventional deadlift. You can execute the lift with your torso a bit more upright, so it’s just not quite as challenging for the back. My general recommendation to ensure that back strength never becomes a limiting factor for your sumo deadlift is to keep some conventional deadlifts in your training program even if your dominant stance is sumo. That, by itself, should ensure that back strength doesn’t ever become a limiting factor.
VI. Frequently Asked Questions
Should I deadlift sumo or conventional?
People ask me all the time if there’s an easy way to know if they’re best-suited for the sumo or conventional deadlift.
There’s not.
Speaking in generalities, the smaller you are, the more likely it is that sumo will be your best stance, and the larger you are, the more likely it is that conventional will be your best stance. At the very least, that’s the trend you tend to see among the best lifters in the world. However, size is no guarantor; there are still good lightweight conventional deadlifters, and good heavyweight sumo deadlifters.

There are some ideas floating around concerning limb lengths and body segment ratios as predictive factors. However, I’m not sure those ideas hold any water; anthropometric factors that would be beneficial for one deadlift stance (i.e. long arms) would be beneficial for the other one as well.
When comparing the two lifts:
- They require slightly different things from your hips. The conventional deadlift requires a lot of straight-ahead hip flexion, whereas the sumo deadlift demands more hip abduction. Some people will simply have hips and pelvises that are better suited for one variant over the other. The hip extension demands themselves are quite similar between the two variants of the lift, so neither is easier for the hips in a general sense, but one may be considerably easier on your hips simply due to your unique hip structure.
- The sumo deadlift places considerably higher demands on the quads. Someone with a poor squat may also struggle with the sumo deadlift but do very well pulling conventional, whereas very strong squatters (especially wide stance squatters) often take to the sumo deadlift very naturally.
- The demands on the back are roughly 10% higher in the conventional deadlift. If you have a very strong back that won’t be a limiting factor, the conventional deadlift may be perfect for you. If your back is weaker (especially if you have strong quads and the requisite mobility), the sumo deadlift will likely be easier for you.
My best advice is simply to experiment with both styles for a while. They complement each other well anyways. Sumo deadlifts allow a conventional deadlifter to train the general deadlift pattern a bit more frequently without being as limited by back fatigue. On the other hand, sumo deadlifters often get achy hips from high volumes of exclusively sumo deadlifts, and can give their hips a break (while ensuring back strength won’t limit their sumo pull) by training the conventional deadlift.
Once you have at least 6-12 months of both pulling styles under your belt, you should have a pretty good idea of which style is stronger and more comfortable for you. Stick with that as your primary deadlift style.
What’s the point of chalk and baby powder?
You may see serious powerlifters putting chalk on their hands before a heavy deadlift attempt, or putting baby powder on their legs.
Both are used to manipulate friction.
Chalk increases the friction between your hands and the bar, independently and by soaking up any moisture on your hands to make them a bit less slippery. This can let you grip considerably heavier loads more comfortably.
If your gym doesn’t allow normal chalk (because yes, it can be very messy), see if they’ll allow you to use a chalk bag (like the ones gymnasts and climbers use; you can keep it in a large ziplock bag to contain the spread of chalk) or liquid chalk. Liquid chalk is normal lifting chalk dissolved in an alcohol-based medium that rapidly dries after application (like hand sanitizer), leaving the chalk behind on your hands. This keeps chalk dust from spreading.
Baby powder, on the other hand, decreases the friction between the bar and your legs. I wouldn’t recommend using baby powder for normal training, but putting baby powder on your thighs before you attempt a big pull in a meet can make a big difference, especially if you’re weakest at lockout. Just make sure you don’t get any baby powder on your hands when applying it, since that can make it harder to grip the bar. Sprinkle some powder on your legs, and rub it evenly over your thighs with the bottom of the powder bottle.
Is it necessary to start the lift with a perfectly vertical shin?
This was already covered in the setup section, but I thought it was important to cover it again in the FAQ since I see this question/issue frequently.
No, a vertical shin isn’t required at the start of the lift. Whether or not you’re strongest with a vertical shin will largely depend on the relative strength of your quads and hamstrings. If you have stronger quads, starting with your shins inclined a bit and your knees over the bar will allow you to get a little extra drive from your quads to help break the bar off the floor. If your hamstrings are stronger, on the other hand, a vertical shin position will necessitate slightly higher hips at the start of the pull, putting more tension on the hamstrings, thus allowing them to be a bit more involved in breaking the bar off the floor in more of a pure hinge pattern.
The key is simply that your shins and knees get out of the way of the bar after it breaks off the floor. If your shins stay too inclined for too long, they can force the bar to drift forward, throwing you off balance. (This isn’t a major concern for people with a reasonable amount of experience with the lift and a modicum of kinesthetic awareness. After a few shaky reps when learning the lift, most people don’t have any issue with getting their knees out of the way of the bar, even if they pull with their shins inclined at the start of the lift).
Ramping vs. Scooping: Making Lockout Easier
This is a little deadlift tip that can be a lifesaver if you have lockout problems, but it tiptoes along the line of legal technique. It’s mainly applicable to the conventional deadlift.
Once the bar clears your knees, you can immediately start driving your knees back forward under the bar, and slide the bar up your thighs to complete the lift. This will bring your hips closer to the bar, making lockout easier for your hips and back, though slightly harder on your grip (since there will be more friction between your thighs and the bar).
This technique is distinct from hitching – bouncing the weight up and down as you inch it up your thighs – because it’s done in one fluid movement.
Some judges may give you red lights (disqualify the lift) for this technique, but it’s largely a judgment call since most lifters will have some degree of contact between the bar and their thighs as they approach lockout anyways. The key for getting a lift passed with this technique is to make sure it’s executed as one fluid movement. If you rest the bar on your thighs and let it remain motionless for a moment before finishing the pull, you’ll generally get red lights. If you just shift your knees forward a bit and continue the lift as usual, most judges will be fine with it.
Under “Causes for Disqualification of the Deadlift,” the rule reads:
“Supporting the bar on the thighs during the performance of the lift. If the bar edges up the thigh but is not supported this is not reason for disqualification. The lifter should benefit in all decisions of doubt made by the referee.”
The image illustrating the bar resting on the thighs shows the skin and muscle pushed down below where the bar is resting, indicating that the bar is just sitting there motionless. As long as you continue the lift in one fluid motion, it should get white lights in competition (because it’s technically within the bounds of the rules).
However, you’d get red lighted for deadlift lockouts that look like these:
If you don’t have any issues with lockout, there’s really no point in learning this technique (there’s no point in taking a risk of getting a lift turned down for a technical violation if you don’t need to, no matter how small that risk is), but it’s probably worth learning and practicing if lockout is problematic for you.
When you’re pulling multiple reps in a set, should you reset between reps, or pull touch-and-go?
Some people argue that it’s better to reset between every rep when you’re deadlifting for multiple reps due to specificity: Since you have to pull the bar from a dead start when attempting a one rep max, you should pull every rep from a dead start as well to get as much practice as possible.
Other people argue that touch-and-go is better since you can generally pull more reps with a given weight or pull the same number of reps with a heavier weight with a touch-and-go technique, thus allowing for higher training volumes (and thus faster gains in muscle and strength, in all likelihood).
I think the most important question to ask is this: Do you make technical errors when attempting heavy singles, or on your first rep of sets with loads in excess of 80% of your 1rm?
If you do, then I think it’s important to reset between reps to get more practice setting up and honing your technique.
If your form is dialed in with heavy singles, then I think you can pull touch-and-go if that’s your preference.
The second most important question relates to safety: Which technique best allows you to maintain safe technique (keeping lumbar spine extension) as a set progresses?
One benefit of touch-and-go reps is that they typically force people to maintain core tension and spinal extension on the eccentric to put themselves in a good position to start the next rep, and since one rep flows into the next, they maintain the core tension and spinal position established on the eccentric.
Since you can relax for a moment between reps when resetting, it can be a bit easier to let core tension and spinal positioning slip a bit rep to rep as you fatigue. Maybe the first rep is flawless, but each subsequent rep looks more and more like a scared cat as you fatigue and put a little less effort into creating tension before each successive rep.
Now, I’m obviously speaking in generalities here. Some people use terrible form for touch-and-go reps, and some people fastidiously maintain technique when resetting between reps (which should be the point of resetting between reps in the first place).
Whichever technique better allows you to maintain constant form rep-to-rep is probably the better technique for you. Plenty of good lifters reset between reps, and plenty of good lifters pull touch and go.
If you settle on touch-and-go, though, beware of rep max calculators. It’s not too uncommon for people to be able to pull, say, 5-8 reps with 90% of their 1rm touch-and-go. You may think you’re set to pull 530-560 after pulling 450 for 5-8 reps and plugging those numbers into a rep max calculator, only to be disappointed to find out you top out around 500. This is a “problem” with deadlift in general, I’ll note, but it tends to be a bigger problem when pulling touch-and-go.
The role of lats
I’ve got an entire article on this topic here.
This was mentioned above in the technique and setup section, but it bears repeating again.
The lats can’t help extend the spine to a meaningful degree. However, they can be used to reposition the bar relative to your shoulders, hips, and spine, slightly reducing lumbar and hip extension demands and dramatically decreasing thoracic extension demands.
This makes the lift feel considerably easier for your upper back, while also allowing you to lift slightly more weight since your hips or lower back are likely to be bottlenecking performance.
Head position
You’ll notice that the setup section didn’t spend much time talking about head position.
That’s because it really doesn’t matter in a general sense.
Some people argue that the lifter should look up, contending that with the cervical spine (neck) extended, you’ll have an easier time naturally keeping your thoracic and lumbar spine extended as well.
There’s likely some truth to that.
Other people argue that the lifter should look down, especially at the start of the lift, contending that the spine should remain in neutral alignment from top to bottom. Since the torso is inclined forward, raising the head would take the cervical spine out of neutral alignment, which (presumably) increases your risk of neck injuries.
There may be a shred of truth to that. I’ve only seen two neck issues arise from the thousands of deadlifts I’ve seen. Both were mildly strained neck muscles, and both were from people looking up when they deadlifted. (Several of your neck muscles attach somewhere on your skull, and also attach to your clavicle. The clavicles tend to depress when locking out a deadlift, so if your head is also up, that can put a weighted stretch on those muscles.)
Still, I don’t think either position is really worth generalizing into a universal law of good deadlift technique.
While it’s true that many people will naturally have an easier time keeping their thoracic and lumbar spines extended if their heads are up, it also (generally) doesn’t take long to learn how to maintain lumbar and thoracic extension with your neck in a neutral position.
And while it may be true (emphasis on “may”) that looking up could possible increase your risk of a neck strain slightly, I have to emphasize that the absolute risk is still unbelievably low. If it doubles your risk of a neck strain, but the baseline risk was 1 in 10,000, then you’re still probably safe at 1 in 5,000, for example.
I think you’re likely fine experimenting with both head positions and seeing what feels best for you.
If you feel stronger and more comfortable with your head up, then pull with your head up (many strong people swear this makes lockout easier). If you feel stronger and more comfortable with your head down at the start of the lift, then pull with your head down (many strong people swear this makes it easier to break the bar off the floor).
Improving grip strength for the deadlift
If you can’t hold onto the bar when attempting max deadlifts, or if there’s a big gap between what you can pull with straps versus without straps, then your first order of business should obviously be to improve your grip strength.
One thing worth noting first, though: If you don’t regularly pull with chalk, then your grip may not actually be a limiting factor, since chalk can often increase the amount of weight you can grip pretty dramatically.
Many people go about training their deadlift grip the wrong way (or at least in an inefficient way).
You have two primary types of grip strength: crushing grip and support grip.
Crushing grip is exactly what it sounds like: the amount of force you can produce while closing your hand.
Support grip, on the other hand, is the amount of force your grip can withstand before your hand is pulled open.
Essentially, crushing grip is concentric strength, and support grip is isometric strength. The two are roughly correlated, but they’re not synonymous, and an increase in one doesn’t guarantee an increase in the other.
The deadlift requires support grip, and the principle of specificity applies to grip training the same way it applies to squatting or benching or deadlifting.
However, when people have a grip problem in the deadlift, they’ll often train their grip with hand grippers (like the Captains of Crush). Grippers train crushing grip, though. They may increase your support grip for the deadlift a bit, but not to a huge degree.
Another mistake people make is by training support grip with implements that aren’t similar in size to a deadlift bar. For example, a common prescription for grip woes is fat bar or axle deadlifts.
This would be like trying to improve your ass-to-grass squat by training half squats. Sure, your ass-to-grass squat may improve a bit from half squatting, but it would have improved more by squatting ass-to-grass. Fat bar work does train support grip, but it trains it with joint angles and muscle lengths that aren’t maximally specific to the implement you’re deadlifting with – a barbell with a normal diameter. Just because fat bar grip work is hard, that doesn’t necessarily mean it’s maximally effective for improving your deadlift-specific grip.
To train your deadlift support grip, the best grip work you can do is with a normal barbell, or with implements similar in diameter to a barbell.
The easiest and (in my opinion) most effective way to implement grip training for the deadlift is simply with timed deadlift holds.
Find a weight you can only grip for about 15-20 seconds. Hold it for as long as you can, rest for 3-5 minutes, and repeat. Do this for 3-4 sets (after your regular deadlift training), 2-3 times per week. Once you clear 20 seconds with a given weight, go up in weight. Some people prefer to do their grip work double overhand to make it harder, but in my opinion, it’s better to do it with either a mixed grip or a hook grip (whichever is your primary grip style) to maximize specificity.
If you want a little more variety in your grip training, other options include: timed hangs from a pull-up bar (you can do these weighted as well, which may be preferable if your back and traps are exhausted after deadlifting); one-handed barbell holds; double overhand shrugs, rows, and deadlifts; and farmers walks with dumbbells.
Troubleshooting deadlift training
The deadlift, more than any other lift, requires a personalized approach to training.
I find that good bench programs and good squat programs work reasonably well for the majority of people. Some people get great results and some people get mediocre results, but all the results at least trend in a positive direction. Tweaking squat and bench programs is usually pretty straightforward as well: Just find someone’s sweet spot for volume, maybe add an accessory lift or two to address a specific weakness, and the gains should start rolling in.
That’s not the case with the deadlift to nearly the same degree, in my experience. I’ve found, with myself and with lifters I’ve coached, that the deadlift is just a lot more finicky, and an optimized deadlift has considerably greater variability lifter-to-lifter.
Here are some general rules of thumb, though:
- Start off with about 1/2-2/3 as much training volume for your deadlift as for your squat, as it tends to be a bit more fatiguing than the squat.
- The deadlift generally responds best to a fairly high frequency of hinge-pattern work, but a relatively low frequency of actual deadlifting. I find that around 50% of people do best deadlifting once per week, around 25% of people do best deadlifting twice per week, around 15% of people do best deadlifting less than once per week (i.e. twice per 3 weeks), and only around 10% of people do best deadlifting 3 or more times per week. However, most people also have faster gains in their deadlift if they do hinge-pattern work like weighted back raises/hyperextensions, RDLs, heavy KB swings, good mornings, etc., at least 3 days per week, allowing them to train the muscles used in the deadlift and ingrain the basic motor patterns without the fatigue of heavy pulling.
- People who are built better for the deadlift (long arms relative to their body height) and people who pull sumo can generally train the deadlift more frequently and with higher volumes.
- People whose deadlift is limited by back strength are more likely to get worn down by high volume or high-intensity deadlift sessions than are people who are limited by hip strength. Being diligent about accessory work for your back (like weighted back raises/hyperextensions) generally increases the deadlift volume you can handle, and decreases the fatigue from each deadlift session.
- The better and more consistent your technique gets, the higher deadlift volumes you can generally handle.
- If your legs or hips feel a little worn down when you start a squat day, you can probably still get some productive work in, and would be better off completing your session instead of pushing it back or skimping on it. If your hips or back feel tired and beat up at the start of a deadlift session, on the other hand, it’s generally a good idea to push the session off for a day or two until you’re feeling fresher. Pulling hard when you already feel quite fatigued generally just digs a deeper recovery hole and throws off the next 3-4 days of training without a meaningful payoff.
In short, be a bit more conservative with your deadlift training than you would be with your squat or bench training, and prioritize building back strength. The stronger and more resilient your back is, the easier each deadlift session will feel, and the more often you’ll be able to train the deadlift.
Difference in hip height/technique with different body proportions
Hip height at the start of the deadlift riles up the internet form police more than any deadlift issue except for spinal flexion.
However, 9 times out of 10, people’s hip height at the start of a deadlift is perfectly fine.
This is basic geometry.
There are four body segments that, for all intents and purposes, don’t change in length: Your arms, your tibia, your femur, and your torso. (The next section will cover how that isn’t entirely true for the spine in the context of hip extension demands, but the degree of change is small enough that it wouldn’t change the big picture for this section.)
These four segments are connected, and the positioning of one segment will affect the positioning of adjacent segments.
Furthermore, there are constraints on two of the segments: The angle of the arm will be somewhere between perpendicular to the ground (hand and barbell directly below the shoulder) and inclined 2-3 degrees (hand and barbell slightly behind the shoulder with the lats engaged). And the shin can be inclined 10-20 degrees at most at the start of the lift, though it will soon move to an approximately vertical position soon after the bar breaks off the floor.
Therefore, to simplify things, we’ll just assume for now that the arm and shin are both perpendicular to the floor.
That leaves us with just two segments: the torso and the femur. Since the height of the bar off the floor is fixed by the radius of a 45lb/20kg plate, the position of the shoulder is fixed (assuming the bar is perpendicular to the floor and doesn’t change length), and the position of the knee is fixed (assuming the shin is perpendicular to the floor and doesn’t change length), there is only one possible hip position where the bottom of the torso segment meets the top of the femur segment.
In other words, hip position at the start of the pull is determined and constrained, under normal circumstances, by basic geometry.
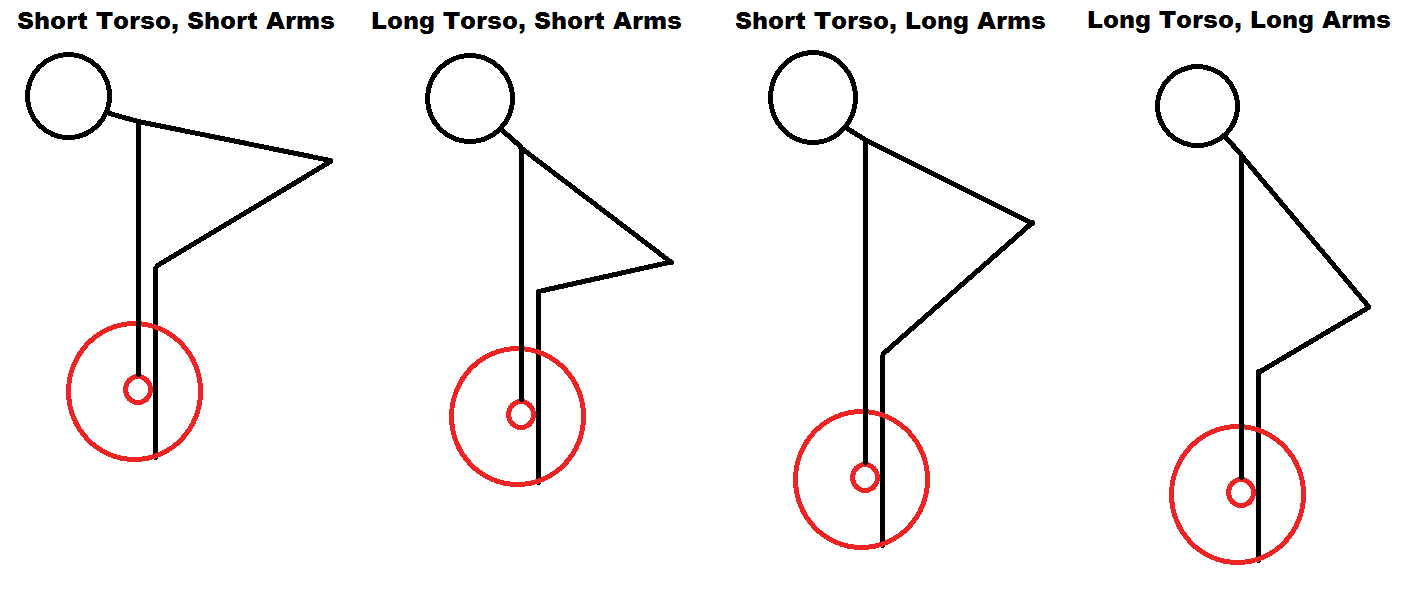
All other things being equal:
- If your arms are longer, your hips will start lower.
- If your torso is longer, your hips will start lower.
- If your femurs are longer, your hips will start higher.
- If your tibias are longer, your hips will start higher.
If we remove the assumption that your arms and shins must be perpendicular to the floor:
- If your shoulders are more extended and your arms are more inclined, your hips will start slightly higher.
- If your shins are more inclined, your hips will start slightly lower.
- If your shins move past vertical, your hips will start slightly higher.
However, none of those things will affect hip height to a great degree because the capacity of additional shoulder extension with heavy loads is limited, and because the shins simply can’t be very inclined after the first inch or two of the pull. In other words, slight shin inclination and slight shoulder flexion affect hip height far less than do the relative lengths of your arms, torso, femurs, and tibias.
Now, it is possible to start with your hips a bit too high. If you’re stronger with slight shin inclination (using your quads to help break the bar off the floor) and your shins move toward vertical before the bar breaks the ground, you’ll be pulling with your hips slightly too high. If you’re pulling sumo and your knees straighten prematurely, you’ll be pulling with your hips slightly too high (likely due to weak quads/glutes, so your knees extend and your butt kicks back to put more tension on your hamstrings so they can help more with initiating the lift).
It’s also possible to start with your hips a bit too low. If your hips start so low and your shins are inclined so far forward that they get in the way of the bar, shifting the bar forward and throwing you off balance, then your hips started slightly too low. If you’re strongest pulling conventional with a vertical tibia, relying a bit more on your hamstrings than your quads to break the bar off the floor, and your shins are inclined farther forward than is optimal for you, then your hips started slightly too low. If you set up by squatting down loosely to the bar instead of spreading the floor and actively pulling your hips down into position, you may start with your hips slightly too low.
But, for the most part, your hip height at the start of a deadlift is dictated by the relative lengths of your arms, torso, femurs, and tibias. 9 times out of 10, people who are castigated for deadlifting with their hips too high are just people who are built in such a manner that they have to pull with high hips. People who are berated for deadlifting with their hips too low are just people who are built in such a manner that they have to pull with low hips. Your technique doesn’t have to look identical to other lifters’ for it to still be within the realm of acceptable technique.
Spinal Flexion and Hip Extension Demands
As alluded to in the “fixing weaknesses” section, spinal flexion in the deadlift isn’t always because of spinal erector weakness.
When your spine flexes, it gets slightly “shorter” front-to-back. This reduces your hip extension demands slightly by bringing your hips a bit closer to the bar.
The degree to which it flexes will determine how much your hip extension demands actually decrease, but around 5% is probably around the average.
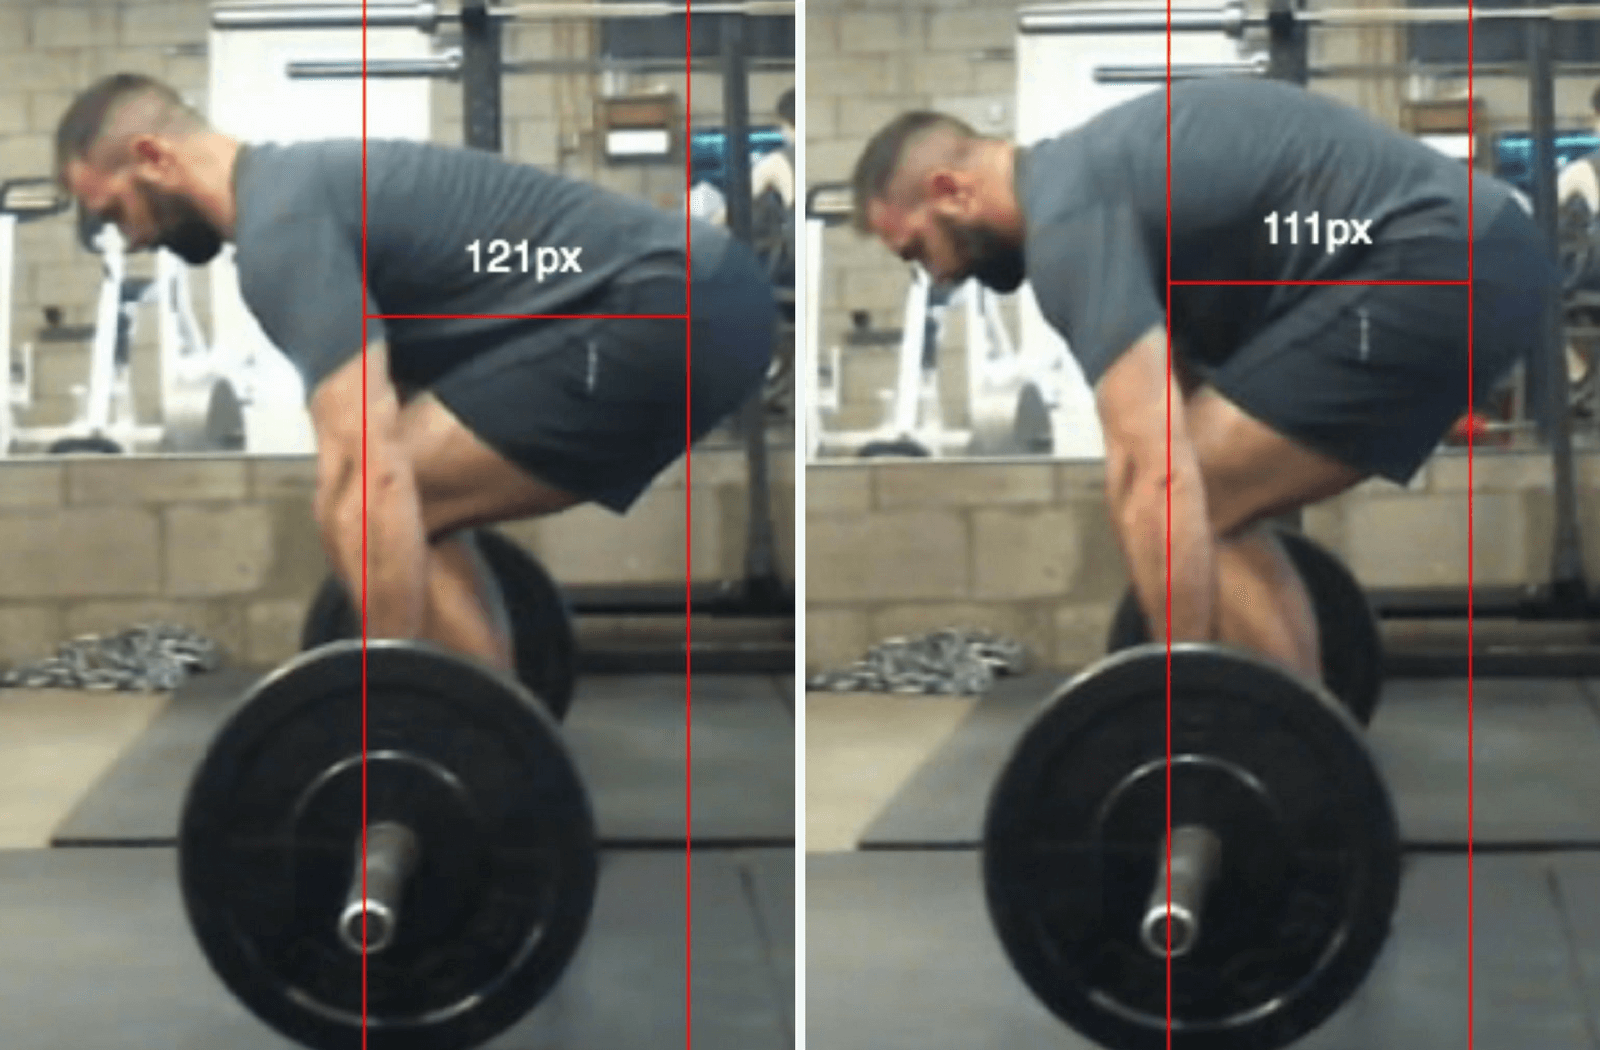
Because of this, many people who are limited by their hip extensor strength find they can pull a bit more weight with spinal flexion. Their back isn’t flexing because it’s too weak; their back is flexing because their hip extensors were maxed out at 95% of 1rm when they were pulling with a flat back, but some spinal flexion ensures that 100% of 1rm isn’t any more challenging for their hip extensors than 95% of 1rm was.
As a general heuristic, if you can pull up to 90-95% of your 1rm before any spinal flexion starts taking place, but you get a little sloppy on 1rm attempts, your spine is probably flexing to compensate for your hips, not because your spinal erectors aren’t strong enough to keep your spine extended.
If, on the other hand, your spine starts flexing with loads below 90% of your 1rm (even when you’re trying your hardest to keep it extended), your spinal erectors may be your weak link.
This may seem counterintuitive, especially if you can re-extend your spine and lock out weights that are above the threshold where you can no longer keep your spine extended (assuming your spine is, in fact, flexing due to spinal erector weakness). But it makes sense if you think sequentially about the demands on your spinal erectors. At the start of the lift when your torso is more inclined, demands on your spinal erectors are at their peak. However, as you extend your hips, and forward lean decreases as you get close to lockout, spinal extension demands decrease dramatically, allowing you to re-extend your spine without too much trouble.
Here’s an apt analogy: If you loaded 110% of your 1rm squat onto the bar and were told to hold that weight isometrically at your sticking point, you probably wouldn’t be able to do it. You’re taking a super maximal load for your quads and hip extensors, and you’re being asked to support it at the most challenging point in the lift. However, if you were asked to quarter squat the same weight, you could probably do it without much issue.
That’s why you can complete a deadlift with a load your spinal erectors can’t support isometrically at the start of the lift. The start of the lift is like the sticking point of the squat; it’s the hardest position for your spinal erectors, and they can’t keep the spine extended with a given load. However, as you extend your hips and your torso becomes less inclined, it’s like quarter-squatting the same load – a much easier task because you’re in a more mechanically advantageous position.
How risky is spinal flexion in the deadlift?
I don’t think any deadlift topic has caused as many acrimonious conversations as has the topic of spinal flexion.
On one hand, some people argue that any spinal flexion whatsoever will automatically make all of your discs explode, leaving you permanently crippled.
Other people will point to some high-level powerlifters who deadlift with a lot of spinal flexion for long careers with no back injuries.
The first position discounts human variability and tissue adaptability. Some people simply have spinal discs that are more resilient and better able to handle the forces imposed on them.
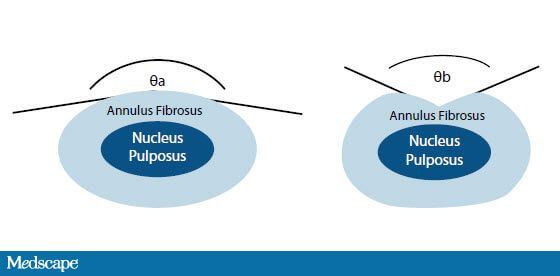
Furthermore, discs can adapt to loading just as every other tissue in your body can. There’s a good chance you’d destroy your ACL, MCL, and medial meniscus if you personally went out today and snatched 450+lbs with the same technique Leonid Tarenenko employed.
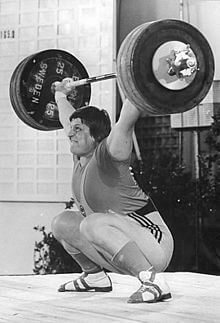
However, Tarenenko used this technique safely throughout his lifting career (as do many other weightlifters) because their knees adapt to the stresses placed on them in those positions in response to gradual, graded, repeated loading.
The same is likely true of deadlifting with a bit of spinal flexion. If you tried to deadlift 900+lbs today with the same amount of spinal flexion Konstantin Konstantinovs displays, there’s a non-negligible chance you’d sustain a disc injury (or at least cause some acute degenerative changes that could accumulate over time). However, KK’s spinal discs have likely strengthened across his training career in the same way weightlifters knee ligaments strengthen to withstand the hip internal rotation and knee valgus required to get super low to receive a snatch. Research into this question is in its early stages, but thus far it seems to show the sort of dose-response relationship you’d expect: Some load-induced stress on spinal discs can strengthen and regenerate them, but too much load-induced stress can cause degenerative changes. We’re still a long way away from knowing the exact details, though.
The second position – it’s perfectly fine to deadlift with a rounded spine without a care in the world – is likely naive and based on survivorship bias.
Yes, it’s true that some people deadlift heavy weights their whole lives with a ton of spinal flexion, and are no worse for wear. However, that doesn’t account for the people who sustained spinal injuries along the way who you never hear from again.
Compressive and shear forces on spinal discs increase as the spine flexes. This becomes especially problematic at end-ROM flexion where forces on the spine increase exponentially, likely causing progressive degenerative changes. These changes may not cause you any problems today, but they likely increase your risk of disc herniation in the long run.
I don’t think either extreme position holds much water.
Let’s start by putting some basic information on the table:
- We know that the injury rates in powerlifting and weightlifting are relatively low compared to many other sports. The injury rates are similar to triathlon training; the injury rates for distance running tend to be a bit higher; and the injury rates of most team sports tend to be considerably higher. Powerlifting includes the deadlift, obviously, and weightlifters frequently do clean pulls and snatch pulls which are similar to deadlifts. Now, these studies don’t necessarily tell us about long-term degenerative changes, but they do tell us that the acute injury risk is relatively low.
- Just two of the six studies examining injury rates in powerlifters (in the table below) found that the low back was among the most common sites for injuries. Only two studies examined the injury rate for weightlifters, and both found that the low back was the most common injury site. This provides some evidence (albeit relative weak indirect evidence) that perhaps a bit of spinal flexion isn’t all that risky. Many powerlifters tend to deadlift with at least a bit of spinal flexion, whereas no decent weightlifter allows any meaningful degree of spinal flexion when doing clean pulls or snatch pulls.
- “Neutral spine” is more of a range than a fixed point.
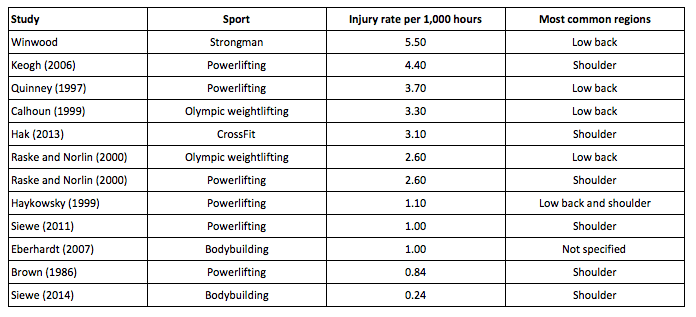
The first two points provide an interesting comparison, but don’t tell us all that much about long-term injury risk. The last point, however, is the most important one.
Excessive spinal extension can cause issues, especially wear and tear on the spinal facets. Conversely, excessive spinal flexion can cause issues as well, namely increasing your risk of disc degeneration and herniation. However, there’s a considerable range between those two extremes that is generally safe and well-tolerated.
You can avoid the last few degrees of flexion and extension and still have at least ~1.5 degrees of flexion or extension at each intervertebral joint, on average, while still staying in the “neutral range.” In other words, a little bit of spinal flexion probably isn’t going to be problematic.
It’s also worth pointing out that most high-level powerlifters who are held up as examples of round-backed deadlifters don’t really have all that much spinal flexion – certainly not approaching end-range flexion.
Take, for example, Konstantinovs, who is the patron saint of round-backed deadlifters.
Clearly his spine is flexed past “neutral” if you take neutral spine to be a single point, but it very well may still be within his neutral range (his lumbar spine especially, though possibly not his thoracic spine). Specifically pay attention to his spinal position as the bar actually breaks the floor: His thoracic spine is very flexed as he sets up for the lift, but isn’t massively flexed when he actually starts pulling. You’ll also notice that while he has a bit of flexion in his thoracic spine, his lumbar spine remains extended. Lumbar flexion tends to be more problematic than thoracic flexion.
It’s also worth mentioning that when assessing spinal flexion in the deadlift, it’s important to take note of the position of the spine itself and not freak out just because you see a little bit of spinal movement.
A lot of people set up to deadlift with their back very arched, and likely hyperextended a bit. You may see their spine flex a bit from that initial position, but it could just be their spine moving back toward neutral, or moving toward a very slightly flexed position that’s still within the neutral range.
To sum up this section:
If you are deadlifting as a hobbyist or for some goal other than competing in powerlifting or strongman, it’s probably safest to be very diligent about always deadlifting with a neutral spine. A bit of spinal flexion probably isn’t going to kill you, but it does likely increase your risk of disc issues a bit. It’s simply a risk you don’t have to take that doesn’t carry any tangible payoffs for you.
If, on the other hand, you’re training the deadlift for powerlifting or strongman, some spinal flexion is probably fine, as long as you stay in the neutral range and don’t approach end-range flexion. This may be slightly riskier than keeping a perfectly neutral spine, but since the sport requires you to lift maximal loads on the platform, and since a bit of spinal flexion may allow you to lift ~5% heavier weights, you may judge that to be an acceptable tradeoff.
I’d still strongly suggest, though, that you fight to try to extend your spine through every rep in training. Don’t allow yourself to get lazy and flex your spine to a greater degree than is necessary, or more often than is necessary. Moreover, I’d suggest that you try to limit the number of sets that require flexion – maybe 1-2 sets every week or two. Exposing yourself to loads that do require a bit of spinal flexion somewhat regularly will help you build and hone the requisite motor skills to keep your spine stable and as safe as possible when flexion is required. Working through spinal flexion too frequently for too many sets, though, will likely unnecessarily increase your injury risk without sufficient payoffs to make the increased risk worthwhile.
How to correct mobility issues or spinal flexion issues
I’m addressing mobility and issues with (excessive) spinal flexion together. More often than not, if your spine is flexing excessively with submaximal loads (i.e. this isn’t a scenario where your spine is flexing to mask a hip weakness), it’s due to a mobility issue.
Before you can deadlift, you first need to get down to the bar, obviously. If you don’t have the required hip mobility to get down to the bar, you can make up for that limited range of motion by flexing your spine. 9 times out of 10, if you set up with your spine flexed, it’s probably going to remain flexed throughout the lift until you start approaching lockout. If you can improve your mobility so that you can set up in a good position to begin with, that often takes care of the problem.
The other scenario that can cause spinal flexion issues (again, largely independent of load) is lack of motor control: You just don’t know how to keep your spine extended in the first place as soon as you start adding a bit of load.
Both of these problems can be corrected with the same tools.
1. Progressive Range Of Motion
If you don’t have the mobility to set up to pull from the floor without rounding your back, don’t pull from the floor right away. Similarly, if you have a hard time controlling your spine and pelvis as your torso angle steepens, don’t pull from the floor right away.
Start with rack pulls or block pulls from a height that does allow you to keep your spine extended throughout the lift. If you just have a slight mobility restriction, that may be rack pulls or block pulls with the bar starting at mid-shin. If you’re new to the lift and just don’t have a good feel for keeping your spine extended, that may be starting with rack pulls or block pulls from above the knee.
Session to session, simply try to increase range of motion. Small increases tend to work best. If you start with the bar just below your knee cap, try deadlifting with the bar starting an inch below your knee cap in your next session. If you don’t have blocks or pins at your gym that allow for such a small increment, standing on 10lb plates generally gets the job done.
If you can keep your spine extended with that slight increase in range of motion, that’s great. If not, simply go back to the prior bar height for another session and try a slightly longer ROM again the next time you deadlift.
This will train your hips through a progressively longer range of motion to improve mobility and joint angle-specific strength. It will also gradually build awareness of your spinal/pelvic positioning through progressively more challenging ranges of motion to improve the general motor skill of keeping your spine extended under load.
You may be able to pull from the floor after 3-4 weeks, or it may take 3-4 months. Be patient, and just increase range of motion as your body allows.
2. Romanian Deadlifts with a stretch and pause
In conjunction with progressive range of motion deadlifts, paused Romanian Deadlifts are another great tool for increasing positional awareness and improving hip mobility.
Eccentric exercise is the gold standard for increasing range of motion. It tends to work even better than other commonly used methods such as stretching or foam rolling. With the RDL, you’re forced to control the eccentric portion of the lift, and you can really stretch your hamstrings under load to improve hip mobility in a manner specific to the deadlift.
Do sets of 5-8 reps, taking 3-5 seconds for each eccentric, and pausing for 2-3 seconds at the bottom of each rep in a stretched position. Go down until you feel a stretch in your hamstrings (not an intense painful stretch, but just to the point of very slight discomfort), pause, and come back up while focusing on arching your back hard throughout the movement. Try to get a little deeper on each rep and each set, and from one session to the next.
When you can do RDLs with the bar getting 2-3 inches from the floor, you’ll probably have adequate control and hip mobility to deadlift from the floor without your back rounding. All you’d need to do from that position is flex your knees a bit, and you’d be in your starting position for the deadlift.
The other two issues that frequently cause people’s backs to round when deadlifting relate to the setup. Spinal flexion is a lot more common for people who jerk the bar off the ground instead of pulling the slack out of the bar (or pulling tension into their body) before they break the bar off the ground, and for people who set up with the bar too far away from their shins.
Do I need to deadlift from the floor in the first place?
In general, longer ranges of motion mean you’ll build more muscle and “general” strength. (Though if you specifically want a big partial deadlift, you’ll probably improve your partial deadlift the most by just doing partial deadlifts since strength is also ROM-specific.)
However, some people simply can’t deadlift safely from the floor, even after working on their mobility.
This shouldn’t come as too much of a surprise. Normal hip flexion range of motion is 110-130 degrees with bent knees, and the start of the deadlift requires about 115 degrees of hip flexion for both the sumo and the conventional deadlift. If you can only get 110 degrees of hip flexion, or if you have short arms and need 120+ degrees of hip flexion to deadlift from the floor, you may be forced to round your back to set up for the deadlift no matter how much mobility work you do.
If you want to compete in powerlifting, then you need to deadlift from the floor, since that’s what is required in competition. You may be able to do a lot of your deadlift training from blocks to spare your back if you’re forced to round your spine to pull from the floor (great deadlifters such as Brad Gillingham and Andy Bolton have made this strategy work). Make no mistake, though: You will need to do at least some deadlifts from the floor to be ready for competition.
However, if you don’t have plans to compete in powerlifting, there’s no good reason why you must deadlift from the floor. Full range of motion for you is the longest range of motion you can manage without needing to flex your spine at the bottom of the lift. If that doesn’t feel right to you, keep in mind that deadlifting from the floor is a completely arbitrary way to define full range of motion in the first place. You’re mainly deadlifting to train your spinal erectors and hip extensors in the first place. Pulling from the floor requires different degrees of hip flexion and different degrees of torso inclination for different people. One person may have an extra 15 degrees of hip flexion they could (and maybe should) be training via RDLs or deficit deadlifts; you could make the case that a deadlift from the floor is a partial lift for them, as opposed to a full-ROM lift. Similarly, pulling from the floor may be an excessive ROM for some people. Defining full-ROM as pulls from the floor may not be a bad rule of thumb, but it’s still completely arbitrary based solely on the radius of the weight plates.
If you don’t plan on competing in powerlifting, and you can’t deadlift from the floor in spite of working on your control and mobility, then there’s no reason why you need to deadlift from the floor.
When should I use a belt?
The short answer: whenever you feel like it.
It’s probably a myth that training with a belt makes your “core” weaker (and it’s probably also a myth that training with a belt strengthens your “core” more than training beltless). However, wearing a belt does generally increase performance, though 4-inch wide powerlifting belts can throw off some peoples’ deadlift setup.
If you can pull more with a belt and feel more comfortable with a belt, wear one. If you don’t feel comfortable with a belt, it may be worth experimenting with a slightly narrower belt for deadlifts that won’t affect your setup as much. If you feel stronger and more comfortable without a belt, then don’t wear one.
If you want to dig into the topic of belt usage in a lot more detail, check out this article.
What’s the deal with deadlift bars?
Some gyms have bars that are designed specifically for the deadlift, and some powerlifting federations allow these bars in competition.
There are three major differences between standard power bars and deadlift bars.
- Most standard power bars have a diameter of 28-29mm, whereas deadlift bars are a little thinner, generally with a diameter of around 27mm. 1-2mm may not sound like much, but it makes the bar easier to grip (especially if you hook grip and have small-ish hands), and it allows the bar to flex more.
- Most deadlift bars are slightly longer than standard power bars, allowing for wider sumo deadlift stances. Since the sleeves are farther apart, this also helps the bar flex more, as the weights are farther from the center of the bar.
- Most deadlift bars have more aggressive knurling. They’re much more uncomfortable to use for high reps or for doing a ton of sets, but the knurling also helps you hold on to heavier weights if you have grip issues.
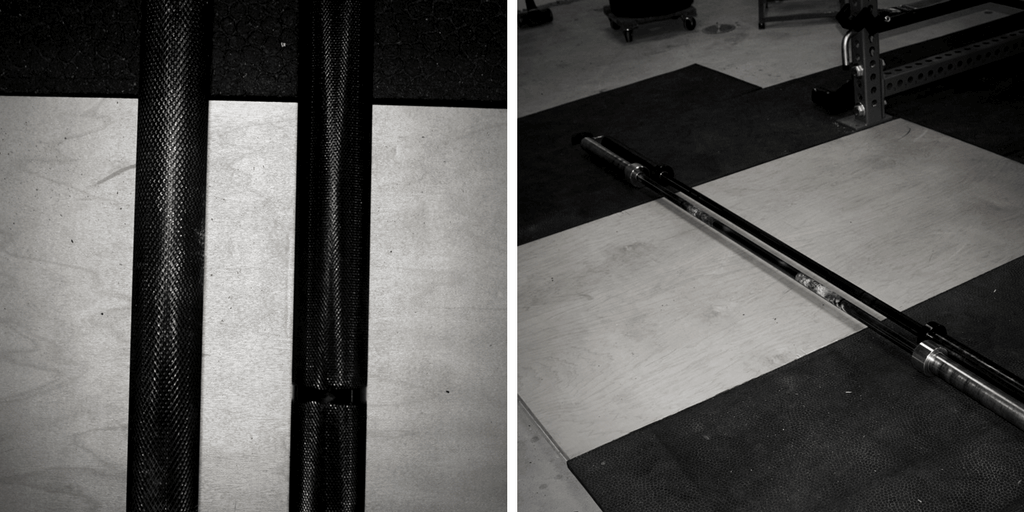
Put these three things together, and deadlift bars allow most people to lift more weight since they’re easier to hold onto and flex more. The additional flex lets your hands/hips/shoulders move an extra inch or two before the weights break off the floor, thus effectively shortening the range of motion slightly.
If you’re already quite strong (deadlifting 600-700+) before ever using a deadlift bar, it may take a few sessions to get used to. The whippier bar can occasionally cause balance issues, and it can throw off the timing of the first part of the lift since the weights break off the floor later than you’re used to. If you’re deadlifting 500 or less, there probably won’t be enough extra flex in the bar to throw off your groove.
Some people get a big boost from using a deadlift bar, and some people can lift just as much on a standard power bar. The two types of people who benefit the most from deadlift bars are people who are limited by grip strength, and people who are the weakest off the floor (as opposed to the more typical sticking point between mid-shin and knee height). Some people in these two categories can lift up to 10% more with a deadlift bar. If you don’t have grip issues and you don’t have an issue breaking weights off the ground, a deadlift bar probably won’t help you much. It may give you a small boost by allowing you to move the weight off the ground slightly faster, but the difference in 1rm strength may only be 10-20lbs, or there may not be any difference for you whatsoever.
For most people, whether or not you train with a deadlift bar is purely a matter of personal preference. If you compete in powerlifting in your country’s IPF affiliate, you probably shouldn’t train with a deadlift bar, because they aren’t allowed in competition. If you compete in a powerlifting federation that uses deadlift bars in competition, then you’d probably be better off pulling on a deadlift bar in training (if your gym has one). For everyone else, it doesn’t really matter.
What should I do about scraping my shins?
Option 1: Scrape away, and display your deadlift scars with pride. Just make sure you clean the bar after using it if you get some blood on it.
Option 2: Deadlift in high socks, long pants, or with a pair of knee sleeves over your shins so the bar doesn’t scrape you.
Generally, scraping your shins isn’t a bad thing. You want the bar to be in close to your body, so scraping your shins from time to time is just bound to happen. If your shins are really inclined at the start of the lift and you bloody up your entire shin from your first warmup sets, then you may need to address your setup and start the lift with your hips slightly higher. Otherwise, your best bet is just to make sure you have some fabric over your shins so the bar is less likely to draw blood. Since knee sleeves are thicker than socks or sweat pants, they tend to work best.
Different deadlift variations and their functions
Conventional deadlift: Of the two primary deadlift stances, it’s more challenging for your back and similarly challenging for your hip extensors.
Sumo deadlift: Of the two primary deadlift stances, it’s more challenging for your quads and similarly challenging for your hip extensors.
Block/rack deadlift: A deadlift performed with the bar/plates elevated off the floor. Block deadlifts (with the plates supported on blocks or mats) are generally preferable since the weights can roll a bit, making set-up feel more natural. Block deadlifts are also less likely to damage a bar. Rack deadlifts (with the bar supported on the safety pins of the power rack) can be a little more challenging to set up, and sitting the bar down hard on the pins between reps can permanently bend the bar. Block/rack pulls are great for overloading the movement since they generally allow you to lift more weight. They can also be used with submaximal loads to spare your lower back if it tends to get fatigued when pulling frequently from the floor. Elevating the bar between 2-8 inches off the floor tends to have the most carryover to the lift, though rack/block pulls from above the knee can be helpful for some lockout issues.
Deficit deadlift: Deadlifts performed with your feet elevated on blocks/plates/etc. They allow you to train the movement through a slightly longer range of motion, and can be useful for some people who are weak off the floor, or who are just looking for a bigger challenge.
Romanian deadlift: Romanian deadlifts start from the top of the lift. You can either get there by doing a normal deadlift from the floor before the first rep, or by setting the bar in the hooks of a power rack, picking it up, and taking a small step forward. From there, arch your back hard, bend your knees slightly, hinge at your hips until you feel a stretch in your hamstrings, and then come back up. RDLs are a great movement for specifically training your hamstrings without the risk of back strength limiting you.
Stiff-legged deadlift: Stiff-legged deadlifts are functionally identical to Romanian deadlifts, except that you perform each rep from the floor. As such, they require more hip mobility than RDLs.
Trap bar deadlift: Deadlifts performed with a bar that wraps around your body, allowing you to grip the bar with a neutral grip. Since a trap bar won’t scrape your shins, it doesn’t constrain forward knee travel. As such, trap bar deadlifts are slightly more knee-dominant and slightly less hip-dominant than conventional deadlifts (though the shift is smaller than people often make it out to be), and generally allow you to lift 5-10% heavier loads.
Deadlift with bands: These are just regular deadlifts performed with elastic bands over the bar and anchored to the ground. The tension provided by the bands increases basically linearly as the bands stretch. Deadlifting with bands can help build lockout strength, and it can also help teach you to pull the bar fast off the floor. Since the band tension ramps up as you approach lockout, you need to have a lot of momentum built up to lock the lift out. This naturally teaches you to be more explosive off the floor.
Deadlift with chains: Deadlifts with chains draped over the bar. This serves the same basic purpose as deadlifting with bands, but the increase in load isn’t as dramatic. The weight you feel in your hands increases as more links of the chains come off the floor, so the load increases fairly linearly. Deadlifting with chains can also build lockout strength and explosiveness off the floor without being quite as jarring as deadlifting with bands.
Reverse band deadlifts: Deadlifts with bands around the bar and attached to the top of a power rack. The effect of the bands is reversed. Instead of providing resistance, they provide assistance at the start of the lift, with the assistance decreasing as the bar gets closer to lockout. Reverse band deadlifts are generally used to help people get used to feeling heavier weights in their hands, and to help with lockout weaknesses.
Paused deadlifts: Deadlifts with pauses at various points in the lift (generally right off the floor and/or at knee height). As discussed in the setup and execution section, paused deadlifts are a great teaching tool for correcting balance issues and ingraining proper positioning throughout the lift.
Deadlift to knee height: These are exactly what they sound like – deadlifts only performed to knee height. The range of motion is shorter, but includes the weakest part of the pull for most people. You can use deadlifts to knee height to build strength and skill through the bottom half of the range of motion without inducing as much fatigue as pulling full reps would.
Snatch grip deadlift: The snatch grip is a normal deadlift performed with the hands spaced considerably wider – generally outside the grip rings. Snatch grip deadlifts are similar to deficit deadlifts. Since your hands are further apart, the ROM is longer. Unlike deficit deadlifts, the ROM is lengthened at the top of the pull as well, since you’ll lock the bar out higher on your legs/pelvis. As such, snatch grip deadlifts are a good overall accessory lift for people with a weakness off the floor or at lockout. You’ll probably need to use straps to do snatch grip deadlifts if you don’t pull with a hook grip. Since your grip is so much wider, it can be really uncomfortable to grip the bar with the supinated hand if pulling with a mixed grip.
Single leg deadlift: Single leg deadlifts are exactly what they sound like – deadlifts performed on one leg. They don’t get much love from many powerlifters since you can’t use as much weight and since they look sort of gimmicky. However, they do a great job of stretching and training the hip abductors and external rotators, which can help keep your hips healthy and feeling good for your heavy squat and deadlift training.
When should you deadlift with straps? Also how/when to use straps.
Deadlift straps work by allowing you to grip heavier weights or grip a given weight for longer (i.e. do more reps).
Some people demonize straps, say that pulling with straps is cheating, or even imply that lifting with straps is dangerous (i.e. it’s not “natural” to lift more weight than you can grip, therefore it must predispose you to injuries).
However, there’s no evidence whatsoever that lifting with straps increases your injury risk. If anything, it may decrease your risk of torn biceps if you’d otherwise be pulling with a mixed grip.
If you’re a powerlifter, you should definitely do at least some of your training without straps to ensure that your grip is strong enough to lift max loads on the platform.
However, if you don’t have a grip issue with 1rm attempts, I don’t see any reason to avoid using straps in training. (And if you’re not a powerlifter, there’s no good reason you can’t use straps as often as you want.)
Straps offer two big advantages: They help protect your hands, and they make sure grip won’t limit how hard you can train your back and hips.
Protecting your hands
This may be anecdotal, but I’ve never heard any complaints from lifters with sufficient grip strength who started using straps more often in their training.
Especially if you deadlift with high volume – lots of sets, lots of reps, multiple times per week – your hands can take a beating. This is doubly true if you train with a bar that has deep knurling that cuts into your hands.
The worst case scenario is tearing a callus that takes a while to heal, requiring you to cut back on any sort of training that requires you to grip the bar hard (deadlifts, rows, pull-ups, shrugs, etc.). Even if that doesn’t happen, though, when your hands are fatigued and tender, the rest of your training generally just feels worse and more sluggish, perhaps because of how heavily innervated the hands are, leading to a lot of negative feedback to your nervous system any time you have to grip anything.
It’s been my experience (and I’m far from unique in this regard) that if you do the same deadlift workout with straps instead of strap-less, you generally don’t feel as worn down for the next few days, allowing you to have more productive training sessions for your other lifts.
Ensuring your grip won’t limit you
Many people have plenty of grip strength for 1rm deadlift attempts, but their grip fatigues over a hard deadlift session. They may be able to grip 700lbs for a single with ease, but they have a hard time gripping the bar near the end of several sets of 5 with 550 or a few sets of 8 with 500.
In this circumstance, I don’t see a good reason to not use straps. Your grip isn’t limiting you when it counts (on the platform), but it is limiting your ability to train your spinal erectors and hip extensors as hard as you want to train them.
If you just don’t prefer deadlifting with straps, that’s perfectly fine. However, there are good reasons to deadlift with straps, and I’m generally of the opinion that most lifters who aren’t limited by grip strength on the platform would benefit from using straps more often in their training, especially when deadlifting with high volume.
Is it okay to deadlift with a trap bar?
You may be picking up on a trend by now: If you’re a powerlifter, you should practice like you play for the majority of your training, and deadlift with a straight bar. (Trap bar deadlifts are fine as an accessory movement, or to use for a cycle or two when you’re far out from a meet as a way to train the deadlift pattern without quite as much back fatigue.)
If you’re not a powerlifter, it’s perfectly fine to deadlift with a trap bar. In fact, it may even be preferable.
In this study, highly trained lifters worked up to 80% of their straight bar 1rm with 10% increments with both a straight bar and a trap bar.
With 70-80% loads, the hip and spine moments were about 10% larger with the straight bar, whereas the knee moment was about twice as large with the trap bar (though the knee moments seen with a trap bar were only about 30-40% as large as you’d see with a squat in a similarly well-trained cohort – nowhere close to maximal).
Furthermore, they produced higher peak force, peak power, and peak velocity with the trap bar, perhaps indicating a superior general training effect for transfer to sport.
It’s also questionable whether the larger hip and spine moments would actually play out in the real world. The participants were able to lift ~8% heavier loads with a trap bar (584lbs vs. 539lbs), but all the comparisons were based on their straight bar 1rms. If the researchers compared 80% of the lifters’ trap bar 1rm to 80% of their straight bar 1rm, the difference in hip and spine moments would presumably be smaller than the 10% difference that was observed when basing all the loads off straight bar 1rms.
The results of this recent study corroborate the results of the first study: Slightly higher hamstrings and spinal erector EMG readings with a straight bar, and slightly higher quad EMG readings, peak power, peak force, and peak velocity with a trap bar.
In short, the differences between the two lifts are much smaller than often assumed. Powerlifters should train with a straight bar. For non-powerlifters, it’s primarily a matter of personal preference. However, since the trap bar deadlift tends to be easier to learn and tends to allow for higher peak force, power, and velocity with any given load, trap bar deadlifts are probably slightly better than straight bar deadlifts for most non-powerlifters.
Progressing to straight bar deadlifts
If you’re new to deadlifting or teaching a brand new lifter, this is a great progression you can use to learn or teach the movement if regular deadlifts don’t feel great right away.
1. Simply start with ingraining the hinge pattern. This is a good article if you want a lot of neat ideas about how to get comfortable in a hinge pattern, but these are the two simplest drills to learn the pattern:
1a. Stand with your back to a wall, and your feet about 3 inches from the wall. Bend your knees very slightly. Push your butt back until it barely taps the wall, while keeping your chest up. Step forward about half an inch. Repeat the process. Step forward another half inch. Keep going until you can barely tap the wall with your butt while keep your chest up, without needing to bend your knees more. Then step away from the wall and keep practicing the pattern.
1b. To start adding load, get a light dumbbell or kettlebell and pull it firmly into your sternum. Then repeat the process from the first drill. Do this for a couple of sets of 5-10 reps. It should feel like a piece of cake.
2. Once you have a feel for the basic hinge pattern, move on to kettlebell deadlifts. If you don’t have kettlebells, you can instead do dumbbell deadlifts, grabbing one side of the dumbbell with both hands. Start with the kettlebell between your feet, and hinge down to it. You may need to bend your knees slightly more than you did in the prior drills to get your hands down to the kettlebell without rounding your back, but don’t bend them anymore than is necessary – you’re hinging, not squatting. Stand up with the kettlebell by keeping your chest high and pushing your hips forward. Lower the kettlebell back to the ground by reversing the pattern – keep your chest high, bend your knees slightly, and push your hips back. Repeat for sets of 5-10 reps. Once you can do this comfortably with a 40-50lb kettlebell, it’s time to move on.
3a. If you’re not a powerlifter and you want to do trap bar deadlifts, you can move on to trap bar deadlifts from here. Start with just the bar if you need to. Keep the hinge pattern in mind, and refer to the setup section dealing with the conventional deadlift. 95% of that information applies to the trap bar deadlift (except the stuff about rolling the bar, scraping your shins, or how to grip the bar since the trap bar deadlift uses a neutral grip).
3b. If you’re progressing to straight bar deadlift, move on to Romanian Deadlifts next. The RDLs should feel very similar to the kettlebell deadlifts, except that the bar has to stay in front of your legs through the entire lift, which may require you to push your hips back even farther and incline your torso a little bit more. The cues are the same: Keep your chest up and push your hips back to initiate the hinge, and come up by driving your chest up and driving your hips to the bar. Once you can do RDLs with 60kg/135lbs (or 40kg/95lbs if your gym has 10kg/25lb bumper plates that are the same diameter as 20kg/45lb plates) with the bar getting within about 3 inches of the ground, then you’re probably ready to start deadlifting from the floor.
4. If you feel strong and comfortable with RDLs, but you don’t have the mobility to get the weights within a few inches of the ground, then refer to the section titled “How to Correct Mobility Issues or Spinal Flexion Issues” for tips about how to progress toward straight bar deadlifts from the floor.
Wrapping Things Up
I want this to be the best, most accurate, and most thorough guide to the deadlift on the internet, so if you have any any suggestions, I’d love to hear them. If you’ve reached this point in the guide and your deadlift question wasn’t answered, or your deadlift problem wasn’t addressed, post a comment below.
If you’re interested in seeing my sources, they’re all either linked below (general research about the deadlift), or linked in the text of the article (to support specific claims and positions). If you loved the deadlift guide, check out the squat guide or bench guide next to learn about the other lifts in this level of detail.
Sources
Beckham. Isometric strength of powerlifters in key positions of the conventional deadlift.
Bird. Exploring the deadlift.
Berglund. Which Patients With Low Back Pain Benefit From Deadlift Training?
Bezerra. Electromyographic Activity of Lower Body Muscles during the Deadlift and Still-Legged Deadlift.
Blatnik. Effect of Load on Peak Power of the Bar, Body and System during the Deadlift.
Brown. Kinematics and kinetics of the dead lift in adolescent power lifters.
Cholewicki. Lumbar spine loads during the lifting of extremely heavy weights.
Cholewicki. Lumbar posterior ligament involvement during extremely heavy lifts estimated from fluoroscopic measurements.
Coswig. Kinematics and kinetics of multiple sets using lifting straps during deadlift training.
Ebben. Muscle activation during lower body resistance training.
Escamilla. A three-dimensional biomechanical analysis of sumo and conventional style deadlifts.
Escamilla. Biomechanical analysis of the deadlift during the 1999 Special Olympics World Games.
Escamilla. An electromyographic analysis of sumo and conventional style deadlifts.
Farley. Analysis of the Conventional Deadlift.
Graham. Exercise: Deadlift.
Granhed. The loads on the lumbar spine during extreme weight lifting.
McAllister. Muscle activation during various hamstring exercises.
McGuigan. Biomechanical Analysis of the Deadlift.
Moir. Effect of Cluster Set Configurations on Mechanical Variables During the Deadlift Exercise.
Nemeth. Hip load moments and muscular activity during lifting.
Noe. Myoelectric activity and sequencing of selected trunk muscles during isokinetic lifting.
Piper. Variations of the Deadlift.
Sakakibara. Influence of lumbopelvic stability on deadlift performance in competitive powerlifters.
Schellenberg. Kinetic and kinematic differences between deadlifts and good mornings.
Swinton. A biomechanical analysis of straight and hexagonal barbell deadlifts using submaximal loads.
Winwood. A Biomechanical Analysis of the Farmers Walk, and Comparison with the Deadlift and Unloaded Walk.